In Adobe Photoshop CS5 there are countless ways to get creative with your photography. One of my favorite ways to make an image stand out is to use a cool border effect. One style a lot of people like is the "Torn Edges" look.
We'll start by opening a new image in Adobe Photoshop. In the layers panel double click on the Background Layer and rename the layer "Border Effect," and hit OK. The layer is now unlocked and editable. Next, add a layer mask to the Border Effect layer by clicking on the Add Layer Mask icon located at the bottom of the layers panel; the symbol looks like a square with a small circle in the middle. You should now see a white layer mask appear on the right of your layer thumbnail.
Select the brush tool from your tools panel or tap the 'B' key. Be sure to set the foreground color to black and the background color to white. Next, go to your Brush panel (if you do not see it go to Window> Brush, Or, click the panel button
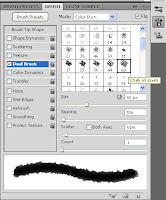
 on the left side of the options bar. With the Brush panel open you'll see a list of brush setting displayed on the left. Start clean by unchecking all of the brush setting options. Click on 'Brush Tip Shape' located at the top. Displayed on the right will be several brush tip shapes, select a soft, round brush from the menu. In the brush options find the Size slider and make the brush between 120-125px in diameter. Be sure that hardness is set to 0% and spacing is at the default of 25%.
Go back to the brush settings list and select Dual Brush (when selected a check mark will automatically appear next to Dual Brush). In the dual brush settings select the 60px Chalk brush, leaving the brush options set at their defaults. In the brush stroke preview at the bottom of the Brush panel, you'll see your brush shape change from a soft round brush to a textured, rough edged brush. For now hide or close the Brush panel.
Now that the brush is configured to give uneven edges and texture, go back to your Border Effect layer. On the Border Effect layer click on the layer mask thumbnail to be sure that it is selected. Be sure that your brush tool is still selected and that you are painting with black. Move your cursor into the image and begin to paint along all four edges of your picture. You will see the edges of the image turn rough and uneven. The beauty of using a layer mask to create the border is the fact that it's non-destructive.
If you look at the border and decide it's not quite what you had in mind you can paint with white on the layer mask and reveal more of the original image. You can always modify the brush by changing the size and opacity. You can also experiment further with the brush shape by going back to the Brush panel and adjusting the spacing, scatter or count settings of the Dual Brush. Once you have found a brush you like save it as a preset! At the bottom right of the Brush panel you'll see a New Brush icon (this looks just like the New Layer icon in the Layers panel) Click on the New Brush icon and give your brush a distinct name like "Torn edges." You'll now be able to find the brush you created in the Brush Presets panel and use it whenever you need.
To finish the effect, create a new layer and fill with your color of choice (or leave it transparent) and move under your background in the layer stack.
You can follow these steps to create a variety of brush presets to use for creating fun and original borders for your images. You can also use the other Brush Settings in conjunction with Dual Brush to make even more styles of brushes.
If you have any questions about this or any of the tips you see here on the Light Workshops Blog contact us at info@LightWorkshops.com
Fiat Lux!


No comments:
Post a Comment