Saturday, December 22, 2012

Impromptu Flash Accessory for Holiday Family Portraits!

Packing for a Christmas or family holiday trip can be a bit hectic...sometimes you might even forget a modifier for your Speedlight.
Hal scooting with his homemade modifier.

Now what you are about to see is what we like to call "bush league" but the modifier/soft box works extremely well and you can definitely find the materials at grandma's house! Depending on the size of your flash you can also create any size you want.


For a very simple modifier here are the items you will need:

  • 2 plastic or paper plates (you can choose dinner plate size or a dessert platter depending upon the size of your flash and the "softening" power you want)
  • Gift box tissue paper (white is most most versatile but a colored tissue will be just like a colored gel)
  • Tape 
  • Scissors

All of the pictures below show the entire process. Start by cutting out the inside or flat portion of the plate. Try to keep as much of the cut out portion because you will use it later in the process. The ring you are left with is the frame for the modifier.


Cut or fold the tissue paper into a square about the same size as the frame/ring.  One piece will do just fine but if you want to make the light more even, add an additional layer or two.  It is always a trade-off though when you add layers.  The light becomes more even but you will lose more of the flash's effective power.  For example, when I made this example, I used four layers of tissue and lost approximately 2.5 stops of light.

Tape the tissue to the frame.  You can get all "gucci" with it but I used four pieces and have a nice, tight surface.


From the cutout portion of the plate, fashion a rectangle or two.  Put onto the end of your flash to act as an attachment collar.


With the other plate cut out two rectangular supports.  Tape one end of each to the attachment collar on the flash.  The final step is to tape the supports to the plate/modifier.  When you put the flash on your camera, I like to change the zoom to Manual at about 50mm.


Simple but effective.  When we talk about light's quality of being either hard or soft, the only factor that matters is the size of the light source relative to your subject (this is, of course, controlled by the size of the light source and the distance from the source to the subject.)  The bare surface area of the flash is @ 3.7 square inches.  After adding the "bush league" modifier the surface area is @64 square inches. That is an increase of 17X.  One of the biggest issues with many modifiers is they do not really change the surface area by that much. But 17X?  That is effective!

Another nice feature of this homemade version is it is extremely light.  Whenever you add an attachment to your flash, always consider weight.  If the modifier is too heavy or has a lengthy moment arm you can easily damage your flash.


Thursday, December 13, 2012

The Ultimate Stocking Stuffer


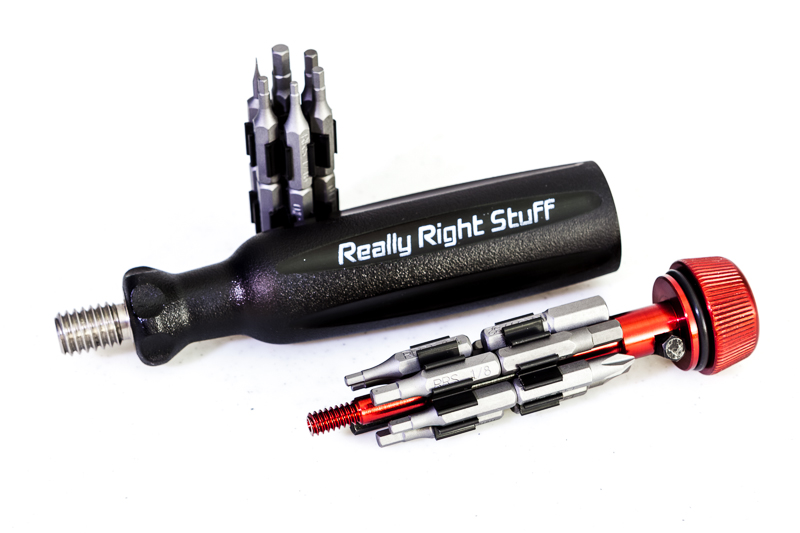
This is the ultimate stocking stuffer for any photographer.  Honestly, this is a multi-tool that everyone should have photographer or not. As you know I am very picky and demand my gear be the absolute best.  This multi-tool is the real deal.  The quantity and variety of bits in this kit is awesome.  I started using it about three weeks ago on my tripod but soon found out it works on just about everything from camera, to eye glasses, to computer, etc.  With 22 bits in hex, torx/star, flat, and cross this is my primary tool to adjust most small gear and equipment.


The entire kit packs very light and compact and is now a permanent addition to my bag.  For those who have a Really Right Stuff Tripod in either the 2 or 3 series the tool even fits right into the center column, so it is always available. There are other cool uses as well that you can check out if you follow the link below.


Really Right Stuff calls this the MTX and you should really have one.  Check it out at the following link MTX. 


For full disclosure, I am not paid to recommend this gear and the link above is not an affiliate link.  I use RRS because everything they make performs for me in the studio and in the field.

Fiat Lux,

Bull Schmitt

Wednesday, December 5, 2012


While I was looking over some images for yesterday's blog I found this sequence.  Thought it would make a nice simple time lapse.

Gorgeous Alaska day and a slow humpback whale dive.  Shot the sequence on my photo tour with a Canon 1D Mk IV and an EF 70-300 4.5/5.6L.

Put the time lapse together with Lightroom. Recommend the 720 quality option.

Tuesday, December 4, 2012

The Test Shot

Killer whale attacking a Steller's sea lion

There are many shots that require you to react extremely quickly in order to capture what you want such as these whales I photographed during one of my Alaska workshops.  One of the most successful techniques you can use is what I call the "test shot."

The test shot has two primary objectives, exposure and rough focus.  When taking a test shot your actual subject is usually not in the frame.  For example, these whales break the surface in less than a second and if I wait until the subject is in the frame to find exposure I will be less than successful most of the time.  If instead I anticipate where the subject will appear or what the event will look like, I can figure out exposure ahead of time very easily.  I can also pre-focus so that the precision focus process is much faster once my subject is in frame and my auto focus sensors are properly placed.

A humpback whale going for it in front of Devil's Thumb

When you make a test shot, it is often times not adequate to set exposure based on the environment/background.  You need to anticipate what will drive the exposure.  For example, in all three whale shots the critical elements are the white water and the white fins/body.  If I make a test shot of just the water and set exposure without considering the extreme tonal difference between water and white water/whale, I will, most likely, blow the highlights in the shot. When I made the test shots for these images, I set my exposure based on white not on the water/background.  You can use rules of thumb to underexpose for the predicted highlights but I prefer actual meter data, when I can get it.  In these examples, I changed my camera's metering mode to Spot and then I set exposure off of something white.  I actually used the boat's wake but a white sheet of paper would work as well.  As long as the white is under the same lighting conditions as my subject, my exposure will work perfectly.

.1" earlier

This process is simpler when shooting in Manual exposure mode but can be used with Aperture or Shutter priority and auto exposure lock.  Once I have my exposure, I pre-focus to the expected subject distance and take a test shot and evaluate. With my exposure and pre-focus set, I am much better prepared to quickly execute the actual shot when the action occurs.

I use test shots all the time to give myself the advantage when something might happen and my reactions have to be perfect. When I am out photographing, people find it odd that I am shooting every now and again at what appears to be nothing. But my "strange" behavior pays off.  If you stack your deck ahead of time you will enjoy success in a more consistent and repeatable manner. 

Fiat Lux!