Showing posts with label bull schmitt. Show all posts

Wednesday, March 20, 2013

Computer Specs

One of the most common questions we field concerns computer technical specifications.  People often ask how they should equip and configure their next machine for digital photography purposes (often phrased as Photoshop or Lightroom purposes.)  So let's talk computers for one little post.


 Recent build in the LIGHT studio.

LIGHT recommends the current specs as an excellent configuration.  Off the side I will add comments and fall back positions.

Processor - Core i7 quad core.  We are currently using the Core i7 3770 at 3.4 GHz.  Although the two programs listed above perform best with a fast processor a good fall back position is found in the Core i5 3xxx options. We could go on a bit further regarding hyper threading or adding additional physical cores but we have not seen a huge requirement in typical digital photography needs.  If you push a bit beyond the ordinary with your work, take these into consideration.

Memory - 16 GB.  Most baseline systems these days are equipped with 8 GB of RAM but 16 will give you a nice performance boost.  There normally is no need to get the fastest clock speed RAM available unless you are also going to play games.  On the lower side, go with 12 and on the upper top out at 32.

Graphics - Dedicated video card.  There are a huge number of options here but start with an nVidia or ATI set with at least 1 GB.  You may be tempted to go with the higher end cards but you will not see a huge benefit unless you are working with video or gaming.  If you are thinking of running two or more high resolution displays you may want to upgrade as well. With all that said, the integrated graphics on the Core i5 and i7 (from 2500-4000) are pretty good.  You might be surprised how well they work.  The nice thing is you can always add a dedicated video card later if you need to.

SSD - Solid state drive for programs and speed critical data.  SSD prices have dropped significantly and the performance boost is really nice.  An SSD is not a must have but a majority of our clients enjoy the faster start up times and fast program launches.  At a minimum go with a 128ish GB drive.  You can go bigger (my laptop has a 512 GB SSD) but the drives will be a bit pricier.

Hard drives - At least two, one for data and one for scratch/working space.  Hard drive prices have come back down so we like at least 1 TB for storage and 320-500 GB for scratch.  Try for the 7200 rpm drives and if you want faster there are 10k and 15k rpm available. 

Ports - USB 3.0 and Thunderbolt.  Odds are you will connect external storage to your machine and you want it to be fast.  At the top of the list is the Thunderbolt connection, huge speed and flexibility but not as many peripheral/storage choices and much more expensive.  Not nearly as fast but almost ubiquitous and priced right, the USB 3.0 connection is a necessity. Definitely think about these options as one of the most frustrating things is waiting for your machine to communicate with external storage (Lightroom users especially.)

Fortunately, these specs are not too far out of reach for most folks.  Although you may pay a bit more for the system, configuring it properly will save you big in time and workflow efficiency.

 Pure fun building this little beast of a Photoshop machine.

For the somewhat adventurous, LIGHT recommends building your own system.  I recently built the computer shown in the pictures above for about $1275 and two hours of my time.  It has all of the options listed above and is unbelievably fast.  For those who may be thinking Thunderbolt and Windows?  My machine is Windows and has two Thunderbolt ports along with eight USB 3.0 and a handful of USB 2.0.  Depending upon how and when you source your parts the do it yourself option can save you quite a bit.  More importantly, the process forces you to learn about the options and make smart choices as to what is best for your needs and workflow.

Any questions, comments, concerns, or addtions add a comment or email me at hal@lightworkshops.com.

Fiat Lux!


Saturday, December 22, 2012

Impromptu Flash Accessory for Holiday Family Portraits!

Packing for a Christmas or family holiday trip can be a bit hectic...sometimes you might even forget a modifier for your Speedlight.
Hal scooting with his homemade modifier.

Now what you are about to see is what we like to call "bush league" but the modifier/soft box works extremely well and you can definitely find the materials at grandma's house! Depending on the size of your flash you can also create any size you want.


For a very simple modifier here are the items you will need:

  • 2 plastic or paper plates (you can choose dinner plate size or a dessert platter depending upon the size of your flash and the "softening" power you want)
  • Gift box tissue paper (white is most most versatile but a colored tissue will be just like a colored gel)
  • Tape 
  • Scissors

All of the pictures below show the entire process. Start by cutting out the inside or flat portion of the plate. Try to keep as much of the cut out portion because you will use it later in the process. The ring you are left with is the frame for the modifier.


Cut or fold the tissue paper into a square about the same size as the frame/ring.  One piece will do just fine but if you want to make the light more even, add an additional layer or two.  It is always a trade-off though when you add layers.  The light becomes more even but you will lose more of the flash's effective power.  For example, when I made this example, I used four layers of tissue and lost approximately 2.5 stops of light.

Tape the tissue to the frame.  You can get all "gucci" with it but I used four pieces and have a nice, tight surface.


From the cutout portion of the plate, fashion a rectangle or two.  Put onto the end of your flash to act as an attachment collar.


With the other plate cut out two rectangular supports.  Tape one end of each to the attachment collar on the flash.  The final step is to tape the supports to the plate/modifier.  When you put the flash on your camera, I like to change the zoom to Manual at about 50mm.


Simple but effective.  When we talk about light's quality of being either hard or soft, the only factor that matters is the size of the light source relative to your subject (this is, of course, controlled by the size of the light source and the distance from the source to the subject.)  The bare surface area of the flash is @ 3.7 square inches.  After adding the "bush league" modifier the surface area is @64 square inches. That is an increase of 17X.  One of the biggest issues with many modifiers is they do not really change the surface area by that much. But 17X?  That is effective!

Another nice feature of this homemade version is it is extremely light.  Whenever you add an attachment to your flash, always consider weight.  If the modifier is too heavy or has a lengthy moment arm you can easily damage your flash.


Thursday, December 13, 2012

The Ultimate Stocking Stuffer


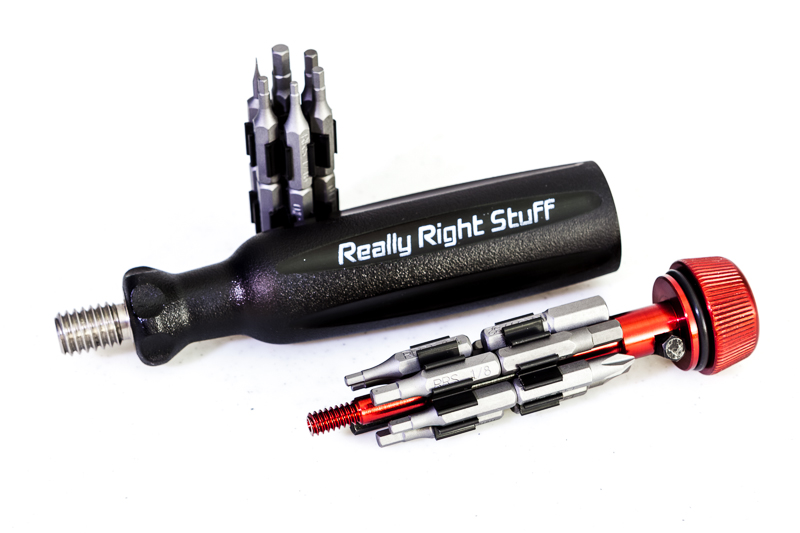
This is the ultimate stocking stuffer for any photographer.  Honestly, this is a multi-tool that everyone should have photographer or not. As you know I am very picky and demand my gear be the absolute best.  This multi-tool is the real deal.  The quantity and variety of bits in this kit is awesome.  I started using it about three weeks ago on my tripod but soon found out it works on just about everything from camera, to eye glasses, to computer, etc.  With 22 bits in hex, torx/star, flat, and cross this is my primary tool to adjust most small gear and equipment.


The entire kit packs very light and compact and is now a permanent addition to my bag.  For those who have a Really Right Stuff Tripod in either the 2 or 3 series the tool even fits right into the center column, so it is always available. There are other cool uses as well that you can check out if you follow the link below.


Really Right Stuff calls this the MTX and you should really have one.  Check it out at the following link MTX. 


For full disclosure, I am not paid to recommend this gear and the link above is not an affiliate link.  I use RRS because everything they make performs for me in the studio and in the field.

Fiat Lux,

Bull Schmitt

Tuesday, December 4, 2012

The Test Shot

Killer whale attacking a Steller's sea lion

There are many shots that require you to react extremely quickly in order to capture what you want such as these whales I photographed during one of my Alaska workshops.  One of the most successful techniques you can use is what I call the "test shot."

The test shot has two primary objectives, exposure and rough focus.  When taking a test shot your actual subject is usually not in the frame.  For example, these whales break the surface in less than a second and if I wait until the subject is in the frame to find exposure I will be less than successful most of the time.  If instead I anticipate where the subject will appear or what the event will look like, I can figure out exposure ahead of time very easily.  I can also pre-focus so that the precision focus process is much faster once my subject is in frame and my auto focus sensors are properly placed.

A humpback whale going for it in front of Devil's Thumb

When you make a test shot, it is often times not adequate to set exposure based on the environment/background.  You need to anticipate what will drive the exposure.  For example, in all three whale shots the critical elements are the white water and the white fins/body.  If I make a test shot of just the water and set exposure without considering the extreme tonal difference between water and white water/whale, I will, most likely, blow the highlights in the shot. When I made the test shots for these images, I set my exposure based on white not on the water/background.  You can use rules of thumb to underexpose for the predicted highlights but I prefer actual meter data, when I can get it.  In these examples, I changed my camera's metering mode to Spot and then I set exposure off of something white.  I actually used the boat's wake but a white sheet of paper would work as well.  As long as the white is under the same lighting conditions as my subject, my exposure will work perfectly.

.1" earlier

This process is simpler when shooting in Manual exposure mode but can be used with Aperture or Shutter priority and auto exposure lock.  Once I have my exposure, I pre-focus to the expected subject distance and take a test shot and evaluate. With my exposure and pre-focus set, I am much better prepared to quickly execute the actual shot when the action occurs.

I use test shots all the time to give myself the advantage when something might happen and my reactions have to be perfect. When I am out photographing, people find it odd that I am shooting every now and again at what appears to be nothing. But my "strange" behavior pays off.  If you stack your deck ahead of time you will enjoy success in a more consistent and repeatable manner. 

Fiat Lux!


Friday, November 30, 2012

Topaz Webinar with Hal

Hal will be leading another webinar and discussion for Topaz Labs next week.  Click the link below to register and join Hal on the 6th of December at 4 PM CST.

Total Workflow with Topaz!

Fiat Lux!


Wednesday, October 31, 2012

Topaz DeNoise Webinar is Available on YouTube


My recent Topaz DeNoise webinar is available to watch on YouTube. 

Enjoy.

Fiat Lux!

Monday, July 30, 2012

Landscape at f/4? Know your DOF

I am a huge believer in understanding and practicing the basics and the fundamentals of photography.  Moreover, it seems most difficult tasks in life, including photography, come down to how well can you execute the basics. To that end, I would like to discuss one of the most common practices I see in the field when shooting landscape, stopping down for no reason. 

The conventional wisdom is to stop down when shooting landscape to increase depth of field (DOF).  Although stopping down does increase DOF it is not always necessary to do so and may, in fact, hinder your ability to make the best shot. 

DOF can be an incredibly complicated and confusing topic but it is worth spending a small amount of time talking about the primary contributors to DOF.  Most photographers are taught that DOF is controlled by aperture; the wider the aperture the shallower the DOF and vice versa.  What is not commonly taught are the two other primary variables that influence DOF, focal length (of the lens in mm), and focal distance (physical distance from shooter to focal point.) 

Just as every photographer quickly memorizes the aperture/DOF relationship they should do the same with focal length/DOF and focal distance/DOF.  So a little homework, memorize the following.
  • The wider the aperture the shallower the DOF
  • The longer the focal length the shallower the DOF
  • The shorter the focal distance the shallower the DOF
and the opposites
  • The narrower the aperture the deeper the DOF
  • The shorter the focal length the deeper the DOF
  • The longer the focal distance the deeper the DOF
One of the best ways to see these rules in action  is to use a DOF calculator and play around.  If you want to go "old school" there are "whiz" wheels out there to show the relationships.  But since this is mid 2012, I recommend finding a DOF app for your smart phone or device.  There are a huge number of these apps available just search for "DOF calculator" and download. 

After playing with a DOF calculator app for just a small amount of time, you will be amazed how quickly you learn the rules and begin to visualize constructing DOF for every shot you take.  When you know the rules and relationships of DOF you will approach your shots from a position of knowledge and you will, most likely, modify some of your accepted habits and practices.  You might even decide to take your DOF calculator app with you on location and run some numbers before you shoot.  I do not think you will do this all the time but if you need some intel, back up, or encouragement break out the app and "run the numbs." 

Recently, I shot some landscape in Alaska and used my understanding of DOF to shoot handheld landscape at f/4 with everything in the shot acceptably in focus.  This goes against the conventional wisdom but it worked perfectly.  The shot I ended up with is shown below.


For this shot I used the focal point shown @1000' from me, 43 mm focal length, and an aperture of f/4.  I shot a bracketed series for HDR and did it handheld as my tripod was not available.

If I had followed the conventional wisdom I would have stopped down to f/16 and would have had the situation shown below.

f/16 would have given me plenty of DOF but a shutter speeds of 1/60, 1/250, and 1/15.  These are, of course, too slow for my handheld situation.  I could have increased my ISO to yield faster shutter speeds but I did not want the additional noise, especially when shooting for HDR.

Instead of changing ISO, I changed aperture and opened up to f/4 which gave me the situation shown below.

f/4 also gave me plenty of DOF and shutter speeds that I could work with hand held.  Because my focal length was 43mm with a focal distance of 1000', changing aperture did not have an appreciable effect on this shot's practical DOF.  As a result, the entire shot is acceptably in focus, even the foreground as it is greater than 52' from me.  Sure f/16 gave me 38' more DOF but it was irrelevant.

Now there will be times and places this does not work but if you understand the basics you will recognize them quickly.  When you do you will find the solution and make the shot work.

More on this topic next time.

Saturday, July 21, 2012

Hal Schmitt's Canvas Gallery Wrap Corner Technique


Canvas Gallery Wrap Techniques - Cutting and Folding the Corners from Hal Schmitt on Vimeo.

Here is a quick video showing Hal Schmitt's corner cutting and folding technique when finishing a canvas gallery wrap.

Hal is working a 24 x 36 gallery wrap with Alpha Strike Matte Canvas photo grade coated with Ambrosia.


Fiat Lux!


Wednesday, June 27, 2012

A Great Lesson from Food TV's Good Eats


I watch a show on The Food Network called Good Eats.  The host is Alton Brown and he discusses a large amount of cooking gear and equipment (in addition, to delivering amazing food facts and cooking techniques.) The consistent thing about Alton's gear recommendations is he loves equipment that can multi-task.  Why have a piece of gear that can only do one thing.  If that is the case, to do three tasks you need three different items.  With multi-tasking, one piece of gear does all three jobs.


If you do a lot (or even a little) travel photography the concept of gear "multi-tasking" is hugely important.  In the ideal world it would be simple to take all of your gear everywhere.  There would never be carry-on limits, space or weight issues, and we would all have our own photo Sherpa.  In the real world, we are often forced to take fewer items in order to meet the travel reality.


I found myself in just such a situation on a recent photo trip to Alaska.  I normally carry a tripod along with a ball head and a gimbal head.  Turns out if I took both my bag would have been 50+ pounds and I did not want to pay the penalty.  I decided on just the gimbal since I knew it would work for my long lenses and also provide basic ballhead functionality (although not quite as efficiently.) 

Even with that I ended up wanting to shoot a macro shot from directly overhead my subject.  My first plan of attack is shown below.


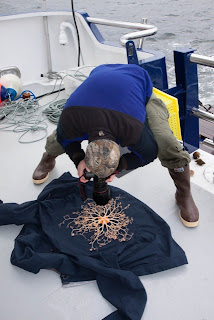
As you can tell, probably not the best way to shoot.  Not only is the platform unstable but my ergonomics are horrible.  This is a really easy way to hurt your back and take a bad picture at the same time.  So I needed to innovate.

My solution was to multi-task my gear.  I know I had a great tripod (Really Right Stuff TVC-33) and my gimbal (RRS PG-02).  I decided to see if I could make it work in this macro situation.


After looking at the PG-02, I took the vertical support arm and turned it around.  This allowed me to support the camera and point it straight down at my basket sea star.  I had never done this before and did not know the PG-02 could do this.  What I found is exactly what Alton Brown talks about on Good Eats; another great use for a piece of gear designed for something a little (or a lot) different.


Although I had good support, my ergonomics still, for lack of a better word, sucked.  Before I destroyed my back, I finally settled on what you see below.


Tremendous support, good ergonomics, and a different view of a basket sea star.  After these shots were taken I switched over to an EF 100mm f/2.8L Macro for closer shots (an example is the first shot at the top of the post.)

So here is to Alton Brown, Good Eats, and multi-tasking. 

As you all know I love Really Right Stuff gear.  This shoot made me an even bigger fan of the RRS PG-02.  Good luck making this happen with any of the other gimbal heads out there.

Fiat Lux!

All shots of me are courtesy of Marc Muench, Leanna Telliard-Stern, and Gina Ruttle.  Thank you!


Basket stars multi-task as hair!


Monday, June 18, 2012

Go For It: Pixels are Free

One of my favorite expressions with digital photography is "pixels are free."  With no cost, photographers should enjoy complete freedom to experiment and play.  If you have an idea for a shot, go for it.  If it works, great.  Take what you did and make it a part of your photography. 

If it does not work out, no big deal.  But use the results as a completely free learning experience. Go to school and figure out what was the issue/s.  Can you make a small adjustment or do you need to go back to the drawing board and plan again. 

I recently found myself in a situation where I honestly did not know how the results would turn out.  I wanted to shoot a series of images for a landscape panorama in rapidly falling light levels.  I had the Canon EF 800mm f/5.6L on my 5K Mk II; a combination not often used for panoramas.  To make matters worse I was on the back of a moving boat.  Not only was it moving forward and slowly rocking side to side but we were in a regular ocean swell so we were slowly heaving (up and down.)

Not the best situation but pixels are free so I went for it.  The results from the 42 shots are shown below. 

 
This is the panorama after the stitching process.  If you follow the bottom (or top) you will notice a nice sine wave pattern.  That is the boat going up and down with the ocean swell.  My camera support was rock solid (RRS TVC-33 and PG-02) but the boat was out of my control. 

At this point I had a nicely stitched panorama even though it is somewhat ugly in terms of how everything lined up.  But it worked and did not cost a thing. 


After a little cleanup, I had a usable, huge panorama to optimize.  For a free experiment, I will take it.

Fiat Lux!

Tuesday, June 5, 2012

LR 4 Local Adjustments - Adjustment Brush Example


A quick demonstration of an effective and efficient local adjustment workflow using Lightroom 4's Adjustment Brush feature to optimize Exposure and White Balance.  Although Lightroom is the example software the exact same process is available in Adobe Camera Raw.

Fiat Lux!

Sunday, June 3, 2012

Canon 5D Mk III Auto Focus Performance

 Canon 5D Mk III, EF 400mm f/2.8L, ISO 200, f/5.6, 1/2000

A quick post to describe my experience with the new auto focus (AF) system on the Canon 5D Mk III.  Bottom line up front, dramatic performance increase when compared with the 5D Mk II and equal to the 1D Mk IV. 

I spent a few days shooting with the Mk III and putting the AF system through some real world action shooting.  You can easily read all of the technical specifications, beeps, and squeaks on many other blogs, I will give you my simple man's take on the AF performance. 

The Mk III is a leap forward for the 5D series in terms of AF.  There are numerous modes and configuration options but you will find the best performance in demanding action situations when you select the Single Point AF mode.  In this mode you choose the appropriate AF point, engage AI servo with proper back button focus techniques and track your subject.  Although this mode does not engage some of the advanced AF logic and new tracking "assist" features, it will deliver the best performance. 

With that said, using a single AF point is not the simplest way to track and focus on a moving subject but, with practice, it is hands down the best.  As always, we do not shoot in a vacuum and the specific shooting situation may require or force you to another mode.  Depending upon the circumstances and variables you may get excellent performance with those as well. 

I consider the 5D Mk III's AF performance to be equal to that of the 1D Mk IV and clearly superior to the 5D Mk II's and 7D's.

I look at action AF performance looking at one main variable (assuming a relatively consistent subject path), track crossing angle or TCA.  TCA is the angular difference between where the camera is pointing (in aviation terms, where the camera is pointing is your effective "track") and the track of your subject.  TCA may be either high or low angle, from a shooters perspective low angle is when a subject is in front of your lens and tracking directly towards or away from you. High angle is when the subject tracks in a perpendicular manner across your shooting direction. 

Varying TCAs, when combined with subject aspect and speed, generates the multitude of tracking conditions necessary to get a good feel for what a camera can do.  I will do a more detailed post with images and some diagrams regarding these topics soon. 


For reference, the image at the top of this post is a 90 degree TCA at a high rate of speed.  The second image is low TCA. 

Fiat Lux!

Tuesday, May 8, 2012

Long Lens + Stability = Great Performance

 Canon 1D Mk IV, EF 800mm f/5.6L 1/320, f/5.6, ISO 400

Both of the shots above were captured with a Canon 1D Mk IV and a Canon EF 800mm f/5.6L.  The image of the mountain goats used a shutter speed of 1/500 and the bear was even slower at 1/320. I could have easily increased the shutter speeds by increasing my ISO but I was trying for the cleanest image I could possibly get.

Canon 1D Mk IV, EF 800mm f/5.6L 1/500, f/5.6, ISO 400

Such shutter speeds are definitely possible but when on a moving boat and compared with an effective focal length of 1040mm, the results are impressive.  I used the image stabilizer in Mode 1 which helped significantly but the real reason I could shoot with certainty at lower shutter speeds is my support setup.

I used a Really Right Stuff camera support setup including TVC-33 tripod, PG-02 gimbal head, and a long lens support package as depicted in the images below.

TVC-33, PG-02, and Long Lens Support Package

If you are a long lens shooter give yourself the advantage of perfect support.  I often say there is not a gear/technology solution to every problem but in this case I could not have made the same shot without it.  When combined with a good foundation in exposure and camera/lens functionality, the support system makes a nice trifecta!

TVC-33, PG-02, and Long Lens Support Package

Fiat Lux!

Monday, May 7, 2012

Get Low Part II


Last week, I showed a panorama of a few bergs in SE Alaska.  Interestingly, as I was shooting the bergs someone shot me.  This image gives you an idea of getting low.  Sometimes to get a different angle you might need to get a little bit wet, muddy, dirty, cold, etc.

Fiat Lux!

Tuesday, April 17, 2012

GoPro + Lightroom 4 + P90X = Interesting Time Lapse


Just finished recording a tutorial about the LR 4 slideshow module and its timelapse functionality (part of a 14+ hour LR tutorial series).  I am biased but the LR 4 series is without equal. Nothing like a little power yoga to relax afterwards. Thought I might try a  timelapse with Lightroom 4, P90x, and a GoPro camera.

Heading south from Anchorage tomorrow for Sitka to meet the Northern Song, Rick Sammon, and the participants on our first eagle photo trip.  Will put up a shot of the gear list I have with me tomorrow.

Fiat Lux!

P.S. Please no comments on the yoga form or lack thereof.

Wednesday, September 7, 2011

Tethered Shooting Spacer

I have always found it a bit unwieldy when shooting in a vertical/portrait orientation with a tethering cable attached.  Recently, Really Right Stuff (RRS) made the perfect solution and I was fortunate to shoot with the Cable Release Spacer (CRS) today. 

The CRS attaches to a standard L-bracket and adds about 1.25" for your tethering cable.  It also has a small locking bar to "lock" your cable to the spacer.  This is great since any tugging on the cable can easily damage your camera's ports, a very expensive fix by the way.

Vertical orientation. The CRS firmly attaches to your L-bracket for stability.


 Horizontal orientation, not much change but cable is firmly attached.

If you are a tethered shooter and are tired of dealing with work arounds for your cable when shooting vertically, pick up a RRS Cable Relief Spacer and all is good.

Click here to visit the RRS site.

Fiat Lux!


Sunday, August 28, 2011

Slow Shutter/Waterfall Tips with Rick Sammon

New Croton Dam, NY
I am in New York this weekend with Rick Sammon.  Hurricane/Tropical Storm Irene just passed through the area.  My discussion in NYC was cancelled so we spent the day shooting around Croton-on-Hudson. 

We recorded a quick video discussing the top slow shutter speed and waterfall photography tips.  Rick and I, along with Juan Pons and Jennifer Wu, did a battle of the sunset photo tips last year at the California Photo Festival (2011 California Photo Fest) so we thought we would do a smaller version.


The top tips on the video, and one or two more, were:

1.  Use a tripod for stability.  When shooting slow a tripod allows you to keep everything solid except for the moving water.

2.  Use your cable release or camera's timer.

3.  Bring a neutral density filter or polarizers.

4.  Use live view.

A small "stream" that had popped up as a result of Irene.

5.  Reference live view's magnification frame to act as an expanded spot meter for perfect exposure.  I normally place the frame over the brightest area of the water I am trying to blur.  This area is normally (but not always) the shot's highlight and drives the overall exposure.

6.  After the shot reference your histogram to make sure the exposure is tight.

7.  Target half a second as your shutter speed.  As water speed changes you may need more or less.

8.  Keep a lens cloth and absorbent cloth nearby to wipe your lens and LCD.

9.  Maintain your SA (situational awareness,) always look behind you to make sure you are not missing a great shot.

Those were just a few we thought of on the spot in beautiful Croton-on-Hudson, NY.

 Same as above but with "enhancement." Took the image to Silver Efex and then blended the result using the Luminosity blend mode in Photoshop.

Check out a bunch of cool tips at Rick Sammon's blog here.

Fiat Lux and see you at the California Photo Festival!

Wednesday, August 24, 2011

First Conversion with Topaz BW Effects

I began playing with and testing the soon-to-be-released Topaz B&W Effects plug-in today.  There is some serious power in the program.

My first take is the black and white conversion is very good.  In addition, the plug-in gives me access to Topaz Adjust-like effects and control over exposure and contrast transition.  There is so much in the program it will take me a couple days to give a full report.  Another great tool to have in the kit.

 B&W from Topaz B&W Effects


Color from Canon and Lightroom


Should be fun testing this one out.

Fiat Lux!

Thursday, August 11, 2011

Recent Topaz Webinar is Up for Review


Topaz Labs just posted the webinar I did with them a couple weeks ago.  Enjoy and, as always, send me any questions, comments, or concerns.

Fiat Lux!

Bull

Tuesday, August 2, 2011

$600/lb. Prawns?


Proof of why I should not quit my day job.  With the cost of fishing licenses and a really small catch, our prawns were effectively $600 per pound.  Tasty, tasty spotted prawns but somewhat pricey.

This was onboard the Alaskan Legend last month during a killer photo tour. 

Thanks to Dr. Kevin Keating for shooting this embarrassing image.

Fiat Lux!