Showing posts with label Really Right Stuff. Show all posts

Thursday, December 13, 2012

The Ultimate Stocking Stuffer


This is the ultimate stocking stuffer for any photographer.  Honestly, this is a multi-tool that everyone should have photographer or not. As you know I am very picky and demand my gear be the absolute best.  This multi-tool is the real deal.  The quantity and variety of bits in this kit is awesome.  I started using it about three weeks ago on my tripod but soon found out it works on just about everything from camera, to eye glasses, to computer, etc.  With 22 bits in hex, torx/star, flat, and cross this is my primary tool to adjust most small gear and equipment.


The entire kit packs very light and compact and is now a permanent addition to my bag.  For those who have a Really Right Stuff Tripod in either the 2 or 3 series the tool even fits right into the center column, so it is always available. There are other cool uses as well that you can check out if you follow the link below.


Really Right Stuff calls this the MTX and you should really have one.  Check it out at the following link MTX. 


For full disclosure, I am not paid to recommend this gear and the link above is not an affiliate link.  I use RRS because everything they make performs for me in the studio and in the field.

Fiat Lux,

Bull Schmitt

Wednesday, June 27, 2012

A Great Lesson from Food TV's Good Eats


I watch a show on The Food Network called Good Eats.  The host is Alton Brown and he discusses a large amount of cooking gear and equipment (in addition, to delivering amazing food facts and cooking techniques.) The consistent thing about Alton's gear recommendations is he loves equipment that can multi-task.  Why have a piece of gear that can only do one thing.  If that is the case, to do three tasks you need three different items.  With multi-tasking, one piece of gear does all three jobs.


If you do a lot (or even a little) travel photography the concept of gear "multi-tasking" is hugely important.  In the ideal world it would be simple to take all of your gear everywhere.  There would never be carry-on limits, space or weight issues, and we would all have our own photo Sherpa.  In the real world, we are often forced to take fewer items in order to meet the travel reality.


I found myself in just such a situation on a recent photo trip to Alaska.  I normally carry a tripod along with a ball head and a gimbal head.  Turns out if I took both my bag would have been 50+ pounds and I did not want to pay the penalty.  I decided on just the gimbal since I knew it would work for my long lenses and also provide basic ballhead functionality (although not quite as efficiently.) 

Even with that I ended up wanting to shoot a macro shot from directly overhead my subject.  My first plan of attack is shown below.


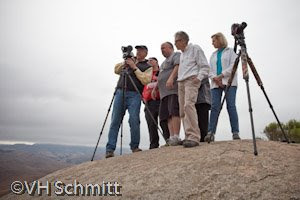
As you can tell, probably not the best way to shoot.  Not only is the platform unstable but my ergonomics are horrible.  This is a really easy way to hurt your back and take a bad picture at the same time.  So I needed to innovate.

My solution was to multi-task my gear.  I know I had a great tripod (Really Right Stuff TVC-33) and my gimbal (RRS PG-02).  I decided to see if I could make it work in this macro situation.


After looking at the PG-02, I took the vertical support arm and turned it around.  This allowed me to support the camera and point it straight down at my basket sea star.  I had never done this before and did not know the PG-02 could do this.  What I found is exactly what Alton Brown talks about on Good Eats; another great use for a piece of gear designed for something a little (or a lot) different.


Although I had good support, my ergonomics still, for lack of a better word, sucked.  Before I destroyed my back, I finally settled on what you see below.


Tremendous support, good ergonomics, and a different view of a basket sea star.  After these shots were taken I switched over to an EF 100mm f/2.8L Macro for closer shots (an example is the first shot at the top of the post.)

So here is to Alton Brown, Good Eats, and multi-tasking. 

As you all know I love Really Right Stuff gear.  This shoot made me an even bigger fan of the RRS PG-02.  Good luck making this happen with any of the other gimbal heads out there.

Fiat Lux!

All shots of me are courtesy of Marc Muench, Leanna Telliard-Stern, and Gina Ruttle.  Thank you!


Basket stars multi-task as hair!


Monday, June 18, 2012

Go For It: Pixels are Free

One of my favorite expressions with digital photography is "pixels are free."  With no cost, photographers should enjoy complete freedom to experiment and play.  If you have an idea for a shot, go for it.  If it works, great.  Take what you did and make it a part of your photography. 

If it does not work out, no big deal.  But use the results as a completely free learning experience. Go to school and figure out what was the issue/s.  Can you make a small adjustment or do you need to go back to the drawing board and plan again. 

I recently found myself in a situation where I honestly did not know how the results would turn out.  I wanted to shoot a series of images for a landscape panorama in rapidly falling light levels.  I had the Canon EF 800mm f/5.6L on my 5K Mk II; a combination not often used for panoramas.  To make matters worse I was on the back of a moving boat.  Not only was it moving forward and slowly rocking side to side but we were in a regular ocean swell so we were slowly heaving (up and down.)

Not the best situation but pixels are free so I went for it.  The results from the 42 shots are shown below. 

 
This is the panorama after the stitching process.  If you follow the bottom (or top) you will notice a nice sine wave pattern.  That is the boat going up and down with the ocean swell.  My camera support was rock solid (RRS TVC-33 and PG-02) but the boat was out of my control. 

At this point I had a nicely stitched panorama even though it is somewhat ugly in terms of how everything lined up.  But it worked and did not cost a thing. 


After a little cleanup, I had a usable, huge panorama to optimize.  For a free experiment, I will take it.

Fiat Lux!

Tuesday, May 8, 2012

Long Lens + Stability = Great Performance

 Canon 1D Mk IV, EF 800mm f/5.6L 1/320, f/5.6, ISO 400

Both of the shots above were captured with a Canon 1D Mk IV and a Canon EF 800mm f/5.6L.  The image of the mountain goats used a shutter speed of 1/500 and the bear was even slower at 1/320. I could have easily increased the shutter speeds by increasing my ISO but I was trying for the cleanest image I could possibly get.

Canon 1D Mk IV, EF 800mm f/5.6L 1/500, f/5.6, ISO 400

Such shutter speeds are definitely possible but when on a moving boat and compared with an effective focal length of 1040mm, the results are impressive.  I used the image stabilizer in Mode 1 which helped significantly but the real reason I could shoot with certainty at lower shutter speeds is my support setup.

I used a Really Right Stuff camera support setup including TVC-33 tripod, PG-02 gimbal head, and a long lens support package as depicted in the images below.

TVC-33, PG-02, and Long Lens Support Package

If you are a long lens shooter give yourself the advantage of perfect support.  I often say there is not a gear/technology solution to every problem but in this case I could not have made the same shot without it.  When combined with a good foundation in exposure and camera/lens functionality, the support system makes a nice trifecta!

TVC-33, PG-02, and Long Lens Support Package

Fiat Lux!

Wednesday, September 7, 2011

Tethered Shooting Spacer

I have always found it a bit unwieldy when shooting in a vertical/portrait orientation with a tethering cable attached.  Recently, Really Right Stuff (RRS) made the perfect solution and I was fortunate to shoot with the Cable Release Spacer (CRS) today. 

The CRS attaches to a standard L-bracket and adds about 1.25" for your tethering cable.  It also has a small locking bar to "lock" your cable to the spacer.  This is great since any tugging on the cable can easily damage your camera's ports, a very expensive fix by the way.

Vertical orientation. The CRS firmly attaches to your L-bracket for stability.


 Horizontal orientation, not much change but cable is firmly attached.

If you are a tethered shooter and are tired of dealing with work arounds for your cable when shooting vertically, pick up a RRS Cable Relief Spacer and all is good.

Click here to visit the RRS site.

Fiat Lux!


Friday, June 3, 2011

Support and RRS Link

Mountain goat from moving boat.
Canon 1D Mk III, EF 800mm f/5.6L, and RRS PG-02

Day five of my Lightroom "Zero to Hero" class here at Light.  Wanted to put up a quick blog before class.

I was looking through some of my AK shots and found these two examples of camera support working in my favor.  We (and most photographers, photo magazines, blogs, etc.) speak a lot regarding capturing the sharpest images.  Hands down the best techniques we have found are to shoot from a STABLE platform and use Live View when possible to compose, expose, and focus (built-in mirror lock-up too.)

A stable platform to me means good tripod and Really Right Stuff gear.  I am using the PG-02 panning gimbal head these days which supports my long lenses and serves double duty as a multi-axis panorama kit. 

The goat shot above is an effective 1040mm with a 1/400 shutter speed from a moving boat!  That is only possible when the platform is stable.  I also used Live View to focus and set my exposure.  The PG-02 makes that probable but the addition of a long lens support kit makes the shot probable.  There is not a gear solution for everything but having the right equipment certainly helps.


24 shot HDR pano taken from a boat with the PG-02.

For a cool writeup from Joe at Really Right Stuff about an awesome trip check out the following link.


Now back to Lightroom for me.  We are learning the final workflow step today - Output.  So plenty of time with export, Print, SS, and Web.  Good living.

Fiat Lux!

Thursday, February 17, 2011

Why I Prefer Really Right Stuff Pano Gear


The screenshot above is from a 360 pano I shot last night.  Sunset fizzled but moonrise was very cool shining through the cumulus clouds.  Fourteen shots from a Canon 5D Mk II, EF 24-70mm f/2.8L, and my Really Right Stuff panorama kit.  The file is 2.25 GB and perfect (the small white masking artifacts are only visible at small magnification and are not really present in the file.)

Awesome!  When the source material is captured properly there is almost no loss from the pano alignment and stitching process and it is, in a word, easy.

There is not always a gear or technology solution but the right equipment really helps.  For this scene the RRS kit was essential to the simplicity and results of the shoot.

OBTW, that is Victoria standing near the left edge of the image shooting her own 360.

I'll put the final pano up when I finish the optimization.

Fiat Lux!

Bull

Saturday, June 13, 2009

HDR, Panoramas, Gigapan and More!


Today started with a 5am meeting at the top of Black Hill in Morro Bay. The goal was to get some great Time Lapse images of the fog coming in over Morro Rock as George has recorded for years. While George's time lapse series was up and running (for 5 hours, 12 frames every minute taken with a Canon 1D Mark III, 24-105mm and a TC 80N3 timer remote), we instructed our students on how to take proper panoramas in the field. With the gracious donations from Really Right Stuff (of various plates) we were able to get everyone in on some incredible panos from about 600 feet above Morro Bay and the Baywood/Los Osos estuary.


Then, George treated us with 2 set-ups from Gigapan (pictured above). Gigapan takes multiple images (today around 40-70 images per gigapan session) and created awesome high depth, high quality panoramas. It's just like taking 4 panoramas to eventually stitch altogether in one image! But this "Gigapan" get-up does it all for you. You plug in the starting point (upper left of the overall image) then plug in the ending point (lower right point of the overall image). Then you press start and away it goes... taking tons of images to create one very large gigapan.

Take a look at George's website to see a few examples, or go to Gigapan's website where they feature some additional gigapan's that George has done withe their contraption. Thanks to Peggy from The Photoshop in San Luis Obispo, we were able to have 2- Canon G10's on hand to create several Gigapan's of Morro Bay.


After taking several panoramas and HDR images of the area we headed to a greasy spoon called Kathy's Country Kitchen where we were entertained by a surprise drizzle on the patio and some very filling biscuits, omelette's and pancakes..

When we returned to the school, we were able to download the "gigs" of images and started on our next feat. Orchid Gigapans.
By tomorrow we are going to have some incredibly detailed and large panoramas of the beautiful orchids that George and Kathy purchased for this portion of the workshop.


We set up about 2-4 580EXII or 580 Ex strobe flashes against our white studio walls and 1 black background, and were able to isolate three different amazing and locally grown orchids.

One set up had two strobes blowing out the wall, two strobes with our amazingly creative diffusers to light the orchids with a beautiful soft light (made from plastic plates and tissue paper left over from our on-the-scenes family Christmas photo in Virginia...just for the fun of it) and one strobe back lighting the orchids. 5D Mark2 with a 180mm Macro lens all rigged up with a series of Really Right Stuff plates (ask RRS for details on the specific plates used this weekend.)


The second set-up was another white wall, but this time the orchids had a slightly harsher light from the MT-24 twin lights on our 180mm macro lens. Two strobes to blow out the background and one strobe to back light the orchids.


The final set up was a black background, 180mm Macro with the twin light set up an one strobe to back light, and our Induro tripod from MAC group. Lessons were truly learned and we are still processing our images in time to print tomorrow with Canon Rep Scott Jo. We are expecting to print our images at about 4'x12' prints (depending on a traditional pano or gigapan) on our Canon iPF 8100.


Stay Tuned to see our final images!

Thanks for reading!

Victoria

P.s. Are you following us yet?...c'mon! Join in on the list! Also, check us out on twitter! I'm photoshopv and Hal updates LightWorkshops.