Showing posts with label Alaska. Show all posts

Wednesday, December 5, 2012


While I was looking over some images for yesterday's blog I found this sequence.  Thought it would make a nice simple time lapse.

Gorgeous Alaska day and a slow humpback whale dive.  Shot the sequence on my photo tour with a Canon 1D Mk IV and an EF 70-300 4.5/5.6L.

Put the time lapse together with Lightroom. Recommend the 720 quality option.

Saturday, August 18, 2012

Digital Photo Experience Interview with Hal

Rick Sammon in "The Suit"


Hal on the Digital Photo Experience with Rick Sammon and Juan Pons

Check out the new podcast from Rick Sammon and Juan Pons over at the Digital Photo Experience; great information and a fun interview with Hal.

Fiat Lux!

Monday, July 30, 2012

Landscape at f/4? Know your DOF

I am a huge believer in understanding and practicing the basics and the fundamentals of photography.  Moreover, it seems most difficult tasks in life, including photography, come down to how well can you execute the basics. To that end, I would like to discuss one of the most common practices I see in the field when shooting landscape, stopping down for no reason. 

The conventional wisdom is to stop down when shooting landscape to increase depth of field (DOF).  Although stopping down does increase DOF it is not always necessary to do so and may, in fact, hinder your ability to make the best shot. 

DOF can be an incredibly complicated and confusing topic but it is worth spending a small amount of time talking about the primary contributors to DOF.  Most photographers are taught that DOF is controlled by aperture; the wider the aperture the shallower the DOF and vice versa.  What is not commonly taught are the two other primary variables that influence DOF, focal length (of the lens in mm), and focal distance (physical distance from shooter to focal point.) 

Just as every photographer quickly memorizes the aperture/DOF relationship they should do the same with focal length/DOF and focal distance/DOF.  So a little homework, memorize the following.
  • The wider the aperture the shallower the DOF
  • The longer the focal length the shallower the DOF
  • The shorter the focal distance the shallower the DOF
and the opposites
  • The narrower the aperture the deeper the DOF
  • The shorter the focal length the deeper the DOF
  • The longer the focal distance the deeper the DOF
One of the best ways to see these rules in action  is to use a DOF calculator and play around.  If you want to go "old school" there are "whiz" wheels out there to show the relationships.  But since this is mid 2012, I recommend finding a DOF app for your smart phone or device.  There are a huge number of these apps available just search for "DOF calculator" and download. 

After playing with a DOF calculator app for just a small amount of time, you will be amazed how quickly you learn the rules and begin to visualize constructing DOF for every shot you take.  When you know the rules and relationships of DOF you will approach your shots from a position of knowledge and you will, most likely, modify some of your accepted habits and practices.  You might even decide to take your DOF calculator app with you on location and run some numbers before you shoot.  I do not think you will do this all the time but if you need some intel, back up, or encouragement break out the app and "run the numbs." 

Recently, I shot some landscape in Alaska and used my understanding of DOF to shoot handheld landscape at f/4 with everything in the shot acceptably in focus.  This goes against the conventional wisdom but it worked perfectly.  The shot I ended up with is shown below.


For this shot I used the focal point shown @1000' from me, 43 mm focal length, and an aperture of f/4.  I shot a bracketed series for HDR and did it handheld as my tripod was not available.

If I had followed the conventional wisdom I would have stopped down to f/16 and would have had the situation shown below.

f/16 would have given me plenty of DOF but a shutter speeds of 1/60, 1/250, and 1/15.  These are, of course, too slow for my handheld situation.  I could have increased my ISO to yield faster shutter speeds but I did not want the additional noise, especially when shooting for HDR.

Instead of changing ISO, I changed aperture and opened up to f/4 which gave me the situation shown below.

f/4 also gave me plenty of DOF and shutter speeds that I could work with hand held.  Because my focal length was 43mm with a focal distance of 1000', changing aperture did not have an appreciable effect on this shot's practical DOF.  As a result, the entire shot is acceptably in focus, even the foreground as it is greater than 52' from me.  Sure f/16 gave me 38' more DOF but it was irrelevant.

Now there will be times and places this does not work but if you understand the basics you will recognize them quickly.  When you do you will find the solution and make the shot work.

More on this topic next time.

Wednesday, June 27, 2012

A Great Lesson from Food TV's Good Eats


I watch a show on The Food Network called Good Eats.  The host is Alton Brown and he discusses a large amount of cooking gear and equipment (in addition, to delivering amazing food facts and cooking techniques.) The consistent thing about Alton's gear recommendations is he loves equipment that can multi-task.  Why have a piece of gear that can only do one thing.  If that is the case, to do three tasks you need three different items.  With multi-tasking, one piece of gear does all three jobs.


If you do a lot (or even a little) travel photography the concept of gear "multi-tasking" is hugely important.  In the ideal world it would be simple to take all of your gear everywhere.  There would never be carry-on limits, space or weight issues, and we would all have our own photo Sherpa.  In the real world, we are often forced to take fewer items in order to meet the travel reality.


I found myself in just such a situation on a recent photo trip to Alaska.  I normally carry a tripod along with a ball head and a gimbal head.  Turns out if I took both my bag would have been 50+ pounds and I did not want to pay the penalty.  I decided on just the gimbal since I knew it would work for my long lenses and also provide basic ballhead functionality (although not quite as efficiently.) 

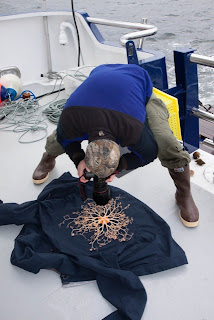
Even with that I ended up wanting to shoot a macro shot from directly overhead my subject.  My first plan of attack is shown below.


As you can tell, probably not the best way to shoot.  Not only is the platform unstable but my ergonomics are horrible.  This is a really easy way to hurt your back and take a bad picture at the same time.  So I needed to innovate.

My solution was to multi-task my gear.  I know I had a great tripod (Really Right Stuff TVC-33) and my gimbal (RRS PG-02).  I decided to see if I could make it work in this macro situation.


After looking at the PG-02, I took the vertical support arm and turned it around.  This allowed me to support the camera and point it straight down at my basket sea star.  I had never done this before and did not know the PG-02 could do this.  What I found is exactly what Alton Brown talks about on Good Eats; another great use for a piece of gear designed for something a little (or a lot) different.


Although I had good support, my ergonomics still, for lack of a better word, sucked.  Before I destroyed my back, I finally settled on what you see below.


Tremendous support, good ergonomics, and a different view of a basket sea star.  After these shots were taken I switched over to an EF 100mm f/2.8L Macro for closer shots (an example is the first shot at the top of the post.)

So here is to Alton Brown, Good Eats, and multi-tasking. 

As you all know I love Really Right Stuff gear.  This shoot made me an even bigger fan of the RRS PG-02.  Good luck making this happen with any of the other gimbal heads out there.

Fiat Lux!

All shots of me are courtesy of Marc Muench, Leanna Telliard-Stern, and Gina Ruttle.  Thank you!


Basket stars multi-task as hair!


Monday, June 18, 2012

Go For It: Pixels are Free

One of my favorite expressions with digital photography is "pixels are free."  With no cost, photographers should enjoy complete freedom to experiment and play.  If you have an idea for a shot, go for it.  If it works, great.  Take what you did and make it a part of your photography. 

If it does not work out, no big deal.  But use the results as a completely free learning experience. Go to school and figure out what was the issue/s.  Can you make a small adjustment or do you need to go back to the drawing board and plan again. 

I recently found myself in a situation where I honestly did not know how the results would turn out.  I wanted to shoot a series of images for a landscape panorama in rapidly falling light levels.  I had the Canon EF 800mm f/5.6L on my 5K Mk II; a combination not often used for panoramas.  To make matters worse I was on the back of a moving boat.  Not only was it moving forward and slowly rocking side to side but we were in a regular ocean swell so we were slowly heaving (up and down.)

Not the best situation but pixels are free so I went for it.  The results from the 42 shots are shown below. 

 
This is the panorama after the stitching process.  If you follow the bottom (or top) you will notice a nice sine wave pattern.  That is the boat going up and down with the ocean swell.  My camera support was rock solid (RRS TVC-33 and PG-02) but the boat was out of my control. 

At this point I had a nicely stitched panorama even though it is somewhat ugly in terms of how everything lined up.  But it worked and did not cost a thing. 


After a little cleanup, I had a usable, huge panorama to optimize.  For a free experiment, I will take it.

Fiat Lux!

Friday, June 15, 2012

Rick's Day in the Barrel


Rick Sammon demonstrating the "proper" technique for donning a survival suit.  Enjoy, we did.

Hope to have you join Rick and I in Alaska.

Fiat Lux!

Monday, May 7, 2012

Get Low Part II


Last week, I showed a panorama of a few bergs in SE Alaska.  Interestingly, as I was shooting the bergs someone shot me.  This image gives you an idea of getting low.  Sometimes to get a different angle you might need to get a little bit wet, muddy, dirty, cold, etc.

Fiat Lux!

Friday, April 27, 2012

Get Low!

 4-shot stitched panorama,


In port for a day before departing again for more eagles, whales, bears, glaciers, and fun.  Rick Sammon and I along with the cruise participants had a tremendous experience and I cannot wait to share some of the images we made.  Marc Muench joined me in Petersburg for this next cruise and I am sure we will have another incredible trip.

A technique I used often during the trip was to get low.  The image above is a four shot stitched panorama shot from a RHIB (rigid hulled inflatable boat) slowly moving through the water.  To make this shot more dramatic I placed the camera about an inch above the water and shot.  Since pixels are more or less free, experiment with different approaches and angles to your photography.  Some will work and others not so much, just part of the process.


Even though the image had tremendous color I thought I might try a black and white also.  It is great having options and experimenting with both capture and your post processing.  Continuing along that process, the image below is the combination of the color version and the black and white version's luminance values.


Fiat Lux!

Wednesday, April 18, 2012

Gear and Leaving Sitka


Quick shot of the gear heading out with me today.  The great thing is all of it fit into a Think Tank Airport International except the big lenses.  It is possible to put the 400 mm (upper right) in the Airport International but not on this trip. 

Taking a Canon 5D Mk II, 7D, 1D Mk IV for bodies.  Lenses include 15mm f/2.8, 24-70mm f/2.8L, 70-200mm f/4L, 70-300mm f/4-5.6L, 100-400, 400mmf/4-5.6L  f/2.8L, and 800mm f/5.6L.  Also have a 580 EX II with battery pack, Zoom sound recorder, and I do not go anywhere without a HoodLoupe from Hoodman.


Sunset kind of fizzled but not a bad view from Sitka.

Heading out from Sitka this morning.  This is my first visit here and the town is spectacular.  The people are friendly and I won't even get started about the fresh seafood.

Fiat Lux!


Tuesday, August 2, 2011

$600/lb. Prawns?


Proof of why I should not quit my day job.  With the cost of fishing licenses and a really small catch, our prawns were effectively $600 per pound.  Tasty, tasty spotted prawns but somewhat pricey.

This was onboard the Alaskan Legend last month during a killer photo tour. 

Thanks to Dr. Kevin Keating for shooting this embarrassing image.

Fiat Lux!

Tuesday, July 26, 2011

Moonrise over the Mountains


This moonrise capped an amazing day of photography on a recent trip.  We were shooting all day with subjects varied from glaciers to brown bears to crazy, trumpeting whales and everyone was tired.  Needless to say the moon rising over the high peaks and snow/ice fields invigorated our group and we shot a little bit longer.

I used a Canon EF 400mm f/2.8L mounted to a 7D body.  A Really Right Stuff PG-02 and Induro CT314 provided the stability.  Stability was incredibly important as I was on an anchored yacht in calm water but it was still  rocking as a result of six whales lunging, diving, and surging.  Turns out 200+ tons of whale makes a ripple or two. 

The dynamic range was fairly large and in order to get enough detail in the moon I sacrificed a little in the shadows.  I shot a bracketed sequence for HDR as well but did not prefer the image to the one you see above.  Since the shadows were a bit dark I used Photoshop to bring up the tonality in the lower portions of the image. 

When I want to brighten an area I often use a Curves adjustment layer.  Instead of moving the curve though, I switch the layer blend mode to Screen.  This brightens the image by approximately one stop.  I liked the result everywhere but the moon so I masked it out and kept the original tone.


Fiat Lux!

Monday, July 25, 2011

Tim Grey Vs. Survival Suit - Photo Adventure Alaska


A little video we shot of Tim Grey donning a cold water survival suit.  The standard is to get into the suit and be ready to get into the water in under a minute.  Take a look and see how Tim does.

Just came home from two back to back cruises in Alaska.  It just keeps getting better every time I go up there.  Hope to have you join me on one of the cruises soon.

Tim will be back with us here for Lightroom (Tim's Lightroom) in August and in October for the California Photo Fest (Photo Fest)  You can find more info about tim at www.TimGrey.com

Fiat Lux!

Thursday, July 14, 2011

Going Back Out for More


Heading back out onto the water this afternoon for another photo tour of south east Alaska's amazing scenery and wildlife.  Took a quick a break in Petersburg after the first trip.  I needed a little time to catch up on sleep as we were shooting all day for over a week.

We had another incredible trip filled with amazing photography, incredible camaraderie, good food and wine, and pure fun. I look forward to sharing some of the images we made and the techniques used to capture them once I get back down to Cali. 

 Lion's Mane


 Humpback tail and barnacles


Rolling in


Fiat Lux!

Friday, June 3, 2011

Support and RRS Link

Mountain goat from moving boat.
Canon 1D Mk III, EF 800mm f/5.6L, and RRS PG-02

Day five of my Lightroom "Zero to Hero" class here at Light.  Wanted to put up a quick blog before class.

I was looking through some of my AK shots and found these two examples of camera support working in my favor.  We (and most photographers, photo magazines, blogs, etc.) speak a lot regarding capturing the sharpest images.  Hands down the best techniques we have found are to shoot from a STABLE platform and use Live View when possible to compose, expose, and focus (built-in mirror lock-up too.)

A stable platform to me means good tripod and Really Right Stuff gear.  I am using the PG-02 panning gimbal head these days which supports my long lenses and serves double duty as a multi-axis panorama kit. 

The goat shot above is an effective 1040mm with a 1/400 shutter speed from a moving boat!  That is only possible when the platform is stable.  I also used Live View to focus and set my exposure.  The PG-02 makes that probable but the addition of a long lens support kit makes the shot probable.  There is not a gear solution for everything but having the right equipment certainly helps.


24 shot HDR pano taken from a boat with the PG-02.

For a cool writeup from Joe at Really Right Stuff about an awesome trip check out the following link.


Now back to Lightroom for me.  We are learning the final workflow step today - Output.  So plenty of time with export, Print, SS, and Web.  Good living.

Fiat Lux!

Thursday, May 26, 2011

Fisheye Pano and A Little Video

Hobart Bay Pano with Northern Song bookends
An early morning fisheye pano I shot recently.  I liked the effect I was getting with the boat framing the vertical edge of the image but the only way to bookend was with a pano.  With the 15mm FE on my 5D Mk II, I was able to get the effect with only two shots.  I knew from previous efforts though I would have a problem trying to stitch just two fisheye images together with Photoshop.  In order to make the stitching process go a little simpler (or go at all) I shot an additional frame for a total of three.

I stacked all three shots, expanded my canvas, and moved each into position manually.  If you ever need to do this the trick is to switch the Layer Blend Mode of the layer you are moving to Difference.  This will give you a weird ghosted effect but you can easily see where to position.  After everything was in place I selected all layers and clicked Edit-Auto Blend.  With the Auto layout selected Photoshop did the rest. 

In the end the image was just under 10K pixels wide so I almost reached a 2:1 ratio for the pano.  More importantly, I got the effect I wanted.  I think the main lesson is pixels are free.  If you have an idea shoot away and see what can be accomplished in post.  If it works, great.  If not, find another way. 

The video below is the final from our last trip ashore.  I posted the other two already so I figured I might as well finish it.  As you can see my lens is still wet and I was not microphoned up.  Hopefully, it captures some of the flavor.


The "sushi" bar comment in the video is when the fish rush ashore and the eagles stand in or near the water.  They reach down with their beaks and snatch the fish up; just like a sushi-go-round restaurant. 

A single eagle at the "sushi bar" with one on deck.
Notice the fish jumping out of the water in the foreground.

The final shot below is the yacht I reference in the video.  I will admit it was kind of small in the frame so here is a closer view.


Fiat Lux!


Monday, May 23, 2011

Couple of HDRs and Component Pre-Processing Tips

Bridge shot from Lightroom, Photomatix Pro, Photoshop, and Topaz
Lens is a 400mm f/2.8L AKA "killer glass"

I showed a Nik HDR Efex Pro processed ice cave the other day and wanted to balance that with a couple of Photomatix Pro HDRs.

Both images started in Lightroom where I processed the components.  My workflow includes removing any of the default settings in the Develop Module that effect tonality.  From top to bottom I do the following: Blacks-0, Brightness-0, Contrast-0, Tone Curve's Point Curve-Linear, Detail's Sharpening Amount-0, and Lens Correction to remove vignetting and chromatic aberration.  I will warn you here, after you make those adjustments the components will not look good.

You can easily make a Preset and the process goes much quicker.


Once the image returns from Photomatix I will go through my normal optimization workflow.  This often returns the above sliders and options to near their default. 

In the case of these two images, I processed them twice in Photomatix, adjusted in Lightroom, and then combined the two in Photoshop.  For the interior shot I also used Topaz Detail to add some shape and form.

Fiat Lux!

Friday, May 20, 2011

Ice Cave


Video shot as I was getting ready to make some HDR source images.  Always be extremely careful when dealing with ice caves.  Many are not safe at all so perform a good survey of the scene and judge integrity, traction, and overall security.  It is also a great idea to not do this alone.  With at least one other person assistance/rescue gets much easier.

The textures, color, and tonal range inside the cave were amazing.  Shooting here was a challenge.  The biggest issue was the melt water.  Keeping the camera and lens relatively dry required full protection.  I do not use any fancy type of rain gear.  I prefer fish fillet bags and rubber bands or gaffer's tape.  They make a simple, effective, and economical solution.  Light levels overall were low so I used a tripod.  Tripod setup was a little challenging with very slippery, uneven terrain (ice) as the cave floor.  The ability to rapidly adjust my tripod leg length and angle was very helpful. 

I shot a single image to assess the tones and decided I needed to shoot multiples to cover the entire range.  For the HDRs on this blog, I shot only three source files at -2, 0, and +2 E.V with a Canon 5D Mk II.  This gave me about 9ish stops of usable data which worked perfectly.  Had I needed more shots I had my Promote Control with me. 


 HDR processed with HDR Efex Pro from Nik

I used Nik's HDR Efex Pro for this scene.  As many of you know I am not all that faithful to one HDR software.  I primarily find myself using Photomatix Pro but I will almost always try other options and pick the best result.  Sometimes my final result is a blend of output from different programs.  For this shot I wanted the result to show texture more than anything else.  Click on the attached images for a larger version since only when big will the real texture come out. 


On this version I pulled some saturation and pushed texture a bit more.

Now I need to go back in July with my Fisheye.  Of course, this cave will be gone but I should be able to find another.  Come out and join me.

Fiat Lux!

Thursday, May 19, 2011

Eagle Tips

Dial it up (as we used to say at TOPGUN)

As many of you know I am a big fan of photographing eagles (might be that fighter pilot thing again.)  There are a huge number of tips and tricks when shooting eagles but I will give two of the simplest.  These two might seem a little bit flippant and MOTO (master of the obvious) but they are true.


My best tip is go where there are a large number of eagles.  The rock above has 19 eagles on it.  What is not shown are the other 30 rock outcroppings just like this one covered with birds or the trees full of birds.  When you surround yourelf with 500-1000 eagles you will have a much higher probability of getting the shots you want.  Photographing eagles in flight is not the easiest task so the more you shoot the better.  Tough to do as you wait for the lone bird to fly by again.


Tip number two often goes hand in hand with number one, go where this is a non-stop supply of eagle food.  I have no problem with feeding eagles to get images but there is a finite amount of frozen herring.  Food equals eagle action.  The birds will feed almost non stop.  I have seen eagles feed until there are fins sticking out their beaks.  With plenty of birds and food you increase your opportunity in a major way.  In the image above the fish are literally jumping out of the water into the waiting talons of the approaching eagle.  There is also something a little more raw and natural about a freshly ripped apart herring; half in the beak and half in the talons.  In the gory image above note there is another whole herring in the talons as well.

As I mentioned, feeding to attract eagles is not really any different than planting flowers to attract butterflies or using sugar water to bring in hummingbirds to an elaborate flash setup.  I do believe in full disclosure though and will discuss if an eagle was baited or not.  Most often it is pretty easy to tell if there is a fish in the frame (in the water or in the talons/beak.)  Recently caught live fish bleed and still look alive.  Frozen herring are slightly discolored, the tail contracts, and the eye is very dead.  For example, check out the gull below picking up a frozen herring.


A few more shots for giggles.


 Yep, the sky was that blue.


Love the dirty birds (juveniles)!
Notice the bright spot in the talons.  Normally a piece of bait...as it is here.


Fiat Lux!

Wednesday, May 18, 2011

Composite Images for Easy Expanded DOF


I shot the two images above for this demo while onboard our yacht tour a couple weeks ago.  We weren't in perfect position for the composition I really wanted but pixels are free so I shot anyway.  The eagles are separated from the mountain and glacier background by about 10 miles.  I had a Canon 400mm f/2.8L on my 7D at the time and could not get both foreground and background in focus with the given focal distance.  I decided to quickly shoot with eagle focus and again with glacier focus; the only thing that changed between shots was focal point.  Although I was on a tripod the boat was moving so there was a slight shift in the images. 

Once back in Lightroom I performed some basic optimization, selected both images, synchronized, right clicked, and chose the option shown below.  If you are working Bridge, the same optimization and synchronization may be done via ACR.  Select both images and then choose Tools-Photoshop-Load files into Photoshop Layers.


With a stack (a multi layer image in which each layer comes from an individual image) in Photoshop I needed to do some masking in order to selectively reveal and conceal each layer.  I wanted the foreground from one image (with the eagles in focus) and the background from the other (mountain and glacier.)  As always with Adobe I had at least three options: 1) I could add a mask to my top layer and then use a brush to paint. or 2) I could select the eagles and rock in the foreground and then add a mask (turning my selection into a mask.) or 3) I could let Photoshop do the work and Auto-Blend.  The Auto-Blend option (Edit-Auto-Blend Layers)when set up as below uses contrast as a discriminant to build a mask.


There are two main "gotchas" with Auto-Blend.  The first is if there is a shift in the images you might need to Auto-Align first.  Interestingly, in this case Auto-Align did not work as the images were fairly different without enough common pixels to scene map.  Second, to activate Auto-Blend as an option multiple layers must be selected.  Use click + shift click functionality to select multiple layers.  


After the blend, Photoshop gave me the layer masks you see above.  Not perfect but pretty good and extremely fast.  I made a few more changes to the images in order to correct color and boost contrast in the background.  I used a Curve adjustment layer for color correction and then stamped visible and set the resultant pixel layer to the Multiply blend mode with a reduced Opacity.  I copied a layer mask from above in order to reveal the effect on only the background.  To copy layer masks from one layer to another hold Alt (Win) / Opt (Mac) and click, hold, and drag a layer mask.  


I also wondered what the image might look like with only one eagle so I removed the bird on the left.  To do this I first selected the left most eagle with the Quick Select Tool and then Filled using Content Aware Fill.  This did most of the job but left a few places to touch up with the Healing Brush and Clone Stamp.  Finally, I cropped a bit differently. 


In the end, the eagle is too centered for my taste.  Normally the center is deadly (As Rick Sammon likes to say.)  Potentially, an argument could be made that the extended depth of field allows the viewer to leave the centered eagle and explore the in focus, interesting background.  Regardless, I think this image will only serve as a demo.

Fiat Lux!