Showing posts with label Light Photographic Workshops. Show all posts

Monday, February 4, 2013

Add Two Steps

Recently, we have seen an increase in photographers using the High Pass filter in Photoshop to add edge contrast and texture detail to their images.  This is a cool technique but when you use the filter remember to add two more steps; desaturate your layer before applying the High Pass filter and always target your filter effects with a mask.


You may have seen or heard many photographers talking about how they sharpen only on the Lightness channel in L*A*B* or they make sure to change the blend mode of their sharpening layers to Luminosity or they use the Fade option with a Luminosity blend mode change.  There are many good reasons to make these switches and we suggest you use them in your sharpening or contrast boost workflow.  For the same reasons, when you use High Pass desaturate.

It is a common misconception that when you run the High Pass filter you are left with an image that is baseline 50% gray and only shows brighter or darker tonality at the edge contrast and texture detail.  Instead, High Pass may retain color information from the original image.  This can lead to color shifts or colored fringe along a high contrast edge similar to haloing.

 Notice the remaining color.
Our workflow is to copy the background layer or stamp visible if you have a multi-layer document and then desaturate via Image>Adjustments>Desaturate this can also be executed with the keyboard shortcut of CTRL+Shift+U for Windows or CMD+Shift+U for Mac.


For those who want to play or have more control you can
  • Run a Black and White adjustment instead and modify the tonality of the color arcs.
  • Use multiple layers of High Pass set to different radii.
  • Leave the color in your layer in order to generate a color boost. Watch out for fringing!
  • Use the filter on a Smart Object so you can make changes.
  • Invert your filter layer to decrease contrast and texture detail.
The second misconception is that areas that appear to be smooth after running the High Pass filter are not. Make sure to use a mask and target the filter effect to only those areas that you want to modify. In general, LIGHT does not recommend enhancing the edge contrast or texture detail on the following:
  • The sky especially blue sky.
  • Areas of constant color or tone.
  • Flowing water.
  • Out of focus areas.
  • Human skin especially female skin.

Fiat Lux!

Wednesday, January 16, 2013

2013 Metadata Presets Update

I am certain you have already done this but just in case you have not make sure to go in and modify your metadata presets.  This is also a great time to verify you made a new parent folder reflecting the new year.

In the quick video Hal shows the update process for Lightroom and the Bridge.
Annual Metadata Preset Update (2013 Version) from Hal Schmitt on Vimeo.

Thursday, December 13, 2012

The Ultimate Stocking Stuffer


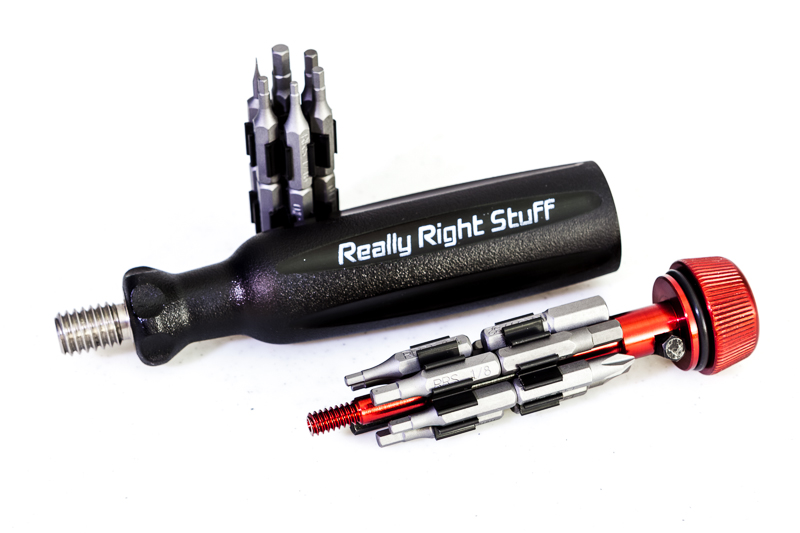
This is the ultimate stocking stuffer for any photographer.  Honestly, this is a multi-tool that everyone should have photographer or not. As you know I am very picky and demand my gear be the absolute best.  This multi-tool is the real deal.  The quantity and variety of bits in this kit is awesome.  I started using it about three weeks ago on my tripod but soon found out it works on just about everything from camera, to eye glasses, to computer, etc.  With 22 bits in hex, torx/star, flat, and cross this is my primary tool to adjust most small gear and equipment.


The entire kit packs very light and compact and is now a permanent addition to my bag.  For those who have a Really Right Stuff Tripod in either the 2 or 3 series the tool even fits right into the center column, so it is always available. There are other cool uses as well that you can check out if you follow the link below.


Really Right Stuff calls this the MTX and you should really have one.  Check it out at the following link MTX. 


For full disclosure, I am not paid to recommend this gear and the link above is not an affiliate link.  I use RRS because everything they make performs for me in the studio and in the field.

Fiat Lux,

Bull Schmitt

Tuesday, December 4, 2012

The Test Shot

Killer whale attacking a Steller's sea lion

There are many shots that require you to react extremely quickly in order to capture what you want such as these whales I photographed during one of my Alaska workshops.  One of the most successful techniques you can use is what I call the "test shot."

The test shot has two primary objectives, exposure and rough focus.  When taking a test shot your actual subject is usually not in the frame.  For example, these whales break the surface in less than a second and if I wait until the subject is in the frame to find exposure I will be less than successful most of the time.  If instead I anticipate where the subject will appear or what the event will look like, I can figure out exposure ahead of time very easily.  I can also pre-focus so that the precision focus process is much faster once my subject is in frame and my auto focus sensors are properly placed.

A humpback whale going for it in front of Devil's Thumb

When you make a test shot, it is often times not adequate to set exposure based on the environment/background.  You need to anticipate what will drive the exposure.  For example, in all three whale shots the critical elements are the white water and the white fins/body.  If I make a test shot of just the water and set exposure without considering the extreme tonal difference between water and white water/whale, I will, most likely, blow the highlights in the shot. When I made the test shots for these images, I set my exposure based on white not on the water/background.  You can use rules of thumb to underexpose for the predicted highlights but I prefer actual meter data, when I can get it.  In these examples, I changed my camera's metering mode to Spot and then I set exposure off of something white.  I actually used the boat's wake but a white sheet of paper would work as well.  As long as the white is under the same lighting conditions as my subject, my exposure will work perfectly.

.1" earlier

This process is simpler when shooting in Manual exposure mode but can be used with Aperture or Shutter priority and auto exposure lock.  Once I have my exposure, I pre-focus to the expected subject distance and take a test shot and evaluate. With my exposure and pre-focus set, I am much better prepared to quickly execute the actual shot when the action occurs.

I use test shots all the time to give myself the advantage when something might happen and my reactions have to be perfect. When I am out photographing, people find it odd that I am shooting every now and again at what appears to be nothing. But my "strange" behavior pays off.  If you stack your deck ahead of time you will enjoy success in a more consistent and repeatable manner. 

Fiat Lux!


Tuesday, September 11, 2012

Denoise Video


A recent video showing my Topaz Denoise and Detail process.

Thanks for the questions that help generate these videos!

Fiat Lux!

Monday, July 30, 2012

Landscape at f/4? Know your DOF

I am a huge believer in understanding and practicing the basics and the fundamentals of photography.  Moreover, it seems most difficult tasks in life, including photography, come down to how well can you execute the basics. To that end, I would like to discuss one of the most common practices I see in the field when shooting landscape, stopping down for no reason. 

The conventional wisdom is to stop down when shooting landscape to increase depth of field (DOF).  Although stopping down does increase DOF it is not always necessary to do so and may, in fact, hinder your ability to make the best shot. 

DOF can be an incredibly complicated and confusing topic but it is worth spending a small amount of time talking about the primary contributors to DOF.  Most photographers are taught that DOF is controlled by aperture; the wider the aperture the shallower the DOF and vice versa.  What is not commonly taught are the two other primary variables that influence DOF, focal length (of the lens in mm), and focal distance (physical distance from shooter to focal point.) 

Just as every photographer quickly memorizes the aperture/DOF relationship they should do the same with focal length/DOF and focal distance/DOF.  So a little homework, memorize the following.
  • The wider the aperture the shallower the DOF
  • The longer the focal length the shallower the DOF
  • The shorter the focal distance the shallower the DOF
and the opposites
  • The narrower the aperture the deeper the DOF
  • The shorter the focal length the deeper the DOF
  • The longer the focal distance the deeper the DOF
One of the best ways to see these rules in action  is to use a DOF calculator and play around.  If you want to go "old school" there are "whiz" wheels out there to show the relationships.  But since this is mid 2012, I recommend finding a DOF app for your smart phone or device.  There are a huge number of these apps available just search for "DOF calculator" and download. 

After playing with a DOF calculator app for just a small amount of time, you will be amazed how quickly you learn the rules and begin to visualize constructing DOF for every shot you take.  When you know the rules and relationships of DOF you will approach your shots from a position of knowledge and you will, most likely, modify some of your accepted habits and practices.  You might even decide to take your DOF calculator app with you on location and run some numbers before you shoot.  I do not think you will do this all the time but if you need some intel, back up, or encouragement break out the app and "run the numbs." 

Recently, I shot some landscape in Alaska and used my understanding of DOF to shoot handheld landscape at f/4 with everything in the shot acceptably in focus.  This goes against the conventional wisdom but it worked perfectly.  The shot I ended up with is shown below.


For this shot I used the focal point shown @1000' from me, 43 mm focal length, and an aperture of f/4.  I shot a bracketed series for HDR and did it handheld as my tripod was not available.

If I had followed the conventional wisdom I would have stopped down to f/16 and would have had the situation shown below.

f/16 would have given me plenty of DOF but a shutter speeds of 1/60, 1/250, and 1/15.  These are, of course, too slow for my handheld situation.  I could have increased my ISO to yield faster shutter speeds but I did not want the additional noise, especially when shooting for HDR.

Instead of changing ISO, I changed aperture and opened up to f/4 which gave me the situation shown below.

f/4 also gave me plenty of DOF and shutter speeds that I could work with hand held.  Because my focal length was 43mm with a focal distance of 1000', changing aperture did not have an appreciable effect on this shot's practical DOF.  As a result, the entire shot is acceptably in focus, even the foreground as it is greater than 52' from me.  Sure f/16 gave me 38' more DOF but it was irrelevant.

Now there will be times and places this does not work but if you understand the basics you will recognize them quickly.  When you do you will find the solution and make the shot work.

More on this topic next time.

Saturday, July 21, 2012

Hal Schmitt's Canvas Gallery Wrap Corner Technique


Canvas Gallery Wrap Techniques - Cutting and Folding the Corners from Hal Schmitt on Vimeo.

Here is a quick video showing Hal Schmitt's corner cutting and folding technique when finishing a canvas gallery wrap.

Hal is working a 24 x 36 gallery wrap with Alpha Strike Matte Canvas photo grade coated with Ambrosia.


Fiat Lux!


Wednesday, June 27, 2012

A Great Lesson from Food TV's Good Eats


I watch a show on The Food Network called Good Eats.  The host is Alton Brown and he discusses a large amount of cooking gear and equipment (in addition, to delivering amazing food facts and cooking techniques.) The consistent thing about Alton's gear recommendations is he loves equipment that can multi-task.  Why have a piece of gear that can only do one thing.  If that is the case, to do three tasks you need three different items.  With multi-tasking, one piece of gear does all three jobs.


If you do a lot (or even a little) travel photography the concept of gear "multi-tasking" is hugely important.  In the ideal world it would be simple to take all of your gear everywhere.  There would never be carry-on limits, space or weight issues, and we would all have our own photo Sherpa.  In the real world, we are often forced to take fewer items in order to meet the travel reality.


I found myself in just such a situation on a recent photo trip to Alaska.  I normally carry a tripod along with a ball head and a gimbal head.  Turns out if I took both my bag would have been 50+ pounds and I did not want to pay the penalty.  I decided on just the gimbal since I knew it would work for my long lenses and also provide basic ballhead functionality (although not quite as efficiently.) 

Even with that I ended up wanting to shoot a macro shot from directly overhead my subject.  My first plan of attack is shown below.


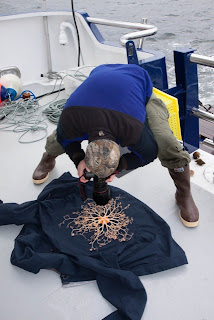
As you can tell, probably not the best way to shoot.  Not only is the platform unstable but my ergonomics are horrible.  This is a really easy way to hurt your back and take a bad picture at the same time.  So I needed to innovate.

My solution was to multi-task my gear.  I know I had a great tripod (Really Right Stuff TVC-33) and my gimbal (RRS PG-02).  I decided to see if I could make it work in this macro situation.


After looking at the PG-02, I took the vertical support arm and turned it around.  This allowed me to support the camera and point it straight down at my basket sea star.  I had never done this before and did not know the PG-02 could do this.  What I found is exactly what Alton Brown talks about on Good Eats; another great use for a piece of gear designed for something a little (or a lot) different.


Although I had good support, my ergonomics still, for lack of a better word, sucked.  Before I destroyed my back, I finally settled on what you see below.


Tremendous support, good ergonomics, and a different view of a basket sea star.  After these shots were taken I switched over to an EF 100mm f/2.8L Macro for closer shots (an example is the first shot at the top of the post.)

So here is to Alton Brown, Good Eats, and multi-tasking. 

As you all know I love Really Right Stuff gear.  This shoot made me an even bigger fan of the RRS PG-02.  Good luck making this happen with any of the other gimbal heads out there.

Fiat Lux!

All shots of me are courtesy of Marc Muench, Leanna Telliard-Stern, and Gina Ruttle.  Thank you!


Basket stars multi-task as hair!


Monday, June 18, 2012

Go For It: Pixels are Free

One of my favorite expressions with digital photography is "pixels are free."  With no cost, photographers should enjoy complete freedom to experiment and play.  If you have an idea for a shot, go for it.  If it works, great.  Take what you did and make it a part of your photography. 

If it does not work out, no big deal.  But use the results as a completely free learning experience. Go to school and figure out what was the issue/s.  Can you make a small adjustment or do you need to go back to the drawing board and plan again. 

I recently found myself in a situation where I honestly did not know how the results would turn out.  I wanted to shoot a series of images for a landscape panorama in rapidly falling light levels.  I had the Canon EF 800mm f/5.6L on my 5K Mk II; a combination not often used for panoramas.  To make matters worse I was on the back of a moving boat.  Not only was it moving forward and slowly rocking side to side but we were in a regular ocean swell so we were slowly heaving (up and down.)

Not the best situation but pixels are free so I went for it.  The results from the 42 shots are shown below. 

 
This is the panorama after the stitching process.  If you follow the bottom (or top) you will notice a nice sine wave pattern.  That is the boat going up and down with the ocean swell.  My camera support was rock solid (RRS TVC-33 and PG-02) but the boat was out of my control. 

At this point I had a nicely stitched panorama even though it is somewhat ugly in terms of how everything lined up.  But it worked and did not cost a thing. 


After a little cleanup, I had a usable, huge panorama to optimize.  For a free experiment, I will take it.

Fiat Lux!

Friday, June 15, 2012

Rick's Day in the Barrel


Rick Sammon demonstrating the "proper" technique for donning a survival suit.  Enjoy, we did.

Hope to have you join Rick and I in Alaska.

Fiat Lux!

Tuesday, June 5, 2012

LR 4 Local Adjustments - Adjustment Brush Example


A quick demonstration of an effective and efficient local adjustment workflow using Lightroom 4's Adjustment Brush feature to optimize Exposure and White Balance.  Although Lightroom is the example software the exact same process is available in Adobe Camera Raw.

Fiat Lux!

Friday, April 27, 2012

Get Low!

 4-shot stitched panorama,


In port for a day before departing again for more eagles, whales, bears, glaciers, and fun.  Rick Sammon and I along with the cruise participants had a tremendous experience and I cannot wait to share some of the images we made.  Marc Muench joined me in Petersburg for this next cruise and I am sure we will have another incredible trip.

A technique I used often during the trip was to get low.  The image above is a four shot stitched panorama shot from a RHIB (rigid hulled inflatable boat) slowly moving through the water.  To make this shot more dramatic I placed the camera about an inch above the water and shot.  Since pixels are more or less free, experiment with different approaches and angles to your photography.  Some will work and others not so much, just part of the process.


Even though the image had tremendous color I thought I might try a black and white also.  It is great having options and experimenting with both capture and your post processing.  Continuing along that process, the image below is the combination of the color version and the black and white version's luminance values.


Fiat Lux!

Wednesday, April 18, 2012

Gear and Leaving Sitka


Quick shot of the gear heading out with me today.  The great thing is all of it fit into a Think Tank Airport International except the big lenses.  It is possible to put the 400 mm (upper right) in the Airport International but not on this trip. 

Taking a Canon 5D Mk II, 7D, 1D Mk IV for bodies.  Lenses include 15mm f/2.8, 24-70mm f/2.8L, 70-200mm f/4L, 70-300mm f/4-5.6L, 100-400, 400mmf/4-5.6L  f/2.8L, and 800mm f/5.6L.  Also have a 580 EX II with battery pack, Zoom sound recorder, and I do not go anywhere without a HoodLoupe from Hoodman.


Sunset kind of fizzled but not a bad view from Sitka.

Heading out from Sitka this morning.  This is my first visit here and the town is spectacular.  The people are friendly and I won't even get started about the fresh seafood.

Fiat Lux!


Tuesday, April 17, 2012

GoPro + Lightroom 4 + P90X = Interesting Time Lapse


Just finished recording a tutorial about the LR 4 slideshow module and its timelapse functionality (part of a 14+ hour LR tutorial series).  I am biased but the LR 4 series is without equal. Nothing like a little power yoga to relax afterwards. Thought I might try a  timelapse with Lightroom 4, P90x, and a GoPro camera.

Heading south from Anchorage tomorrow for Sitka to meet the Northern Song, Rick Sammon, and the participants on our first eagle photo trip.  Will put up a shot of the gear list I have with me tomorrow.

Fiat Lux!

P.S. Please no comments on the yoga form or lack thereof.

Sunday, March 18, 2012

Canvas at Light


A couple of weeks ago we held one of my favorite classes, Canvas!  We started everything with a discussion of the entire print and output process.  Each step is important to ensure you end up with the ultimate quality of both the image and the print, from color management to media selection to pressing the final print button and everything in between.

Canvas is a hands on course and our participants made their stretcher bar assemblies, coated their prints, stretched their canvas, and did all of the finishing.  It is an involved process but everyone made it beautifully.  I am fairly certain that everyone slept well after the course.

Each canvas is printed with Canon's Lucia EX inkset on Alpha Strike matte canvas.  This combination yields the blackest black possible today on canvas!  The next day we coated the canvas with Aegis from Alpha Strike.  Everyone did great with the new, environmentally and health friendly coating.  Both the canvas and the coating are archivally certified by Wilhelm Imaging Research and when the print is finished in our unique manner, the canvas will last for generations (and then some.)

I look forward to our next canvas course later this year and also canvas instruction at Click 3!

Next month I head back to the Inside Passage for eagle, whale, and landscape photography.  I cannot wait to get back out and see what this year brings.

Fiat Lux!

Bull

Friday, January 13, 2012

On the "Radio" with Michael Stern

Had a great time with Michael Stern this morning on the Build a Better Photograph online radio/podcast show.  He also had a guest on who is an expert on search engine optimization (SEO) for photographers.  Definitely worth a quick listen.

The link below will take you to the podcast download.

Build a Better Photograph

Fiat Lux!

Tuesday, January 10, 2012

Lightroom 4 Beta Quick Look


Adobe released the Lightroom 4 Beta earlier today and this video is a quick first look at the major changes in the program that relate to still photos.  I used a fairly broad brush to cover the changes and will go more into detail as the Beta test progresses.

Unfortunately, not a single one of my main upgrade requests is included in version 4 of the program.  Regardless, there are some interesting and useful new features and functions. 

I think the new Book module will be very useful to many users.  Adobe partnered with Blurb and it is now very simple to layout a photo book design.  For those that do not use or have not used Blurb you can also export the book to PDF. 

There is also a Map module for use with geo locating or geo tagging your images. It's pretty cool.

Inside the Develop Module, the Basic tab changed (more detail in the video), there are more options for local adjustments, and CA removal has been simplified (although I have not found it to work all that well.) Soft proofing was also added to the Develop Module for use in prepping an output file.

There are some very large changes to video handling and optimization.  I did not have the time in this quick look to go through them.  But if you do video, you will like them.

I will discuss more regarding the Beta soon.

Fiat Lux!

Friday, December 2, 2011

Don't miss Photography and Photoshop: A Creative Fusion with Ben Willmore!


Push your photography way beyond what is possible "in camera" to produce fine art imagery that takes full advantage of a purely digital workflow. Only a week left to register!


Prevent snapping
When dragging a layer or selection near the edge of a document or layer, Photoshop snaps the edge of the object you’re working with to the edge of the document, layer, or selection that’s currently active. To prevent this, hold down the Control (PC: Ctrl) key after you start dragging the layer or selection and the snapping will be temporarily disabled.

Reposition selections
Click-and-drag with the Rectangular Marquee tool (M) or Elliptical Marquee tool and then press-and-hold the Spacebar to reposition the selection before releasing the mouse button. This is especially useful when attempting to create an elliptical selection
that aligns with an existing object.

Cycle through blend modes
When the Move tool (V) is active, hold down the Shift key and press the plus (+) or minus (–) key to change the blend mode of the active layer in the Layers panel. If the Brush tool (B) or a retouching tool is active, then the same keyboard shortcut will change the
blend mode of the active tool instead in the Options Bar.

Fit on Screen
If you ever copy-and-paste an image from a larger image into a smaller one, and then proceed to transform (Command-T [PC: Ctrl-T]) the resulting layer, you’ll  find that the transformation handles appear outside your view of the document (because they’re beyond the document’s bounds). When that’s the case, press Command- 0 (PC: Ctrl-0) to use the Fit on Screen command to see the transformation handles that are attached to the active layer.

Reset any tool
If any tool is acting oddly, consider resetting the tool. Right-click on the tool icon in the upper-left corner of the Options Bar and choose Reset Tool from the menu that appears.

Multiple undos
Command-Z (PC: Ctrl-Z) works fine when all you want is to undo a single step. If you need to undo multiple steps, add the Option (PC: Alt) key to the aforementioned keyboard shortcut first to be able to apply multiple undos. You can also control how many undos are available. Choose Photoshop (PC: Edit)>Preferences> Performance and in the History & Cache section, change the History States setting.

Cycle through open windows
Press Control-Tab to cycle through the open documents in Photoshop. Adding the Shift key will reverse the direction that the documents are displayed in.

Brush to Eyedropper
Any time the Brush tool (B) is active, hold down the Option (PC: Alt) key and click on an open image to choose a color within the document to paint with. This is the same as temporarily switching to the Eyedropper tool (I).

Painting on a mask
When painting on a mask with the Brush tool (B), press X to swap the Foreground and Background colors, press D to reset the Foreground and Background colors to their defaults, and use the number keys on the keyboard to change the Opacity of the active brush in the Options Bar.

Target a layer
When the Move tool (V) is active, hold down the Command (PC: Ctrl) key and click to target the top-most layer that contains information that’s directly below your mouse position. Hold down the Shift key to add additional layers to the ones that are already selected.

Monday, October 10, 2011

Important Information for all Festival Attendees


Dear California Photo Festival Attendees!
We are getting very close to festival time and we hope you are getting excited!
Here are a some important things to know and to bring on your trip for a smooth and memorable experience during the week! There is a lot of information, but it is important that you read through it all so you can make the most out of your experience at Click!

1. Make sure you print out your schedule right before you leave! 
To do this use the Export my Schedule button at the top of your schedule after logging into Click.
Each attendee has been given their own account to the festival controlled by your own user name and password. You are in charge of creating and SAVING your own schedule. We do not assume responsibility if you have not successfully saved your schedules. If you have not successfully saved your schedule and find your classes are full, we at Light and the CPF team, will do our best to suggest appropriate classes for you but are NOT obligated to add you to full classes.
**Keep your attendee schedule on you AT ALL TIMES during the festival.

2. Check-in: The Check-in station will be located at Embassy Suites. Check-in is open Wednesday 6:30am-1pm; Thursday/Friday/Saturday 7am-1pm; and Sunday 8am-10:30am.  You will receive your Festival Badge, Canon sponsored Festival t-shirt (week passes only), festival swag bag, and festival booklet at check-in.
**For those of you who are signed up for a sunrise workshop and have a day pass, you must check-in the day before to get your pass. If, for some reason you cannot make the check-in times you must contact us before the festival starts to make alternative arrangements. YOU MUST HAVE YOUR FESTIVAL PASS ON AT ALL FESTIVAL EVENTS OR YOU WILL BE ASKED TO LEAVE.

3. Workshops: When you arrive at your festival events you will need to first sign-in with the volunteer on duty. Each volunteer will have an attendee list (printed the day prior) for each of the festival events. If you are not on the attendee list and the class is full, you will be asked to leave and find another workshop to attend. We are trying to keep all of our classes below a certain number so that each attendee has a chance to have some hands-on time with the instructors.
**Please be respectful of this system. Again, if you simply show up without having added the class to your schedule, you will be turned away from full classes.

4. The Festival booklet: The Festival booklet will have important information on all of our festival events, instructors, and the local area, including GPS coordinates, announcements and other festival information needed to make a successful week for you. You will receive the booklet at check-in. No additional copies will be available so please keep it handy and keep it safe at all times.

5. A few of our events during the festival are comprised of "Part 1" and "Part 2" sessions. We understand that there are many awesome events to take, but these Part 1 sessions ARE IMPORTANT for you to participate in the following sessions. If your workshop has an intro "Part 1" please make sure you have signed up for these before going to the following sessions.
These "Part 1" sessions is where you will be given the necessary instruction to participate in "Part 2".
**Our instructors will NOT be repeating the information discussed in prior sessions out in the field as there won't be time to cover the basic important concepts during the shooting times.

6. Dinner with a Pro (DWP). If you are signed up for a Dinner with a Pro, you are responsible for chipping in and paying for the instructors tab at the end of dinner. The wait-staff will divide the bill amongst the group to make this happen equally. If you want to volunteer to solely pick up the instructor tab you may do so, just let the waitstaff know when you arrive. You will know where your restaurant will be once the festival starts. We will have additional sign-up sheets and information at the check-in desk located at Embassy suites for those who are looking to sign up last-minute.
**If an instructor is not scheduled for a DWP do not hesitate to ask us to set one up! We will make the arrangements to make it happen! Let Victoria or the Check-in volunteers know and we will do what we can to assist.

7. LIGHT Computer Lab: Some of the festival events will be held at the LIGHT Workshops computer lab. You are welcome to bring your own laptop to work on or use one of the LIGHT computers. If you choose to use a LIGHT Computer, you will need to have a PC compatible external hard drive to access and download your images. Please do not download images directly to the LIGHT Lab computers. Your images will not be saved on our machines. For more information about the LIGHT computer lab click here.

Some recommendations of what to bring::
-Valid form of picture ID.
-Your most up-to-date festival schedule.
-Laptop computer: If available, so you can work on your images at night and take notes or follow along with instruction during lectures.
-Wind jacket/rain jacket in case our coastal weather decides to give us some great clouds to photograph!
-A Hat: A sun hat and a warm hat is good to have in your box of tricks for the outdoor shoots as well as the early morning and sunset shoots, it can be windy when the sun is down.
-Sunscreen.
-Water bottle: We will also have water stations at Embassy suites for your water needs through the week.
-Snacks: You never know if you're going to be out shooting past breakfast and lunch! Don't be caught hungry.
-Camera bag: Camera, battery, CF cards, SD cards, lenses, battery charger, tripod, external hard drive and/or flash drive
-Hiking shoes: Some workshops will have a small amount of hiking, scrambling, beach walking and mud to trample through.
-Cell phone charger
-iPad and charger: Download our festival app so you can read up about your instructors throughout the week!
-Extra pair of clean shoes: to change into when entering into Light Workshops and the hotels/restaurants in the area. Don't make your mark by being muddy!
-Cash: Some restaurants in Los Osos, Cayucos and other areas only accept cash. Our raffle will only accept cash as well and you will want to get in on these awesome prizes!
-Additional Forms of Payment: We will have a few vendors at Embassy Suites like Samy's Camera, Alpha Strike Paper company, Really Right Stuff and a few others who will be able to sell items to you during the festival week. Some of our vendors will also offer special pricing for buying on site.

**Look for additional gear suggestions in the event descriptions on your schedule!

Events you won't want to miss!
Wednesday 8am: Opening Ceremony: Including some great announcements that you won't want to miss
Wednesday Afternoon: Parish Kohanim's Canon Sponsored lecture: All are welcome, open to the public
Wednesday Evening: Dinner with a Pro! Sign up online now! Suggest additional instructors to dine with!
Thursday: Festival on the beach! Just imagine 200+ photographers at Morro Bay's Rock!
Friday: Dinner with a Pro! Sign up online now! Suggest additional instructors to dine with!
Saturday: Festival Open House at Light Photographic Workshops
Sunday: Rick Sammon Keynote, Festival Raffle: prizes from Adobe, Nik, Canon and many more! And a closing presentation by Canon regional rep Jim Rose!

Festival Photo Contest
This year we are sponsored by SmugMug for our photo gallery of your images during the festival!
Please read through the terms and conditions for the gallery. You will see that it is a great way to help share your images and get noticed by our models, sponsors, instructors and fellow attendees who will be going to the site. We hope that all of you utilize the gallery and help us allow our models and horse riders to contact you for your images for their portfolio and as a thank you for giving you and our festival these incredible opportunities. Once all of the images are uploaded our instructors and team here at Light will go through them all and take your votes and our votes to announce the "Top 3 Images of the 2011 Festival" in order to win one of 3 incredible prizes. More info will be shared as we get through the week!

Please Remember: Be courteous when out shooting. We are invited guests to many of our venues and we must remember to be respectful and grateful to our hosts. Please, also be respectful and considerate to our fellow attendees and instructors around you. We are all here to have a good time, take turns and get as much education out of the week as we can!

FAQ and more information:
Utilize our  Facebook Page! Carpooling, announcements, information, more FAQ, correspondence and more are all listed on our Facebook page. You can even get a great outline on model release and property release information on our discussions board.
**This letter will be posted on our discussion board as well.

Make sure you check-out our Terms and Conditions for very important and legal information including information about model, property and event image rights and usage. Please read through it to stay informed and protected. You should also take a look at our FAQ page in case any of your questions might be on there. If you have additional questions for the staff and team here at Light please let us know.

We want to thank each and every one of you who have signed up this year. This is an amazing opportunity for us here to have these incredible instructors join us in this beautiful area and celebrate what we all love! We are happy to make it happen as it is a passion of ours. We thank you for coming this year and we hope to see you back for years to come!

-Victoria and Hal Schmitt and the Light Team.

Tuesday, September 27, 2011

Tim Grey- Your Digital Imaging Guru!

Tim Grey is a highly regarded digital imaging specialist that has been educating photographers for over 10 years. Tim's vast understanding of the various outlets for image enhancement, including Adobe Photoshop, Lightroom, and Photoshop Elements, has led him to write over a dozen books on digital imaging for photographers. He has also been published in several magazines such as PC Photo, Digital Photo Pro, and Outdoor Photographer.

Tim is returning to the Central Coast for a second year of teaching at the California Photo Festival, October 12-16, 2011. Each day Tim will be sharing essential techniques for photographers of all levels. His courses this year will include Fundamentals of Photoshop, Adobe Lightroom, a series on Time Lapse Video and more!

We've asked Tim why he is coming back to teach at the California Photo Festival for a second year...
© Tim Grey

What do you like about teaching at the California Photo Festival?
"Are you kidding?! It is a great event in a beautiful location with lots of incredible instructors and wonderful attendees. This is easily one of my favorite events to teach at."

Why should other photographers join you at this years event?
"It's quite simple. This event is in a beautiful location that photographers will love, it features the best photographers in the industry, and there are many other enthusiastic attendees to mingle with. Don't miss it!"

Learn more about Tim by visiting www.TimGrey.com

© Tim Grey 
Don't miss out on your chance to deepen your photography skills, with hands-on instruction from this digital imaging guru!

Click here to see all of Tim's classes during the California Photo Festival.

With 16 world-class instructors, over 150 events, and the beauty of the Central Coast, this year's California Photo Festival will be an amazing learning experience for all! Get your pass today at www.CaliforniaPhotoFest.com!