Sunday, July 31, 2011

Canon Speedlite Intensive- The things we do for our students

This weekend is our Speedlite Intensive workshop with Hal Schmitt. Yesterday, after a great morning of instruction on the ins and outs of speedlite photography, we headed out to Sweet Springs Nature Preserve to put theory into practice.

Victoria and Becky were good sports and stood in as the models and they were very creative with their costumes. This just shows how dedicated we here at Light are to helping our students learn!

Today, we will be using these powerful little lights to create beautifully soft light as well as edgy and dramatic light for their images.  


If you missed this course and want to improve your lighting skills we have another speedlite workshop coming up this September 22-25 with instructor Jeff Greene. Jeff's workshop "Small Flash, Big Light!" will be a great opportunity to learn small strobes and enhance your lighting skills.


Thursday, July 28, 2011

California Photo Festival Spotlight: Rob Sheppard

We are very excited to have Rob Sheppard back again for the 2nd annual California Photo Festival!
Rob will be teaching a number of techniques including Lightroom workflow, Basics of Digital Video, and Landscape Photography.

Get a sneak peak of what you can learn from Rob by checking out this great video and tip on shooting
video with your DSLR.


A lot of photographers are interested in shooting video because most new cameras include this capability. Good video needs good sound, which is not something a photographer has usually paid attention to.

First off, you need to be close to your subject, or find a way to get a microphone close. No DSLR with video capabilities has a quality microphone built into it. In addition, built-in mics tend to pick up a lot of camera noise.

For a simple, easy to work with solution, try a small shotgun mic that fits into the camera's hotshoe and plugs into the camera's mic jack (your camera has to have such a jack). I use a Sennheiser MKE-400 microphone that gives great quality at a reasonable price and is compact enough to fit any camera bag. This video was shot with that mic and a Canon EOS 60D.

Courses are filling up for the 2nd annual California Photo Festival! Get your pass today by visiting www.CaliforniaPhotoFestival.com. Early bird pricing ends August 30th, save $50 off your pass!

Wednesday, July 27, 2011

Hal Speaking in New York at B&H

Hal will be speaking in New York on the 28th of August.  He will deliver the new and improved Lessons from a Fighter Pilot that Will Make You a Better Photographer at the B&H Manhattan Event Space.  The Event Space is located on the second floor above the SuperStore.


I am biased but it should be a great time!  Click the link below for more info and to register for the discussion.

Details and Registration

Fiat Lux!

Tuesday, July 26, 2011

Moonrise over the Mountains


This moonrise capped an amazing day of photography on a recent trip.  We were shooting all day with subjects varied from glaciers to brown bears to crazy, trumpeting whales and everyone was tired.  Needless to say the moon rising over the high peaks and snow/ice fields invigorated our group and we shot a little bit longer.

I used a Canon EF 400mm f/2.8L mounted to a 7D body.  A Really Right Stuff PG-02 and Induro CT314 provided the stability.  Stability was incredibly important as I was on an anchored yacht in calm water but it was still  rocking as a result of six whales lunging, diving, and surging.  Turns out 200+ tons of whale makes a ripple or two. 

The dynamic range was fairly large and in order to get enough detail in the moon I sacrificed a little in the shadows.  I shot a bracketed sequence for HDR as well but did not prefer the image to the one you see above.  Since the shadows were a bit dark I used Photoshop to bring up the tonality in the lower portions of the image. 

When I want to brighten an area I often use a Curves adjustment layer.  Instead of moving the curve though, I switch the layer blend mode to Screen.  This brightens the image by approximately one stop.  I liked the result everywhere but the moon so I masked it out and kept the original tone.


Fiat Lux!

Monday, July 25, 2011

Tim Grey Vs. Survival Suit - Photo Adventure Alaska


A little video we shot of Tim Grey donning a cold water survival suit.  The standard is to get into the suit and be ready to get into the water in under a minute.  Take a look and see how Tim does.

Just came home from two back to back cruises in Alaska.  It just keeps getting better every time I go up there.  Hope to have you join me on one of the cruises soon.

Tim will be back with us here for Lightroom (Tim's Lightroom) in August and in October for the California Photo Fest (Photo Fest)  You can find more info about tim at www.TimGrey.com

Fiat Lux!

Thursday, July 21, 2011

Set Specific Goals: A Tip from Rick Sammon

In photography (as well as in life, of course), it's very important to set goals. If you don't set goals, how do you know where you are going?

Here is an example of what I mean.

While teaching a private workshop in Mongolia, the student and I had the opportunity to get the shot that every horse photographer wants to get: a shot of the horse with all the hooves off the ground.

To get the shot, I told the student that we had to (and you can use these tips when photographing fast-moving subjects):

1) Set our Canon 5D cameras to the AI Servo focus mode - which tracks a moving subject right up until the moment of exposure.

2) Choose the rapid frame advance mode.

3) Compose the scene (using our Canon 100-400mm IS lenses) with lots of space around the subject – so no important parts were cut off.

4) Choose a shooting position where the light was just right.

5) Carefully watch the background so that the subject was completely isolated.

6) Take several series of images to ensure at least one good shot.

7) Use a shutter speed of at least 1/000th of a second to freeze the action.

8) Shoot with both eyes open - so we could see if something was coming into the frame that would ruin our pictures.

9) Check all our camera settings (ISO, Image Quality, white balance, etc.) to get the best possible in-camera exposure.

• • •

Setting the specific goal beforehand, and going through the motions of taking the shot in our hotel rooms, we became comfortable with the process. When we got on site, we practiced the process again and again - before the show.

All our practicing made getting the shot relatively easy - again, because we set a specific goal.


So . . . I told this story to my students while teaching a workshop at the Light Photographic Workshops in Los Osos, CA. The next day were were going to photograph horses running on the beach.

Guess what? They all set goals . . . and they all got the shot.

Set specific goals, and you'll have a better chance of getting the shots you envision in your mind's eye.

Explore the light,
Rick

Rick Sammon
www.RickSammon.info

Don't miss seeing Rick Sammon and 4 more Canon Explorers of Light at this year's California Photo Festival.
Early bird pricing ends August 30th! Register today at www.CaliforniaPhotoFest.com 

Thursday, July 14, 2011

Going Back Out for More


Heading back out onto the water this afternoon for another photo tour of south east Alaska's amazing scenery and wildlife.  Took a quick a break in Petersburg after the first trip.  I needed a little time to catch up on sleep as we were shooting all day for over a week.

We had another incredible trip filled with amazing photography, incredible camaraderie, good food and wine, and pure fun. I look forward to sharing some of the images we made and the techniques used to capture them once I get back down to Cali. 

 Lion's Mane


 Humpback tail and barnacles


Rolling in


Fiat Lux!

Wednesday, July 13, 2011

Free Webinar on the 29th!


Very Old Ice with a little Topaz and Photoshop.

Hal will be presenting a webinar on the 29th of this month, noon on the West Coast, 1 PM Mountain, 2 PM Central, and 3 PM East Coast. 

He will discuss using Topaz Detail and Adjust combined with Adobe Photoshop to enhance your HDR and image optimization workflow. 

Register at the link below.

29 July Webinar

Hope to see you online!

Fiat Lux.

Friday, July 1, 2011

Color Balance Delicate Subjects


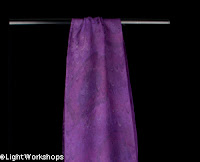
We have been approached by a local silk scarf maker who creates beautiful, one of a kind scarves. The process that you can see on her website looks very fun and very messy! She comes in with dark colored finger tips which gently caress her light fragile looking colorful scarves and says "I can't photograph the color close enough to post on my website".
She indeed came to the right place. Between listening to Kevin Ames, Jim DiVitale and, of course, master of the studio,  Hal Schmitt, they have all shown me awesome tips and accurate techniques in the studio about lighting and post production for commercial purposes.
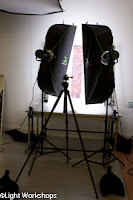
First you want to set up lights that are as balanced as you can get. We use the ProFoto D1 Air Kits along with the Creative light strip boxes. You can see in the photo I'm using 2 strips. The other softbox in the upper left is just hanging for storage purposes only.
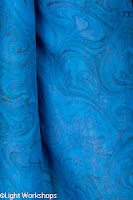
I tried the scarves on white first and got a few good images but wanted to see if black would create a more rich color. Turns out- it didn't matter once I color balanced, set my white and black points and cropped in, but I like shooting on black better. I also prefer having the option of showcasing the entire product and for me, color seems to stand out nicer with a black background.
I hung the scarves on a C-stand to pull them away from the black background to allow the light to fall off quickly behind the subject, making the black background darker. If you are ever getting to much light on the background pull the subject forward, back up and the background will naturally get darker.
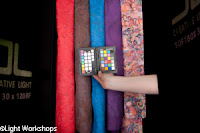
Also, make sure your camera in not in AWB (auto white balance). This could give you varying color balance in the studio depending on what and how you're shooting (thank you Hal). I put it in flash mode, but ultimately I used my trusty X-Rite color checker- incredibly important to maintain neutral, honest color in your scene.  If I changed the lights in any way I would take the photo with the color checker again in case any inconsistencies came up.
I then loaded the images into Lightroom to see how I did. Bring up the image that has the color checker into the Develop Module. In the basic tab there is a small eye dropper next to your exposure slider. Take that eye dropper and click on middle gray or 18% gray. That will help bring your color balance to a neutral state. Set your white point and your black point.  Some photographers are a bit more technical than that, but I find that this method works for me.

Sync your settings to all the images with that developed image and you are color balanced and ready to crop.

I had a little fun with some "posing" and folding of the scarves to see what the client will like, but I can tell that that is going to be the main challenge. Have you ever tried folding silk? Maybe get a wind machine... I can't wait to get started on her other few hundred once we get a good system for her images worked out.

To learn more and get more detailed workflow instruction, come to our California Photo Festival and check out Jim DiVitale and Parish Kohanim for your commercial shoots as well as Rob Sheppard and Tim Grey for your Lightroom workflow.

 Fiat Lux
-Victoria