We have finally integrated the blog with our main website! All new blog posts (and all of the old ones, too) will be found at the following location:
www.LightWorkshops.com/blog/
Hope to see you there. Just posted a demo video on the new Topaz Clarity.
Fiat Lux!

Wednesday, May 22, 2013


Wednesday, April 24, 2013
The $5 Photo Accessory (that could save your life)

As nature, landscape, and wildlife photographers we often place ourselves in locations and situations that are a bit off the beaten path. When we do go out to make photographs it is worth thinking a little about possible contingencies and how we will handle them should something occur. As the most basic precaution, I consider one of the least expensive pieces of gear a photography essential, the simple whistle.
In our modern society, we tend to take our safety or our ability to rapidly communicate for granted. Sometimes that is the case. For example, if you are out with me you know you are with an instructor who is certified in CPR and first aid, has had extensive survival training, and handles high stress situations well. More often though, most photographers think if they have their cell phone they are ready and help is just a call away. But it is amazing how often we find little to no cell coverage, a dead battery, or a situation where the phone is just out of reach.
As a pilot, I learned to plan for contingencies and to prioritize redundancy in safety or communication systems. To back up your phone one of the simplest preparations you can make is to carry a whistle when you go out to make photographs. Survival situation after survival situation has proven that a whistle is a "must have" piece of gear. Look at any list of items you should have in the field or wilderness and a whistle will be on it. Oh by the way, it is not enough to have the whistle with you, have it on your person and easily accessible with either hand.
Photographers in the field are just like hikers, campers, and other outdoor enthusiasts. Interestingly, they tend not to think of themselves as such because our hobby, passion, or profession is so dependent on high tech gear. But in most cases there is no difference. As an example, Hal has a friend in Alaska who recently almost lost his life while out in the wild. Overcoming incredible odds he was rescued and recovered, but only because of his whistle. He was in a bad position and the only way he could try and find help was to blow his whistle. He blew for over an hour and finally someone heard and investigated. They joked afterwards that his whistle was the $2 accessory that saved his life. Pretty amazing considering the guy had thousands of dollars of other gear with him. It is also worth mentioning that Hal's friend broke one of the cardinal rules, he went out alone without using the buddy system (the topic of another post.)
So when you are packing up the camera, lenses, and tripod, make sure to put a simple whistle in your pocket. If you ever run across him in the field, ask Hal to see the four essential pieces of shooting gear: Hoodman HoodLoupe, cell phone for DOF calculations/comms, a good knife, and a whistle.
Always remember making the photograph is optional but making it home is mandatory. (Paraphrased from my mountaineering buddies.)
Fiat Lux!
Tuesday, April 16, 2013
Lightroom 5 Beta Features - Hal's Favorites
The three part video demonstrates and discusses my favorite features of the Lightroom 5 beta. The full feature list is below but my favorites are: Improved spot removal and retouching, the Radial Filter, improved crop overlay, import functionality, Smart Previews, and Upright for auto lens corrections.
In the video I reference additional keyboard shortcuts for the Spot Removal and Radial Filter tools. The shortcuts are shown below.
Spot Removal (Q)
-New circle spot (auto-find source): Single click
-New circle spot (user-defined source): Ctrl drag
-New circle spot (scale from center): Ctrl Alt drag
-New circle spot (scale from anchor): Ctrl Shift drag
-Connect two circle spots: Single click + Shift click
-Increase circle spot size: ]
-Decrease circle spot size: [
-New brush spot: Click drag
-Constrain brush spot to straight line: Shift drag
-Cycle Spot Type: Shift + Q
-Auto-Find New Source: /
-Visualize Spots: A
-Hide Spot Overlays: H
-Delete spot: Alt select
-Delete selected spot: Delete
-Delete multiple spots: Alt drag select
Radial Filter (Shift + M)
-New elliptical mask: Drag
-Apply new mask to crop bounds: Ctrl double-click
-Expand existing mask to crop bounds: Ctrl double-click on mask
-Duplicate: Ctrl Alt drag
-Invert elliptical mask: ’ (apostrophe)
-Hide/show guide: H (short press)
-Hide guide on press, show on release: H (long press)
-Apply & dismiss: Double-click on photo
-Delete selected elliptical mask: Delete
Major feature list
-Smart Previews
-PNGs now supported in Lightroom
-New fullscreen mode. F key is true full screen. Legacy full screen mode is Shift + F
-Configurable grid overlays for Loupe view
-New searchable criteria for Smart Collections - File size, Image size, Image bit depth, color channels, Color mode, Color profile, Smart Preview statsus, and PNG
-Advanced healing brush for Spot Removal
-Radial Filter
-Upright auto lens corrections
-LAB color readout on histogram. Right click on the histogram for a flyout menu.
-New book features
I will do additional videos to show some of these upgrade features.
Fiat Lux!
Wednesday, March 20, 2013
Computer Specs
One of the most common questions we field concerns computer technical specifications. People often ask how they should equip and configure their next machine for digital photography purposes (often phrased as Photoshop or Lightroom purposes.) So let's talk computers for one little post.

LIGHT recommends the current specs as an excellent configuration. Off the side I will add comments and fall back positions.
Processor - Core i7 quad core. We are currently using the Core i7 3770 at 3.4 GHz. Although the two programs listed above perform best with a fast processor a good fall back position is found in the Core i5 3xxx options. We could go on a bit further regarding hyper threading or adding additional physical cores but we have not seen a huge requirement in typical digital photography needs. If you push a bit beyond the ordinary with your work, take these into consideration.
Memory - 16 GB. Most baseline systems these days are equipped with 8 GB of RAM but 16 will give you a nice performance boost. There normally is no need to get the fastest clock speed RAM available unless you are also going to play games. On the lower side, go with 12 and on the upper top out at 32.
Graphics - Dedicated video card. There are a huge number of options here but start with an nVidia or ATI set with at least 1 GB. You may be tempted to go with the higher end cards but you will not see a huge benefit unless you are working with video or gaming. If you are thinking of running two or more high resolution displays you may want to upgrade as well. With all that said, the integrated graphics on the Core i5 and i7 (from 2500-4000) are pretty good. You might be surprised how well they work. The nice thing is you can always add a dedicated video card later if you need to.
SSD - Solid state drive for programs and speed critical data. SSD prices have dropped significantly and the performance boost is really nice. An SSD is not a must have but a majority of our clients enjoy the faster start up times and fast program launches. At a minimum go with a 128ish GB drive. You can go bigger (my laptop has a 512 GB SSD) but the drives will be a bit pricier.
Hard drives - At least two, one for data and one for scratch/working space. Hard drive prices have come back down so we like at least 1 TB for storage and 320-500 GB for scratch. Try for the 7200 rpm drives and if you want faster there are 10k and 15k rpm available.
Ports - USB 3.0 and Thunderbolt. Odds are you will connect external storage to your machine and you want it to be fast. At the top of the list is the Thunderbolt connection, huge speed and flexibility but not as many peripheral/storage choices and much more expensive. Not nearly as fast but almost ubiquitous and priced right, the USB 3.0 connection is a necessity. Definitely think about these options as one of the most frustrating things is waiting for your machine to communicate with external storage (Lightroom users especially.)
Fortunately, these specs are not too far out of reach for most folks. Although you may pay a bit more for the system, configuring it properly will save you big in time and workflow efficiency.

For the somewhat adventurous, LIGHT recommends building your own system. I recently built the computer shown in the pictures above for about $1275 and two hours of my time. It has all of the options listed above and is unbelievably fast. For those who may be thinking Thunderbolt and Windows? My machine is Windows and has two Thunderbolt ports along with eight USB 3.0 and a handful of USB 2.0. Depending upon how and when you source your parts the do it yourself option can save you quite a bit. More importantly, the process forces you to learn about the options and make smart choices as to what is best for your needs and workflow.
Any questions, comments, concerns, or addtions add a comment or email me at hal@lightworkshops.com.
Fiat Lux!
Recent build in the LIGHT studio.
Processor - Core i7 quad core. We are currently using the Core i7 3770 at 3.4 GHz. Although the two programs listed above perform best with a fast processor a good fall back position is found in the Core i5 3xxx options. We could go on a bit further regarding hyper threading or adding additional physical cores but we have not seen a huge requirement in typical digital photography needs. If you push a bit beyond the ordinary with your work, take these into consideration.
Memory - 16 GB. Most baseline systems these days are equipped with 8 GB of RAM but 16 will give you a nice performance boost. There normally is no need to get the fastest clock speed RAM available unless you are also going to play games. On the lower side, go with 12 and on the upper top out at 32.
Graphics - Dedicated video card. There are a huge number of options here but start with an nVidia or ATI set with at least 1 GB. You may be tempted to go with the higher end cards but you will not see a huge benefit unless you are working with video or gaming. If you are thinking of running two or more high resolution displays you may want to upgrade as well. With all that said, the integrated graphics on the Core i5 and i7 (from 2500-4000) are pretty good. You might be surprised how well they work. The nice thing is you can always add a dedicated video card later if you need to.
SSD - Solid state drive for programs and speed critical data. SSD prices have dropped significantly and the performance boost is really nice. An SSD is not a must have but a majority of our clients enjoy the faster start up times and fast program launches. At a minimum go with a 128ish GB drive. You can go bigger (my laptop has a 512 GB SSD) but the drives will be a bit pricier.
Hard drives - At least two, one for data and one for scratch/working space. Hard drive prices have come back down so we like at least 1 TB for storage and 320-500 GB for scratch. Try for the 7200 rpm drives and if you want faster there are 10k and 15k rpm available.
Ports - USB 3.0 and Thunderbolt. Odds are you will connect external storage to your machine and you want it to be fast. At the top of the list is the Thunderbolt connection, huge speed and flexibility but not as many peripheral/storage choices and much more expensive. Not nearly as fast but almost ubiquitous and priced right, the USB 3.0 connection is a necessity. Definitely think about these options as one of the most frustrating things is waiting for your machine to communicate with external storage (Lightroom users especially.)
Fortunately, these specs are not too far out of reach for most folks. Although you may pay a bit more for the system, configuring it properly will save you big in time and workflow efficiency.
Pure fun building this little beast of a Photoshop machine.
Any questions, comments, concerns, or addtions add a comment or email me at hal@lightworkshops.com.
Fiat Lux!
Monday, February 4, 2013
Add Two Steps
Recently, we have seen an increase in photographers using the High Pass filter in Photoshop to add edge contrast and texture detail to their images. This is a cool technique but when you use the filter remember to add two more steps; desaturate your layer before applying the High Pass filter and always target your filter effects with a mask.
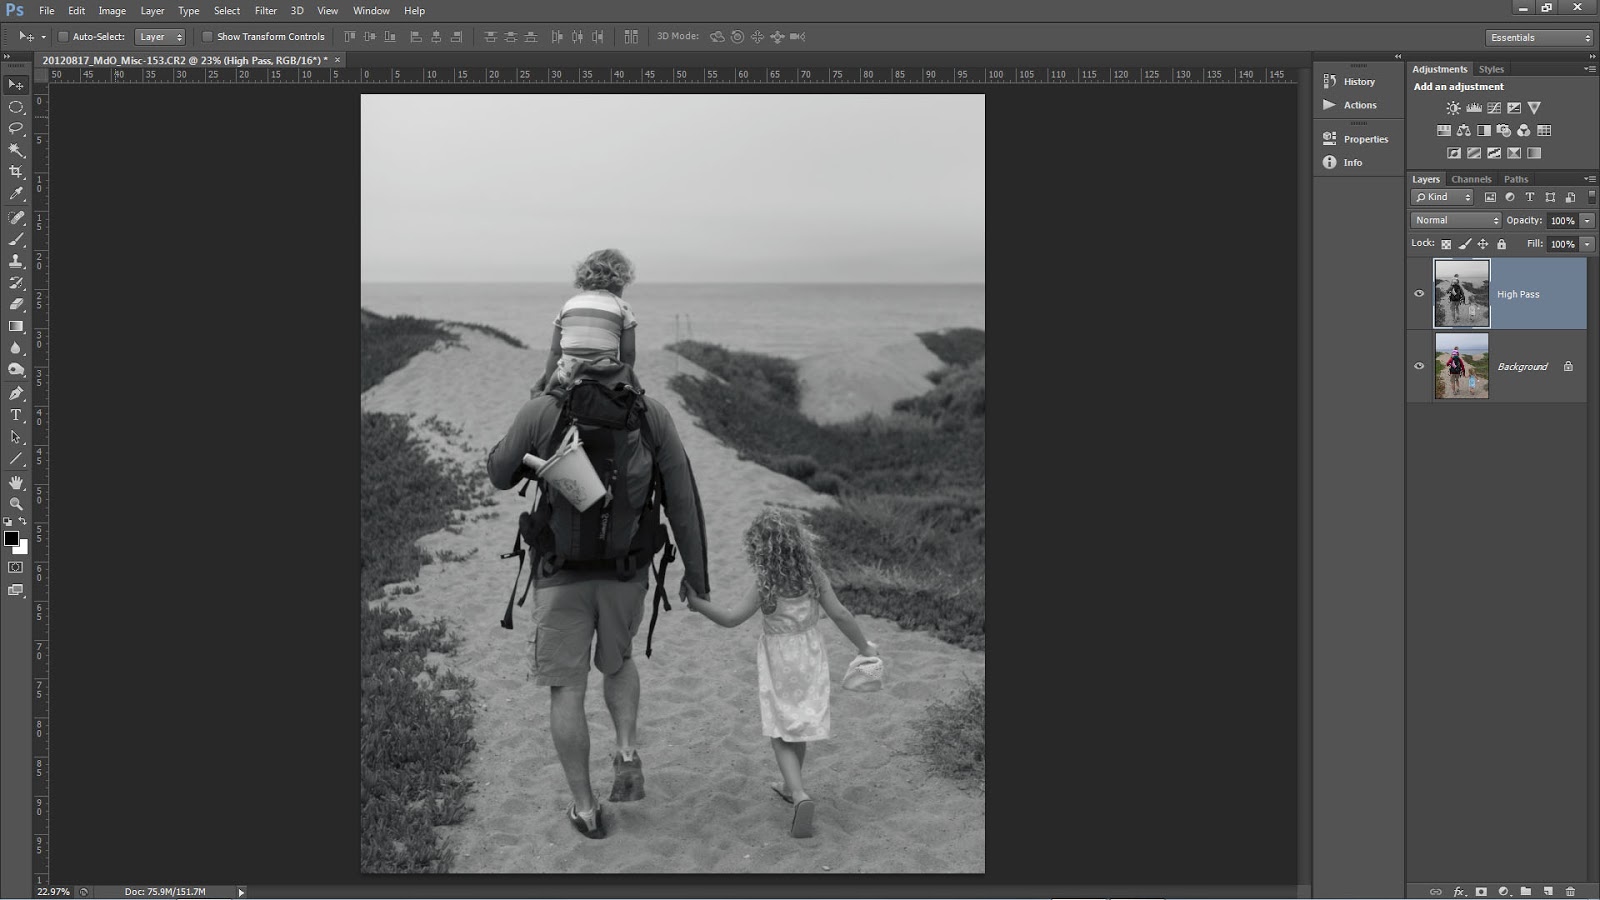
You may have seen or heard many photographers talking about how they sharpen only on the Lightness channel in L*A*B* or they make sure to change the blend mode of their sharpening layers to Luminosity or they use the Fade option with a Luminosity blend mode change. There are many good reasons to make these switches and we suggest you use them in your sharpening or contrast boost workflow. For the same reasons, when you use High Pass desaturate.
It is a common misconception that when you run the High Pass filter you are left with an image that is baseline 50% gray and only shows brighter or darker tonality at the edge contrast and texture detail. Instead, High Pass may retain color information from the original image. This can lead to color shifts or colored fringe along a high contrast edge similar to haloing.
 Our workflow is to copy the background layer or stamp visible if you have a multi-layer document and then desaturate via Image>Adjustments>Desaturate this can also be executed with the keyboard shortcut of CTRL+Shift+U for Windows or CMD+Shift+U for Mac.

For those who want to play or have more control you can

Fiat Lux!
It is a common misconception that when you run the High Pass filter you are left with an image that is baseline 50% gray and only shows brighter or darker tonality at the edge contrast and texture detail. Instead, High Pass may retain color information from the original image. This can lead to color shifts or colored fringe along a high contrast edge similar to haloing.
Notice the remaining color.
- Run a Black and White adjustment instead and modify the tonality of the color arcs.
- Use multiple layers of High Pass set to different radii.
- Leave the color in your layer in order to generate a color boost. Watch out for fringing!
- Use the filter on a Smart Object so you can make changes.
- Invert your filter layer to decrease contrast and texture detail.
- The sky especially blue sky.
- Areas of constant color or tone.
- Flowing water.
- Out of focus areas.
- Human skin especially female skin.
Wednesday, January 16, 2013
2013 Metadata Presets Update
I am certain you have already done this but just in case you have not make sure to go in and modify your metadata presets. This is also a great time to verify you made a new parent folder reflecting the new year.
In the quick video Hal shows the update process for Lightroom and the Bridge.
Annual Metadata Preset Update (2013 Version) from Hal Schmitt on Vimeo.
In the quick video Hal shows the update process for Lightroom and the Bridge.
Annual Metadata Preset Update (2013 Version) from Hal Schmitt on Vimeo.
Tuesday, January 15, 2013
LR Videos Streaming Free
If you have not seen this announced yet, Elephorm is streaming Hal's Lightroom training videos free until the 31st of January.
We are biased but there is no better Lightroom training available and FREE for the next two weeks makes it even better.
Elephorm Lightroom
Have fun and Fiat Lux!
We are biased but there is no better Lightroom training available and FREE for the next two weeks makes it even better.
Elephorm Lightroom
Have fun and Fiat Lux!
Saturday, December 22, 2012
Impromptu Flash Accessory for Holiday Family Portraits!
Packing for a Christmas or family holiday trip can be a bit hectic...sometimes you might even forget a modifier for your Speedlight.

Now what you are about to see is what we like to call "bush league" but the modifier/soft box works extremely well and you can definitely find the materials at grandma's house! Depending on the size of your flash you can also create any size you want.

For a very simple modifier here are the items you will need:
All of the pictures below show the entire process. Start by cutting out the inside or flat portion of the plate. Try to keep as much of the cut out portion because you will use it later in the process. The ring you are left with is the frame for the modifier.

Cut or fold the tissue paper into a square about the same size as the frame/ring. One piece will do just fine but if you want to make the light more even, add an additional layer or two. It is always a trade-off though when you add layers. The light becomes more even but you will lose more of the flash's effective power. For example, when I made this example, I used four layers of tissue and lost approximately 2.5 stops of light.

 Tape the tissue to the frame. You can get all "gucci" with it but I used four pieces and have a nice, tight surface.

 From the cutout portion of the plate, fashion a rectangle or two. Put onto the end of your flash to act as an attachment collar.

 With the other plate cut out two rectangular supports. Tape one end of each to the attachment collar on the flash. The final step is to tape the supports to the plate/modifier. When you put the flash on your camera, I like to change the zoom to Manual at about 50mm.

Simple but effective. When we talk about light's quality of being either hard or soft, the only factor that matters is the size of the light source relative to your subject (this is, of course, controlled by the size of the light source and the distance from the source to the subject.) The bare surface area of the flash is @ 3.7 square inches. After adding the "bush league" modifier the surface area is @64 square inches. That is an increase of 17X. One of the biggest issues with many modifiers is they do not really change the surface area by that much. But 17X? That is effective!
Another nice feature of this homemade version is it is extremely light. Whenever you add an attachment to your flash, always consider weight. If the modifier is too heavy or has a lengthy moment arm you can easily damage your flash.


Hal scooting with his homemade modifier.

- 2 plastic or paper plates (you can choose dinner plate size or a dessert platter depending upon the size of your flash and the "softening" power you want)
- Gift box tissue paper (white is most most versatile but a colored tissue will be just like a colored gel)
- Tape
- Scissors
All of the pictures below show the entire process. Start by cutting out the inside or flat portion of the plate. Try to keep as much of the cut out portion because you will use it later in the process. The ring you are left with is the frame for the modifier.


 Tape the tissue to the frame. You can get all "gucci" with it but I used four pieces and have a nice, tight surface.
 From the cutout portion of the plate, fashion a rectangle or two. Put onto the end of your flash to act as an attachment collar.
 With the other plate cut out two rectangular supports. Tape one end of each to the attachment collar on the flash. The final step is to tape the supports to the plate/modifier. When you put the flash on your camera, I like to change the zoom to Manual at about 50mm.
Simple but effective. When we talk about light's quality of being either hard or soft, the only factor that matters is the size of the light source relative to your subject (this is, of course, controlled by the size of the light source and the distance from the source to the subject.) The bare surface area of the flash is @ 3.7 square inches. After adding the "bush league" modifier the surface area is @64 square inches. That is an increase of 17X. One of the biggest issues with many modifiers is they do not really change the surface area by that much. But 17X? That is effective!
Another nice feature of this homemade version is it is extremely light. Whenever you add an attachment to your flash, always consider weight. If the modifier is too heavy or has a lengthy moment arm you can easily damage your flash.

Thursday, December 13, 2012
The Ultimate Stocking Stuffer

This is the ultimate stocking stuffer for any photographer. Honestly, this is a multi-tool that everyone should have photographer or not. As you know I am very picky and demand my gear be the absolute best. This multi-tool is the real deal. The quantity and variety of bits in this kit is awesome. I started using it about three weeks ago on my tripod but soon found out it works on just about everything from camera, to eye glasses, to computer, etc. With 22 bits in hex, torx/star, flat, and cross this is my primary tool to adjust most small gear and equipment.

The entire kit packs very light and compact and is now a permanent addition to my bag. For those who have a Really Right Stuff Tripod in either the 2 or 3 series the tool even fits right into the center column, so it is always available. There are other cool uses as well that you can check out if you follow the link below.
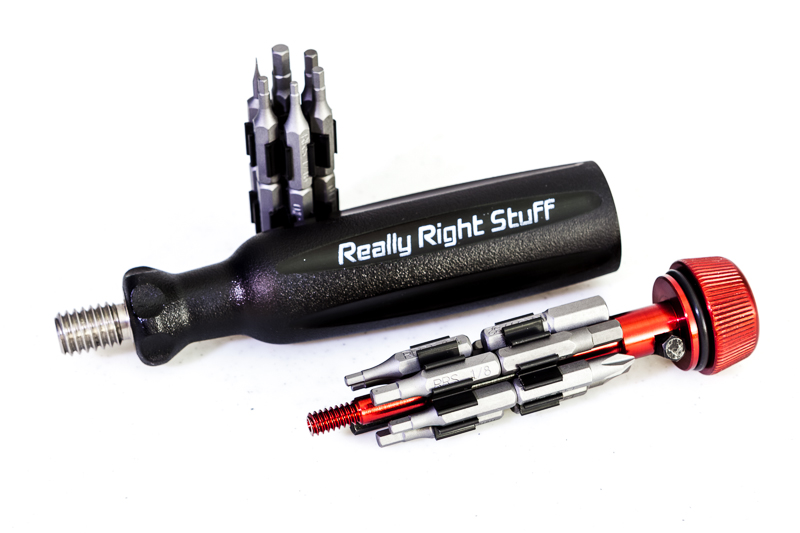
Really Right Stuff calls this the MTX and you should really have one. Check it out at the following link MTX.

For full disclosure, I am not paid to recommend this gear and the link above is not an affiliate link. I use RRS because everything they make performs for me in the studio and in the field.
Fiat Lux,
Bull Schmitt
Wednesday, December 5, 2012
While I was looking over some images for yesterday's blog I found this sequence. Thought it would make a nice simple time lapse.
Gorgeous Alaska day and a slow humpback whale dive. Shot the sequence on my photo tour with a Canon 1D Mk IV and an EF 70-300 4.5/5.6L.
Put the time lapse together with Lightroom. Recommend the 720 quality option.
Tuesday, December 4, 2012
The Test Shot

Killer whale attacking a Steller's sea lion
There are many shots that require you to react extremely quickly in order to capture what you want such as these whales I photographed during one of my Alaska workshops. One of the most successful techniques you can use is what I call the "test shot."
The test shot has two primary objectives, exposure and rough focus. When taking a test shot your actual subject is usually not in the frame. For example, these whales break the surface in less than a second and if I wait until the subject is in the frame to find exposure I will be less than successful most of the time. If instead I anticipate where the subject will appear or what the event will look like, I can figure out exposure ahead of time very easily. I can also pre-focus so that the precision focus process is much faster once my subject is in frame and my auto focus sensors are properly placed.

A humpback whale going for it in front of Devil's Thumb
When you make a test shot, it is often times not adequate to set exposure based on the environment/background. You need to anticipate what will drive the exposure. For example, in all three whale shots the critical elements are the white water and the white fins/body. If I make a test shot of just the water and set exposure without considering the extreme tonal difference between water and white water/whale, I will, most likely, blow the highlights in the shot. When I made the test shots for these images, I set my exposure based on white not on the water/background. You can use rules of thumb to underexpose for the predicted highlights but I prefer actual meter data, when I can get it. In these examples, I changed my camera's metering mode to Spot and then I set exposure off of something white. I actually used the boat's wake but a white sheet of paper would work as well. As long as the white is under the same lighting conditions as my subject, my exposure will work perfectly.

.1" earlier
This process is simpler when shooting in Manual exposure mode but can be used with Aperture or Shutter priority and auto exposure lock. Once I have my exposure, I pre-focus to the expected subject distance and take a test shot and evaluate. With my exposure and pre-focus set, I am much better prepared to quickly execute the actual shot when the action occurs.
I use test shots all the time to give myself the advantage when something might happen and my reactions have to be perfect. When I am out photographing, people find it odd that I am shooting every now and again at what appears to be nothing. But my "strange" behavior pays off. If you stack your deck ahead of time you will enjoy success in a more consistent and repeatable manner.
Fiat Lux!
Friday, November 30, 2012
Topaz Webinar with Hal
Hal will be leading another webinar and discussion for Topaz Labs next week. Click the link below to register and join Hal on the 6th of December at 4 PM CST.
Total Workflow with Topaz!
Fiat Lux!
Total Workflow with Topaz!
Fiat Lux!
Wednesday, October 31, 2012
Topaz DeNoise Webinar is Available on YouTube
My recent Topaz DeNoise webinar is available to watch on YouTube.
Enjoy.
Fiat Lux!
Wednesday, October 24, 2012
Tiny Planet Mania

It seemed that during the California Photo Festival I could not swing a cable release without hitting a few people discussing or playing with the app called Tiny Planet. The app manipulates an image in a pretty cool way and the result often resembles a small planet in the center of a square frame.
Although the buzz was about the phone app, the process has been around a while and there are many websites and blogs dedicated to the effect. So for all those who do not have the app or if you have it but want to apply a similar effect to your big photos, here is the quick way to do it in Photoshop.
Oh by the way, Jill Waterbury, Light's in house iPhoneography instructor, introduced just about everyone to the app and also requested the Photoshop method. So here it is for Jill and anyone else who wants to play around with their images to have fun and create.
The Photoshop method works best on panoramic images, especially 360 degree panos, but can be done to any image. To demo the process, I will start with a 360 pano I shot during Click.

The basic process is to open the image in Photoshop and then to apply a simple filter called "Polar Coordinates." This filter is found in the Filter>Distort menu. Of note it will only be available with 8-bit images so if you have a 16-bit workflow you will have to change to 8. (Go to Image>Mode>8-bits) Hand in hand with the depth change you may need to convert the image to a smaller color space. For example, Light recommends a 16-bit workflow using ProPhoto RGB. If you go from 16 to 8, you should also convert to either Adobe RGB (1998) or sRGB via Edit>Convert to Profile.
When you choose the Polar Coordinates filter you see the dialog below.

Make sure to select the "Rectangular to Polar" button. When you apply the polar coordinates filter you get the following image.

There was obviously a change but the filter created a "down the rabbit hole" effect and it is not a square frame, not what we are looking for. Interestingly, this effect is found in the app but is called "tiny tube." So before you apply the filter, you need to do two other steps.
First, go to Image>Image Size. In the dialog box, make sure resample image is checked but uncheck Constrain Proportions.


Your image will look distorted but go with it.

Next go to Image>Image Rotation>Flip Canvas Vertical and the image will flip upside down.

Now we are ready to go back to the Filter>Distort>Polar Coordinates. The result is a tiny planet-like square image.
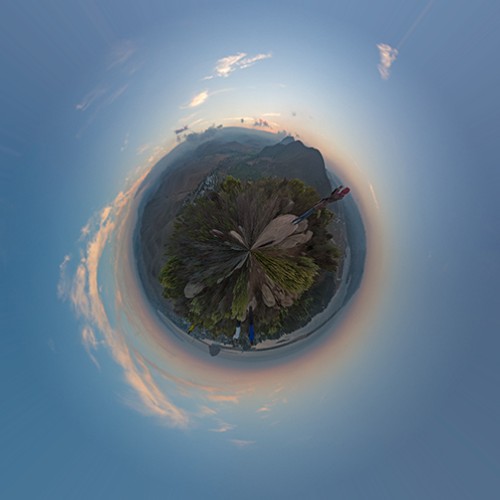
If you have a 360 degree pano all you have to do is the process described above. If you do not have that type of image you can still do the process. The best types of images to use are those with a
panoramic aspect ratio, images with little detail on the top and bottom, and a strong linear shape but with vertical development in the middle, vertical third of the frame. Even with the perfect image, there may possibly be a few more steps after you apply the filter. So here goes with a normal image.
panoramic aspect ratio, images with little detail on the top and bottom, and a strong linear shape but with vertical development in the middle, vertical third of the frame. Even with the perfect image, there may possibly be a few more steps after you apply the filter. So here goes with a normal image.

This image does not have a panoramic aspect ratio (in general vertical images are more challenging to use than landscape) but there is limited detail at the top and bottom of the frame with a linear shape along the horizon displaying strong vertical development.
For any image that is not a 360 degree panorama, the first step is to make sure the horizon is level. After that do everything we did above. You will get the following intermediate images.


Just as before run the Polar Coordinates filter and you get this.

There is the tiny planet but there is a seam at the top because our image ends did not match perfectly. No worries, do a quick retouch and rotate the image to the desired angle and you get this.


A small planet with a volcano or two. This effect can be used on all sorts of images so have fun. Here is one more for the fun of it, this is a composite of a tiny planet and a tiny tube from the same image.

As you play remember to try the opposite effect. If you do not flip the image you can make a tiny tube like this one. (the opposite of the image at the top of this post.)

Fiat Lux!
Monday, October 1, 2012
Long Exposures in the Midday Light
It is difficult to imagine that in a day when all
photographers are pushing the manufacturers for higher and higher ISO that at
the same time there is a need for lower and lower ISO. The truth is I enjoy
shooting 30 sec and longer exposures during the daylight hours. There is no way
to reduce the ISO low enough to create such long exposures while the sun is up.
The only way to create this long shutter speed is with the use of neutral
density filters. If you’re like me and
want to attempt this very cool look, I recommend the new Lee ND filter called
“The Big Stopper”. This filter requires their holder but offers 10 stops of
density to help you create those long exposures.
 |
| Before Filter |
 |
| After Filter |
Life is short, take pictures!
Marc Muench
Tuesday, September 18, 2012
High Angle Shooting Tip!
By Rob Sheppard

 The obvious answer is to get higher. You can see the difference
in these two shots from Death Valley showing a creosote bush in the Eureka
Dunes area. You would not think that the main bush is the same one! The first
shot is from a high camera angle, whereas the second one is shot from standard
tripod height. The first shot gives an interesting foreground to background
relationship that shows how the creosote bush fits into this landscape. The
second is hardly worth considering because the bush is too high in the
landscape. (The green of the creosote bush is better in the first image because
I used Viveza 2 on that image, but not on the second.)
The obvious answer is to get higher. You can see the difference
in these two shots from Death Valley showing a creosote bush in the Eureka
Dunes area. You would not think that the main bush is the same one! The first
shot is from a high camera angle, whereas the second one is shot from standard
tripod height. The first shot gives an interesting foreground to background
relationship that shows how the creosote bush fits into this landscape. The
second is hardly worth considering because the bush is too high in the
landscape. (The green of the creosote bush is better in the first image because
I used Viveza 2 on that image, but not on the second.) So how did I do this? Did I drive a truck onto the dunes? Bring
a big heavy ladder with me? Nope. I used my tripod, but in a unique way that
works very well with digital photography.
So how did I do this? Did I drive a truck onto the dunes? Bring
a big heavy ladder with me? Nope. I used my tripod, but in a unique way that
works very well with digital photography.
Did you ever see the photos of Ansel Adams standing on top of his car? He had a platform built that allowed him to set up a camera
and tripod on his car to gain some height. A challenge we often face when
photographing landscapes is that we are too low. Too low means we have to shoot
through foreground stuff that is distracting or we can't get a good perspective
on the scene. We can't get above important objects so they become truncated and
we cannot show their real relationship with the scene.


 The obvious answer is to get higher. You can see the difference
in these two shots from Death Valley showing a creosote bush in the Eureka
Dunes area. You would not think that the main bush is the same one! The first
shot is from a high camera angle, whereas the second one is shot from standard
tripod height. The first shot gives an interesting foreground to background
relationship that shows how the creosote bush fits into this landscape. The
second is hardly worth considering because the bush is too high in the
landscape. (The green of the creosote bush is better in the first image because
I used Viveza 2 on that image, but not on the second.)
The obvious answer is to get higher. You can see the difference
in these two shots from Death Valley showing a creosote bush in the Eureka
Dunes area. You would not think that the main bush is the same one! The first
shot is from a high camera angle, whereas the second one is shot from standard
tripod height. The first shot gives an interesting foreground to background
relationship that shows how the creosote bush fits into this landscape. The
second is hardly worth considering because the bush is too high in the
landscape. (The green of the creosote bush is better in the first image because
I used Viveza 2 on that image, but not on the second.)
 So how did I do this? Did I drive a truck onto the dunes? Bring
a big heavy ladder with me? Nope. I used my tripod, but in a unique way that
works very well with digital photography.
So how did I do this? Did I drive a truck onto the dunes? Bring
a big heavy ladder with me? Nope. I used my tripod, but in a unique way that
works very well with digital photography.
I extended the tripod legs to their max, then brought them
together. I set the self-timer of the camera to 10 seconds, set up my exposure
and focus appropriately (in this case, aperture priority and auto focus),
pressed the shutter, then hoisted my camera on tripod over my head. I held it
until the shutter released, then brought it back down.
The great thing about digital for this technique is that you can
instantly see what you got and make revisions. You may need to hold the camera
straighter, aim a little higher or lower, and so forth. In just a few shots, I
had my shot. (I did have to do some minor cropping for a slight straightening
-- it can be hard to get the camera perfectly level when doing this, but then
the Crop Tool in Lightroom makes this easy to fix!).
Obviously, you have to watch your shutter speed doing this or
risk unsharp images due to camera movement during exposure. With a wide-angle
lens, you can shoot at a slower shutter speed and still get sharp images,
though this is inherently an unstable camera position, so you can't go too low.
With a wide-angle like this, it is easy to use f/8 or f/11 to allow a faster
shutter speed, plus I will use a higher ISO as needed, too.
So the next time you are in front of a landscape that is giving
you problems, try hoisting your camera overhead! It can be worth a try just to
see what the landscape looks like from up there.
This last picture includes a shadow of me hoisting that camera
overhead to get some unique views of the tufa formations at Mono Lake that
actually show Mono Lake as part of the scene.
-Rob Sheppard
Tuesday, September 11, 2012
Denoise Video
A recent video showing my Topaz Denoise and Detail process.
Thanks for the questions that help generate these videos!
Fiat Lux!
Thursday, September 6, 2012
Ambrosia Coating: Rolling it on.
Ambrosia Coating: Application to Canvas with a roller. from Hal Schmitt on Vimeo.
A quick video showing the process and disussing tactics, techniques, and procedures for effective canvas coating with a roller. For this demo, I used a Canon ipf 6350, Alpha Strike's new Lucia/Lucia EX ready canvas, and Ambrosia.
With this new coating you can also coat water resistant photo and art papers;archival protection without glass or glazing, very, very cool. More videos on those soon.
For all of the product specs check out Ambrosia.
Tuesday, August 28, 2012
David Wells on Travel Photography Tips
Guest Blog by David Wells
 David Wells, one of our leading festival instructors at the California Photo Festival this year gave us a great article on something a lot of travel photographers have to go through. We hope you enjoy and come to learn more at his sessions in October!
I work a lot in the developing world, partly because my wife is from India. Before we met, I was also working a lot in the nether-reaches of the globe because personal projects and paying work took me there.
 A friend just asked me if I had any tips he could incorporate into his working process as he heads off to Mexico. The challenge for me in writing this blog was not coming up with advice but rather with figuring out how to explain those things that I do almost automatically when I am photographing in places like India, Guatemala, Vietnam or Turkey.
Half of the preparation involves gear, planning and other logistics which is the easiest to define and write about.
The other half is about attitude and behavior.
In some ways it is more important than the gear issues, but it is also harder to define and then write about.
 First, get camera insurance. Make sure it covers you around the globe. Be careful about add-ons to your current home owners insurance. The first thing your insurance company will do if you file a claim is google your name and see if you are a professional. I did just that for the friend who asked the question that prompted this blog. Sure enough, he shows up in Linked-in as a pro so.... The insurer will then point out how 99% of all policies do not cover pros and then you are stuck. I have blogged on The Wells Point about the types of insurance you should carry so I will direct you to that.
I have seen many people who put black tape or use a black marker to cover the name the camera. I don’t actually do that. I would get rid of the screaming logos on the camera straps. I would encourage you to do that and get straps that are as supportive as possible. I have blogged about why I use Black Rapid straps, which is simply because they solve my particular set of problems. I tend to walk with two cameras, one on each shoulder. When I am moving they are usually pulled together with one hand so they gather in front of my gut. I use a kind of a fanny pack but it is always turned in FRONT, not in back. I usually wear some simple cotton shirts that I have custom made in India. They are thin cotton which helps in the hot weather. They are also extra wide at the waist so they can easily be pulled over the fanny pack. When I am in “stealth” mode, I look extra wide (fat) but much of my gear is hidden away.

As I am walking I usually turn the lenses inward rather than outwards. I do that as much to avoid hitting things as to prevent problems. Also, kids LOVE to touch shiny lenses, so having them turned in keeps the lenses finger print free. I stay away from lens vests or anything else that screams pro. I work very hard to look like a round middle aged Western tourist. I frequently use a pair of simple canvas/cotton bag that was a gift from my mother in law. Putting one inside the other means I have one main pocket and two side pockets. I have a huge advantage over many people in that I use smaller simpler cameras, my Olympus OMDs. If I had something like a Canon 5D or one of the giant Nikon DSLRs I am not sure what I would do (except maybe buy a smaller camera for traveling.) You can read about my general travel and image archiving approach at BHPhotoVideo Part 1 and BHPhotoVideo Part 2
 After the question of gear is the issue of dress. If you are not appropriately dressed, you may feel uncomfortable. If you fell uncomfortable, you will not be as successful in your photographing. I would avoid plunging necklines, bare shoulders and clothes that are too tight or short. At my mother in-law’s house in India, anything goes.
I usually wear shorts inside, but I am careful not to dress inappropriately when I am out walking on the streets. There people will stare, especially at foreigners, doubly so foreign women. Think of it this way, if you want to connect with people it makes them more comfortable to wear clothes that are not too different from what they know. Because some of the streets are a little gross, I have taken to wearing the newer sandals which can be hosed down if I step into something less than desirable.
I use two cameras for many reasons, including the fact that changing lenses or flash cards takes a lot of concentration so I try to avoid doing that in the middle of a public place. Two small cameras, like the Olympus OMDs generates some curiosity, but not as much as a 5D with a giant lens and an even more threatening lens hood. I would definitely lose (or minimize the use of) the giant butterfly lens hoods, especially on the longer telephoto lenses. Those are threatening to people on the other end of the camera and they suggest “pro” to a potential thief.
 The key to working in the developing world, in my experience is what is often called “situational awareness.” Obviously it means being aware of what is going on around you, both in terms of things to photograph and potential problems. While I am constantly looking around to see what is happening, I also take clues from the people around me. The classic example of this is when I am doing night photography I will photograph in a night market until it starts to empty out. When the locals go home, I do as well. Similarly, when the locals step back because a loud, drunk or annoying person is coming, I follow their lead.
I never use an iPod or any kind of music player when I am working. Never. There are too many things going on around me to pay attention to. Zoning out with music is the surest way to get into trouble (or just miss great picture.)
My first step when something looks like it may go wrong is to make eye contact with the person in question. 99.9% of the time they are curious, want to be helpful, want to sell you something or are begging. I see them, they know that and that gives them pause. I try to smile too. It makes a world of difference. Usually that is enough.
The next step is to subtly turn my body so as to block them and protect my gear. After that I pull all my gear in closer to me. The last step is to move on to another location. No photo is ever worth the potential safety issue so, I move on and to date I have been very, very lucky. The process of extracting myself from a situation that I am unsure of usually means nothing more than stepping out of the situation, ideally so I end up with my back against a wall.
 I pause, reassess the situation and most times I will dive back in.
Again, I always make eye contact with the people involved, smiling as much as I can.
India is one place where people’s faces seem to default to what looks like a scowl but as soon as I smile they usually warmly smile back. With my back against a wall I also might pause to change lenses or flash cards but again, by having two cameras I can usually avoid doing that. Keep in mind that over 90% of crimes are what are called crimes of opportunity, which just means the criminal sees an opportunity and acts.
If you make eye contact, they usually move on. If they see that you are confident, mentally present and have high situational awareness, they will skip you. Mostly they will look for the next fool who is daydreaming and that person will (sadly) become the hapless victim. In that horrible situation where your are directly confronted with a weapon and obvious harm, I have been told over and over give up the gear and not argue, even for a moment.
 That is the plan that I hope I will be disciplined enough to stick to if that ever happens but....
I was recently photographing a street food stall selling piping hot Kebabs. After ordering and eating a portion (mmmm) I spent about 45 minutes there photographing and making videos. During that time, I showed the back of the camera to at least half a dozen people so they saw what I was doing. I also made instant Polaroid Pogo prints for the three main subjects I was photographing. I made eye contact with a couple dozen people, most of whom were curious (and harmless.) One kid got too close to my camera so, after making eye contact and waving my hand telling him not to touch my camera and he persisted, I gently pushed his hand back. By the time I left, the entire group (the workers and the customers) were having a conversation and a good laugh at the crazy American. The Kebab tasted great and I had supported their business. The video and stills were equally good. They felt as if I had treated them respectfully. All my gear was intact. It doesn’t get much better that that.

Continue your travels with David here at the California Photo Festival October 10-14 where he will show you how to study the light, create as story with your images and improve your photography success stories!
Thanks David!
David Wells, one of our leading festival instructors at the California Photo Festival this year gave us a great article on something a lot of travel photographers have to go through. We hope you enjoy and come to learn more at his sessions in October! I work a lot in the developing world, partly because my wife is from India. Before we met, I was also working a lot in the nether-reaches of the globe because personal projects and paying work took me there.
 A friend just asked me if I had any tips he could incorporate into his working process as he heads off to Mexico. The challenge for me in writing this blog was not coming up with advice but rather with figuring out how to explain those things that I do almost automatically when I am photographing in places like India, Guatemala, Vietnam or Turkey.
Half of the preparation involves gear, planning and other logistics which is the easiest to define and write about.
The other half is about attitude and behavior.
In some ways it is more important than the gear issues, but it is also harder to define and then write about.
 First, get camera insurance. Make sure it covers you around the globe. Be careful about add-ons to your current home owners insurance. The first thing your insurance company will do if you file a claim is google your name and see if you are a professional. I did just that for the friend who asked the question that prompted this blog. Sure enough, he shows up in Linked-in as a pro so.... The insurer will then point out how 99% of all policies do not cover pros and then you are stuck. I have blogged on The Wells Point about the types of insurance you should carry so I will direct you to that.
 I have seen many people who put black tape or use a black marker to cover the name the camera. I don’t actually do that. I would get rid of the screaming logos on the camera straps. I would encourage you to do that and get straps that are as supportive as possible. I have blogged about why I use Black Rapid straps, which is simply because they solve my particular set of problems. I tend to walk with two cameras, one on each shoulder. When I am moving they are usually pulled together with one hand so they gather in front of my gut. I use a kind of a fanny pack but it is always turned in FRONT, not in back. I usually wear some simple cotton shirts that I have custom made in India. They are thin cotton which helps in the hot weather. They are also extra wide at the waist so they can easily be pulled over the fanny pack. When I am in “stealth” mode, I look extra wide (fat) but much of my gear is hidden away.

As I am walking I usually turn the lenses inward rather than outwards. I do that as much to avoid hitting things as to prevent problems. Also, kids LOVE to touch shiny lenses, so having them turned in keeps the lenses finger print free. I stay away from lens vests or anything else that screams pro. I work very hard to look like a round middle aged Western tourist. I frequently use a pair of simple canvas/cotton bag that was a gift from my mother in law. Putting one inside the other means I have one main pocket and two side pockets. I have a huge advantage over many people in that I use smaller simpler cameras, my Olympus OMDs. If I had something like a Canon 5D or one of the giant Nikon DSLRs I am not sure what I would do (except maybe buy a smaller camera for traveling.) You can read about my general travel and image archiving approach at BHPhotoVideo Part 1 and BHPhotoVideo Part 2

I usually wear shorts inside, but I am careful not to dress inappropriately when I am out walking on the streets. There people will stare, especially at foreigners, doubly so foreign women. Think of it this way, if you want to connect with people it makes them more comfortable to wear clothes that are not too different from what they know. Because some of the streets are a little gross, I have taken to wearing the newer sandals which can be hosed down if I step into something less than desirable.
I use two cameras for many reasons, including the fact that changing lenses or flash cards takes a lot of concentration so I try to avoid doing that in the middle of a public place. Two small cameras, like the Olympus OMDs generates some curiosity, but not as much as a 5D with a giant lens and an even more threatening lens hood. I would definitely lose (or minimize the use of) the giant butterfly lens hoods, especially on the longer telephoto lenses. Those are threatening to people on the other end of the camera and they suggest “pro” to a potential thief.
The key to working in the developing world, in my experience is what is often called “situational awareness.” Obviously it means being aware of what is going on around you, both in terms of things to photograph and potential problems. While I am constantly looking around to see what is happening, I also take clues from the people around me. The classic example of this is when I am doing night photography I will photograph in a night market until it starts to empty out. When the locals go home, I do as well. Similarly, when the locals step back because a loud, drunk or annoying person is coming, I follow their lead.I never use an iPod or any kind of music player when I am working. Never. There are too many things going on around me to pay attention to. Zoning out with music is the surest way to get into trouble (or just miss great picture.)
My first step when something looks like it may go wrong is to make eye contact with the person in question. 99.9% of the time they are curious, want to be helpful, want to sell you something or are begging. I see them, they know that and that gives them pause. I try to smile too. It makes a world of difference. Usually that is enough.
The next step is to subtly turn my body so as to block them and protect my gear. After that I pull all my gear in closer to me. The last step is to move on to another location. No photo is ever worth the potential safety issue so, I move on and to date I have been very, very lucky. The process of extracting myself from a situation that I am unsure of usually means nothing more than stepping out of the situation, ideally so I end up with my back against a wall.
 I pause, reassess the situation and most times I will dive back in.
 Again, I always make eye contact with the people involved, smiling as much as I can.
India is one place where people’s faces seem to default to what looks like a scowl but as soon as I smile they usually warmly smile back. With my back against a wall I also might pause to change lenses or flash cards but again, by having two cameras I can usually avoid doing that. Keep in mind that over 90% of crimes are what are called crimes of opportunity, which just means the criminal sees an opportunity and acts.
If you make eye contact, they usually move on. If they see that you are confident, mentally present and have high situational awareness, they will skip you. Mostly they will look for the next fool who is daydreaming and that person will (sadly) become the hapless victim. In that horrible situation where your are directly confronted with a weapon and obvious harm, I have been told over and over give up the gear and not argue, even for a moment.
That is the plan that I hope I will be disciplined enough to stick to if that ever happens but....I was recently photographing a street food stall selling piping hot Kebabs. After ordering and eating a portion (mmmm) I spent about 45 minutes there photographing and making videos. During that time, I showed the back of the camera to at least half a dozen people so they saw what I was doing. I also made instant Polaroid Pogo prints for the three main subjects I was photographing. I made eye contact with a couple dozen people, most of whom were curious (and harmless.) One kid got too close to my camera so, after making eye contact and waving my hand telling him not to touch my camera and he persisted, I gently pushed his hand back. By the time I left, the entire group (the workers and the customers) were having a conversation and a good laugh at the crazy American. The Kebab tasted great and I had supported their business. The video and stills were equally good. They felt as if I had treated them respectfully. All my gear was intact. It doesn’t get much better that that.

Continue your travels with David here at the California Photo Festival October 10-14 where he will show you how to study the light, create as story with your images and improve your photography success stories!
Thanks David!
Subscribe to:
Posts (Atom)