Thursday, December 13, 2012
The Ultimate Stocking Stuffer
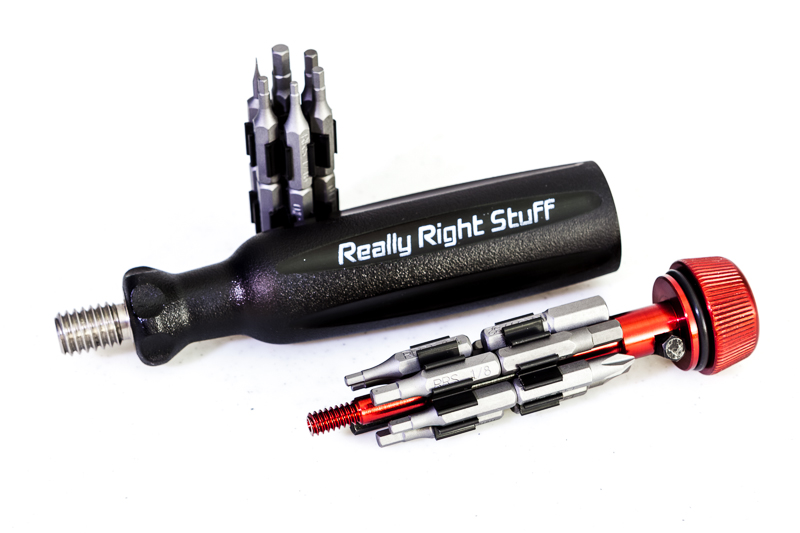
This is the ultimate stocking stuffer for any photographer. Honestly, this is a multi-tool that everyone should have photographer or not. As you know I am very picky and demand my gear be the absolute best. This multi-tool is the real deal. The quantity and variety of bits in this kit is awesome. I started using it about three weeks ago on my tripod but soon found out it works on just about everything from camera, to eye glasses, to computer, etc. With 22 bits in hex, torx/star, flat, and cross this is my primary tool to adjust most small gear and equipment.
The entire kit packs very light and compact and is now a permanent addition to my bag. For those who have a Really Right Stuff Tripod in either the 2 or 3 series the tool even fits right into the center column, so it is always available. There are other cool uses as well that you can check out if you follow the link below.
Really Right Stuff calls this the MTX and you should really have one. Check it out at the following link MTX.
For full disclosure, I am not paid to recommend this gear and the link above is not an affiliate link. I use RRS because everything they make performs for me in the studio and in the field.
Fiat Lux,
Bull Schmitt
Wednesday, December 5, 2012
While I was looking over some images for yesterday's blog I found this sequence. Thought it would make a nice simple time lapse.
Gorgeous Alaska day and a slow humpback whale dive. Shot the sequence on my photo tour with a Canon 1D Mk IV and an EF 70-300 4.5/5.6L.
Put the time lapse together with Lightroom. Recommend the 720 quality option.
Tuesday, December 4, 2012
The Test Shot
Killer whale attacking a Steller's sea lion
There are many shots that require you to react extremely quickly in order to capture what you want such as these whales I photographed during one of my Alaska workshops. One of the most successful techniques you can use is what I call the "test shot."
The test shot has two primary objectives, exposure and rough focus. When taking a test shot your actual subject is usually not in the frame. For example, these whales break the surface in less than a second and if I wait until the subject is in the frame to find exposure I will be less than successful most of the time. If instead I anticipate where the subject will appear or what the event will look like, I can figure out exposure ahead of time very easily. I can also pre-focus so that the precision focus process is much faster once my subject is in frame and my auto focus sensors are properly placed.
A humpback whale going for it in front of Devil's Thumb
When you make a test shot, it is often times not adequate to set exposure based on the environment/background. You need to anticipate what will drive the exposure. For example, in all three whale shots the critical elements are the white water and the white fins/body. If I make a test shot of just the water and set exposure without considering the extreme tonal difference between water and white water/whale, I will, most likely, blow the highlights in the shot. When I made the test shots for these images, I set my exposure based on white not on the water/background. You can use rules of thumb to underexpose for the predicted highlights but I prefer actual meter data, when I can get it. In these examples, I changed my camera's metering mode to Spot and then I set exposure off of something white. I actually used the boat's wake but a white sheet of paper would work as well. As long as the white is under the same lighting conditions as my subject, my exposure will work perfectly.
.1" earlier
This process is simpler when shooting in Manual exposure mode but can be used with Aperture or Shutter priority and auto exposure lock. Once I have my exposure, I pre-focus to the expected subject distance and take a test shot and evaluate. With my exposure and pre-focus set, I am much better prepared to quickly execute the actual shot when the action occurs.
I use test shots all the time to give myself the advantage when something might happen and my reactions have to be perfect. When I am out photographing, people find it odd that I am shooting every now and again at what appears to be nothing. But my "strange" behavior pays off. If you stack your deck ahead of time you will enjoy success in a more consistent and repeatable manner.
Fiat Lux!
Friday, November 30, 2012
Topaz Webinar with Hal
Hal will be leading another webinar and discussion for Topaz Labs next week. Click the link below to register and join Hal on the 6th of December at 4 PM CST.
Total Workflow with Topaz!
Fiat Lux!
Total Workflow with Topaz!
Fiat Lux!
Labels:
bull schmitt,
Hal Schmitt,
Topaz Labs,
webinar
Wednesday, October 31, 2012
Topaz DeNoise Webinar is Available on YouTube
My recent Topaz DeNoise webinar is available to watch on YouTube.
Enjoy.
Fiat Lux!
Labels:
bull schmitt,
DeNoise,
Hal Schmitt,
Lightroom,
Photoshop,
Topaz,
tutorial,
Video,
workflow
Wednesday, October 24, 2012
Tiny Planet Mania
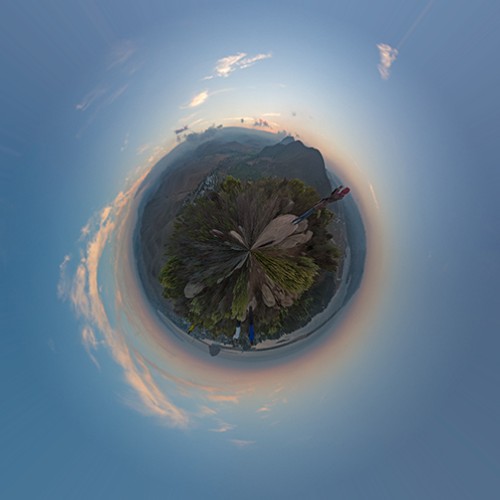
It seemed that during the California Photo Festival I could not swing a cable release without hitting a few people discussing or playing with the app called Tiny Planet. The app manipulates an image in a pretty cool way and the result often resembles a small planet in the center of a square frame.
Although the buzz was about the phone app, the process has been around a while and there are many websites and blogs dedicated to the effect. So for all those who do not have the app or if you have it but want to apply a similar effect to your big photos, here is the quick way to do it in Photoshop.
Oh by the way, Jill Waterbury, Light's in house iPhoneography instructor, introduced just about everyone to the app and also requested the Photoshop method. So here it is for Jill and anyone else who wants to play around with their images to have fun and create.
The Photoshop method works best on panoramic images, especially 360 degree panos, but can be done to any image. To demo the process, I will start with a 360 pano I shot during Click.
The basic process is to open the image in Photoshop and then to apply a simple filter called "Polar Coordinates." This filter is found in the Filter>Distort menu. Of note it will only be available with 8-bit images so if you have a 16-bit workflow you will have to change to 8. (Go to Image>Mode>8-bits) Hand in hand with the depth change you may need to convert the image to a smaller color space. For example, Light recommends a 16-bit workflow using ProPhoto RGB. If you go from 16 to 8, you should also convert to either Adobe RGB (1998) or sRGB via Edit>Convert to Profile.
When you choose the Polar Coordinates filter you see the dialog below.
Make sure to select the "Rectangular to Polar" button. When you apply the polar coordinates filter you get the following image.
There was obviously a change but the filter created a "down the rabbit hole" effect and it is not a square frame, not what we are looking for. Interestingly, this effect is found in the app but is called "tiny tube." So before you apply the filter, you need to do two other steps.
First, go to Image>Image Size. In the dialog box, make sure resample image is checked but uncheck Constrain Proportions.
Your image will look distorted but go with it.
Next go to Image>Image Rotation>Flip Canvas Vertical and the image will flip upside down.
Now we are ready to go back to the Filter>Distort>Polar Coordinates. The result is a tiny planet-like square image.
If you have a 360 degree pano all you have to do is the process described above. If you do not have that type of image you can still do the process. The best types of images to use are those with a
panoramic aspect ratio, images with little detail on the top and bottom, and a strong linear shape but with vertical development in the middle, vertical third of the frame. Even with the perfect image, there may possibly be a few more steps after you apply the filter. So here goes with a normal image.
This image does not have a panoramic aspect ratio (in general vertical images are more challenging to use than landscape) but there is limited detail at the top and bottom of the frame with a linear shape along the horizon displaying strong vertical development.
For any image that is not a 360 degree panorama, the first step is to make sure the horizon is level. After that do everything we did above. You will get the following intermediate images.
Just as before run the Polar Coordinates filter and you get this.
There is the tiny planet but there is a seam at the top because our image ends did not match perfectly. No worries, do a quick retouch and rotate the image to the desired angle and you get this.
A small planet with a volcano or two. This effect can be used on all sorts of images so have fun. Here is one more for the fun of it, this is a composite of a tiny planet and a tiny tube from the same image.
As you play remember to try the opposite effect. If you do not flip the image you can make a tiny tube like this one. (the opposite of the image at the top of this post.)
Fiat Lux!
Labels:
Adobe Photoshop,
app,
Hal Schmitt,
polar coordinates,
tiny planet,
tiny tube,
tutorial
Monday, October 1, 2012
Long Exposures in the Midday Light
It is difficult to imagine that in a day when all
photographers are pushing the manufacturers for higher and higher ISO that at
the same time there is a need for lower and lower ISO. The truth is I enjoy
shooting 30 sec and longer exposures during the daylight hours. There is no way
to reduce the ISO low enough to create such long exposures while the sun is up.
The only way to create this long shutter speed is with the use of neutral
density filters. If you’re like me and
want to attempt this very cool look, I recommend the new Lee ND filter called
“The Big Stopper”. This filter requires their holder but offers 10 stops of
density to help you create those long exposures.
![]() |
| Before Filter |
![]() |
| After Filter |
Life is short, take pictures!
Marc Muench
Subscribe to:
Posts (Atom)