I am certain you have already done this but just in case you have not make sure to go in and modify your metadata presets. This is also a great time to verify you made a new parent folder reflecting the new year.
In the quick video Hal shows the update process for Lightroom and the Bridge.
Annual Metadata Preset Update (2013 Version) from Hal Schmitt on Vimeo.

Showing posts with label tutorial. Show all posts
Showing posts with label tutorial. Show all posts
Wednesday, January 16, 2013


Wednesday, October 31, 2012
Topaz DeNoise Webinar is Available on YouTube
My recent Topaz DeNoise webinar is available to watch on YouTube.
Enjoy.
Fiat Lux!
Wednesday, October 24, 2012
Tiny Planet Mania

It seemed that during the California Photo Festival I could not swing a cable release without hitting a few people discussing or playing with the app called Tiny Planet. The app manipulates an image in a pretty cool way and the result often resembles a small planet in the center of a square frame.
Although the buzz was about the phone app, the process has been around a while and there are many websites and blogs dedicated to the effect. So for all those who do not have the app or if you have it but want to apply a similar effect to your big photos, here is the quick way to do it in Photoshop.
Oh by the way, Jill Waterbury, Light's in house iPhoneography instructor, introduced just about everyone to the app and also requested the Photoshop method. So here it is for Jill and anyone else who wants to play around with their images to have fun and create.
The Photoshop method works best on panoramic images, especially 360 degree panos, but can be done to any image. To demo the process, I will start with a 360 pano I shot during Click.

The basic process is to open the image in Photoshop and then to apply a simple filter called "Polar Coordinates." This filter is found in the Filter>Distort menu. Of note it will only be available with 8-bit images so if you have a 16-bit workflow you will have to change to 8. (Go to Image>Mode>8-bits) Hand in hand with the depth change you may need to convert the image to a smaller color space. For example, Light recommends a 16-bit workflow using ProPhoto RGB. If you go from 16 to 8, you should also convert to either Adobe RGB (1998) or sRGB via Edit>Convert to Profile.
When you choose the Polar Coordinates filter you see the dialog below.

Make sure to select the "Rectangular to Polar" button. When you apply the polar coordinates filter you get the following image.

There was obviously a change but the filter created a "down the rabbit hole" effect and it is not a square frame, not what we are looking for. Interestingly, this effect is found in the app but is called "tiny tube." So before you apply the filter, you need to do two other steps.
First, go to Image>Image Size. In the dialog box, make sure resample image is checked but uncheck Constrain Proportions.


Your image will look distorted but go with it.

Next go to Image>Image Rotation>Flip Canvas Vertical and the image will flip upside down.

Now we are ready to go back to the Filter>Distort>Polar Coordinates. The result is a tiny planet-like square image.
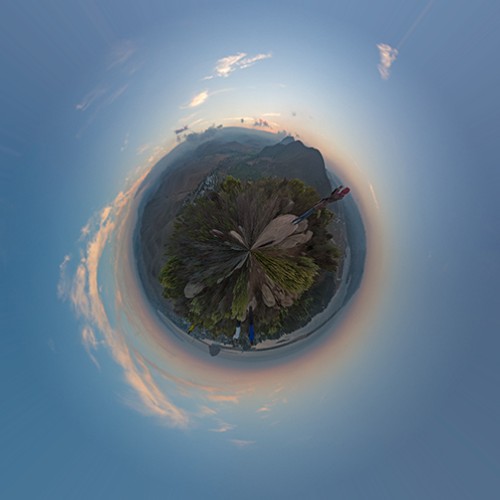
If you have a 360 degree pano all you have to do is the process described above. If you do not have that type of image you can still do the process. The best types of images to use are those with a
panoramic aspect ratio, images with little detail on the top and bottom, and a strong linear shape but with vertical development in the middle, vertical third of the frame. Even with the perfect image, there may possibly be a few more steps after you apply the filter. So here goes with a normal image.
panoramic aspect ratio, images with little detail on the top and bottom, and a strong linear shape but with vertical development in the middle, vertical third of the frame. Even with the perfect image, there may possibly be a few more steps after you apply the filter. So here goes with a normal image.

This image does not have a panoramic aspect ratio (in general vertical images are more challenging to use than landscape) but there is limited detail at the top and bottom of the frame with a linear shape along the horizon displaying strong vertical development.
For any image that is not a 360 degree panorama, the first step is to make sure the horizon is level. After that do everything we did above. You will get the following intermediate images.


Just as before run the Polar Coordinates filter and you get this.

There is the tiny planet but there is a seam at the top because our image ends did not match perfectly. No worries, do a quick retouch and rotate the image to the desired angle and you get this.


A small planet with a volcano or two. This effect can be used on all sorts of images so have fun. Here is one more for the fun of it, this is a composite of a tiny planet and a tiny tube from the same image.

As you play remember to try the opposite effect. If you do not flip the image you can make a tiny tube like this one. (the opposite of the image at the top of this post.)

Fiat Lux!
Tuesday, September 11, 2012
Denoise Video
A recent video showing my Topaz Denoise and Detail process.
Thanks for the questions that help generate these videos!
Fiat Lux!
Thursday, August 23, 2012
Elephorm Universal Player FAQ - For Hal's Lightroom Tutorial
For those who might not be familiar Hal's Lightroom training is available via streaming video or you can download the content to your desktop/laptop. If you download the interface to play the videos is the Universal Player.
Currently, you can stream all of the videos on your idevices but the content is not downloadable there yet. An iOS app for iPad/Phone is almost ready though.
Thank you to everyone for providing the great feedback and reviews!
If you have not checked the training out yet, you can find it here Elephorm - Lightroom
 Connect to en.elephorm.com with your email and password, and locate the Universal Player Blob, as shown on picture below. Click on the Install button and follow instructions.  After installation, the player will open automatically. You will then be prompted to accept the End User License Agreement (EULA) and to enter your details (same email and password you use to connect to en.elephorm.com)  You are now in your library, and you’ll be able to download your tutorials to HD in a few clicks.
 NOTE: To access the Lessons Summary shown in the picture below, you just have to click on the Chapter Access button in the Library. A few things you should know:
 |
Saturday, July 21, 2012
Hal Schmitt's Canvas Gallery Wrap Corner Technique
Canvas Gallery Wrap Techniques - Cutting and Folding the Corners from Hal Schmitt on Vimeo.
Here is a quick video showing Hal Schmitt's corner cutting and folding technique when finishing a canvas gallery wrap.
Hal is working a 24 x 36 gallery wrap with Alpha Strike Matte Canvas photo grade coated with Ambrosia.
Fiat Lux!
Tuesday, June 5, 2012
LR 4 Local Adjustments - Adjustment Brush Example
A quick demonstration of an effective and efficient local adjustment workflow using Lightroom 4's Adjustment Brush feature to optimize Exposure and White Balance. Although Lightroom is the example software the exact same process is available in Adobe Camera Raw.
Fiat Lux!
Subscribe to:
Posts (Atom)