Monday, July 30, 2012

Landscape at f/4? Know your DOF

I am a huge believer in understanding and practicing the basics and the fundamentals of photography.  Moreover, it seems most difficult tasks in life, including photography, come down to how well can you execute the basics. To that end, I would like to discuss one of the most common practices I see in the field when shooting landscape, stopping down for no reason. 

The conventional wisdom is to stop down when shooting landscape to increase depth of field (DOF).  Although stopping down does increase DOF it is not always necessary to do so and may, in fact, hinder your ability to make the best shot. 

DOF can be an incredibly complicated and confusing topic but it is worth spending a small amount of time talking about the primary contributors to DOF.  Most photographers are taught that DOF is controlled by aperture; the wider the aperture the shallower the DOF and vice versa.  What is not commonly taught are the two other primary variables that influence DOF, focal length (of the lens in mm), and focal distance (physical distance from shooter to focal point.) 

Just as every photographer quickly memorizes the aperture/DOF relationship they should do the same with focal length/DOF and focal distance/DOF.  So a little homework, memorize the following.
  • The wider the aperture the shallower the DOF
  • The longer the focal length the shallower the DOF
  • The shorter the focal distance the shallower the DOF
and the opposites
  • The narrower the aperture the deeper the DOF
  • The shorter the focal length the deeper the DOF
  • The longer the focal distance the deeper the DOF
One of the best ways to see these rules in action  is to use a DOF calculator and play around.  If you want to go "old school" there are "whiz" wheels out there to show the relationships.  But since this is mid 2012, I recommend finding a DOF app for your smart phone or device.  There are a huge number of these apps available just search for "DOF calculator" and download. 

After playing with a DOF calculator app for just a small amount of time, you will be amazed how quickly you learn the rules and begin to visualize constructing DOF for every shot you take.  When you know the rules and relationships of DOF you will approach your shots from a position of knowledge and you will, most likely, modify some of your accepted habits and practices.  You might even decide to take your DOF calculator app with you on location and run some numbers before you shoot.  I do not think you will do this all the time but if you need some intel, back up, or encouragement break out the app and "run the numbs." 

Recently, I shot some landscape in Alaska and used my understanding of DOF to shoot handheld landscape at f/4 with everything in the shot acceptably in focus.  This goes against the conventional wisdom but it worked perfectly.  The shot I ended up with is shown below.


For this shot I used the focal point shown @1000' from me, 43 mm focal length, and an aperture of f/4.  I shot a bracketed series for HDR and did it handheld as my tripod was not available.

If I had followed the conventional wisdom I would have stopped down to f/16 and would have had the situation shown below.

f/16 would have given me plenty of DOF but a shutter speeds of 1/60, 1/250, and 1/15.  These are, of course, too slow for my handheld situation.  I could have increased my ISO to yield faster shutter speeds but I did not want the additional noise, especially when shooting for HDR.

Instead of changing ISO, I changed aperture and opened up to f/4 which gave me the situation shown below.

f/4 also gave me plenty of DOF and shutter speeds that I could work with hand held.  Because my focal length was 43mm with a focal distance of 1000', changing aperture did not have an appreciable effect on this shot's practical DOF.  As a result, the entire shot is acceptably in focus, even the foreground as it is greater than 52' from me.  Sure f/16 gave me 38' more DOF but it was irrelevant.

Now there will be times and places this does not work but if you understand the basics you will recognize them quickly.  When you do you will find the solution and make the shot work.

More on this topic next time.

Saturday, July 21, 2012

Hal Schmitt's Canvas Gallery Wrap Corner Technique


Canvas Gallery Wrap Techniques - Cutting and Folding the Corners from Hal Schmitt on Vimeo.

Here is a quick video showing Hal Schmitt's corner cutting and folding technique when finishing a canvas gallery wrap.

Hal is working a 24 x 36 gallery wrap with Alpha Strike Matte Canvas photo grade coated with Ambrosia.


Fiat Lux!


Wednesday, June 27, 2012

A Great Lesson from Food TV's Good Eats


I watch a show on The Food Network called Good Eats.  The host is Alton Brown and he discusses a large amount of cooking gear and equipment (in addition, to delivering amazing food facts and cooking techniques.) The consistent thing about Alton's gear recommendations is he loves equipment that can multi-task.  Why have a piece of gear that can only do one thing.  If that is the case, to do three tasks you need three different items.  With multi-tasking, one piece of gear does all three jobs.


If you do a lot (or even a little) travel photography the concept of gear "multi-tasking" is hugely important.  In the ideal world it would be simple to take all of your gear everywhere.  There would never be carry-on limits, space or weight issues, and we would all have our own photo Sherpa.  In the real world, we are often forced to take fewer items in order to meet the travel reality.


I found myself in just such a situation on a recent photo trip to Alaska.  I normally carry a tripod along with a ball head and a gimbal head.  Turns out if I took both my bag would have been 50+ pounds and I did not want to pay the penalty.  I decided on just the gimbal since I knew it would work for my long lenses and also provide basic ballhead functionality (although not quite as efficiently.) 

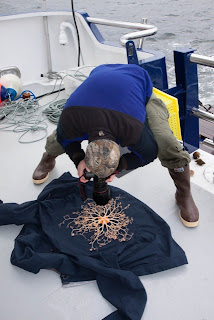
Even with that I ended up wanting to shoot a macro shot from directly overhead my subject.  My first plan of attack is shown below.


As you can tell, probably not the best way to shoot.  Not only is the platform unstable but my ergonomics are horrible.  This is a really easy way to hurt your back and take a bad picture at the same time.  So I needed to innovate.

My solution was to multi-task my gear.  I know I had a great tripod (Really Right Stuff TVC-33) and my gimbal (RRS PG-02).  I decided to see if I could make it work in this macro situation.


After looking at the PG-02, I took the vertical support arm and turned it around.  This allowed me to support the camera and point it straight down at my basket sea star.  I had never done this before and did not know the PG-02 could do this.  What I found is exactly what Alton Brown talks about on Good Eats; another great use for a piece of gear designed for something a little (or a lot) different.


Although I had good support, my ergonomics still, for lack of a better word, sucked.  Before I destroyed my back, I finally settled on what you see below.


Tremendous support, good ergonomics, and a different view of a basket sea star.  After these shots were taken I switched over to an EF 100mm f/2.8L Macro for closer shots (an example is the first shot at the top of the post.)

So here is to Alton Brown, Good Eats, and multi-tasking. 

As you all know I love Really Right Stuff gear.  This shoot made me an even bigger fan of the RRS PG-02.  Good luck making this happen with any of the other gimbal heads out there.

Fiat Lux!

All shots of me are courtesy of Marc Muench, Leanna Telliard-Stern, and Gina Ruttle.  Thank you!


Basket stars multi-task as hair!


Monday, June 18, 2012

Go For It: Pixels are Free

One of my favorite expressions with digital photography is "pixels are free."  With no cost, photographers should enjoy complete freedom to experiment and play.  If you have an idea for a shot, go for it.  If it works, great.  Take what you did and make it a part of your photography. 

If it does not work out, no big deal.  But use the results as a completely free learning experience. Go to school and figure out what was the issue/s.  Can you make a small adjustment or do you need to go back to the drawing board and plan again. 

I recently found myself in a situation where I honestly did not know how the results would turn out.  I wanted to shoot a series of images for a landscape panorama in rapidly falling light levels.  I had the Canon EF 800mm f/5.6L on my 5K Mk II; a combination not often used for panoramas.  To make matters worse I was on the back of a moving boat.  Not only was it moving forward and slowly rocking side to side but we were in a regular ocean swell so we were slowly heaving (up and down.)

Not the best situation but pixels are free so I went for it.  The results from the 42 shots are shown below. 

 
This is the panorama after the stitching process.  If you follow the bottom (or top) you will notice a nice sine wave pattern.  That is the boat going up and down with the ocean swell.  My camera support was rock solid (RRS TVC-33 and PG-02) but the boat was out of my control. 

At this point I had a nicely stitched panorama even though it is somewhat ugly in terms of how everything lined up.  But it worked and did not cost a thing. 


After a little cleanup, I had a usable, huge panorama to optimize.  For a free experiment, I will take it.

Fiat Lux!

Friday, June 15, 2012

Rick's Day in the Barrel


Rick Sammon demonstrating the "proper" technique for donning a survival suit.  Enjoy, we did.

Hope to have you join Rick and I in Alaska.

Fiat Lux!

Tuesday, June 5, 2012

LR 4 Local Adjustments - Adjustment Brush Example


A quick demonstration of an effective and efficient local adjustment workflow using Lightroom 4's Adjustment Brush feature to optimize Exposure and White Balance.  Although Lightroom is the example software the exact same process is available in Adobe Camera Raw.

Fiat Lux!

Sunday, June 3, 2012

Canon 5D Mk III Auto Focus Performance

 Canon 5D Mk III, EF 400mm f/2.8L, ISO 200, f/5.6, 1/2000

A quick post to describe my experience with the new auto focus (AF) system on the Canon 5D Mk III.  Bottom line up front, dramatic performance increase when compared with the 5D Mk II and equal to the 1D Mk IV. 

I spent a few days shooting with the Mk III and putting the AF system through some real world action shooting.  You can easily read all of the technical specifications, beeps, and squeaks on many other blogs, I will give you my simple man's take on the AF performance. 

The Mk III is a leap forward for the 5D series in terms of AF.  There are numerous modes and configuration options but you will find the best performance in demanding action situations when you select the Single Point AF mode.  In this mode you choose the appropriate AF point, engage AI servo with proper back button focus techniques and track your subject.  Although this mode does not engage some of the advanced AF logic and new tracking "assist" features, it will deliver the best performance. 

With that said, using a single AF point is not the simplest way to track and focus on a moving subject but, with practice, it is hands down the best.  As always, we do not shoot in a vacuum and the specific shooting situation may require or force you to another mode.  Depending upon the circumstances and variables you may get excellent performance with those as well. 

I consider the 5D Mk III's AF performance to be equal to that of the 1D Mk IV and clearly superior to the 5D Mk II's and 7D's.

I look at action AF performance looking at one main variable (assuming a relatively consistent subject path), track crossing angle or TCA.  TCA is the angular difference between where the camera is pointing (in aviation terms, where the camera is pointing is your effective "track") and the track of your subject.  TCA may be either high or low angle, from a shooters perspective low angle is when a subject is in front of your lens and tracking directly towards or away from you. High angle is when the subject tracks in a perpendicular manner across your shooting direction. 

Varying TCAs, when combined with subject aspect and speed, generates the multitude of tracking conditions necessary to get a good feel for what a camera can do.  I will do a more detailed post with images and some diagrams regarding these topics soon. 


For reference, the image at the top of this post is a 90 degree TCA at a high rate of speed.  The second image is low TCA. 

Fiat Lux!