Hal will be leading another webinar and discussion for Topaz Labs next week. Click the link below to register and join Hal on the 6th of December at 4 PM CST.
Total Workflow with Topaz!
Fiat Lux!

Friday, November 30, 2012
Wednesday, October 31, 2012
Topaz DeNoise Webinar is Available on YouTube
My recent Topaz DeNoise webinar is available to watch on YouTube.
Enjoy.
Fiat Lux!
Wednesday, October 24, 2012
Tiny Planet Mania

It seemed that during the California Photo Festival I could not swing a cable release without hitting a few people discussing or playing with the app called Tiny Planet. The app manipulates an image in a pretty cool way and the result often resembles a small planet in the center of a square frame.
Although the buzz was about the phone app, the process has been around a while and there are many websites and blogs dedicated to the effect. So for all those who do not have the app or if you have it but want to apply a similar effect to your big photos, here is the quick way to do it in Photoshop.
Oh by the way, Jill Waterbury, Light's in house iPhoneography instructor, introduced just about everyone to the app and also requested the Photoshop method. So here it is for Jill and anyone else who wants to play around with their images to have fun and create.
The Photoshop method works best on panoramic images, especially 360 degree panos, but can be done to any image. To demo the process, I will start with a 360 pano I shot during Click.

The basic process is to open the image in Photoshop and then to apply a simple filter called "Polar Coordinates." This filter is found in the Filter>Distort menu. Of note it will only be available with 8-bit images so if you have a 16-bit workflow you will have to change to 8. (Go to Image>Mode>8-bits) Hand in hand with the depth change you may need to convert the image to a smaller color space. For example, Light recommends a 16-bit workflow using ProPhoto RGB. If you go from 16 to 8, you should also convert to either Adobe RGB (1998) or sRGB via Edit>Convert to Profile.
When you choose the Polar Coordinates filter you see the dialog below.

Make sure to select the "Rectangular to Polar" button. When you apply the polar coordinates filter you get the following image.

There was obviously a change but the filter created a "down the rabbit hole" effect and it is not a square frame, not what we are looking for. Interestingly, this effect is found in the app but is called "tiny tube." So before you apply the filter, you need to do two other steps.
First, go to Image>Image Size. In the dialog box, make sure resample image is checked but uncheck Constrain Proportions.


Your image will look distorted but go with it.

Next go to Image>Image Rotation>Flip Canvas Vertical and the image will flip upside down.

Now we are ready to go back to the Filter>Distort>Polar Coordinates. The result is a tiny planet-like square image.
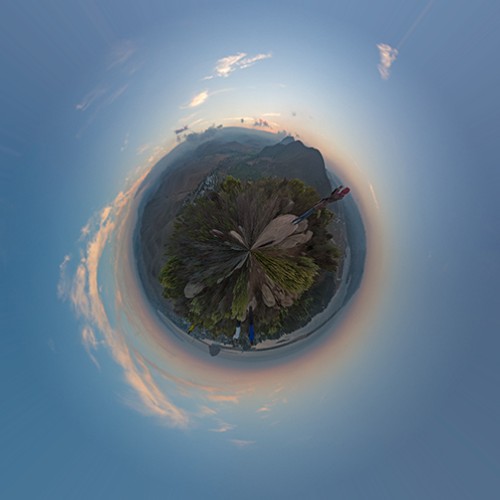
If you have a 360 degree pano all you have to do is the process described above. If you do not have that type of image you can still do the process. The best types of images to use are those with a
panoramic aspect ratio, images with little detail on the top and bottom, and a strong linear shape but with vertical development in the middle, vertical third of the frame. Even with the perfect image, there may possibly be a few more steps after you apply the filter. So here goes with a normal image.
panoramic aspect ratio, images with little detail on the top and bottom, and a strong linear shape but with vertical development in the middle, vertical third of the frame. Even with the perfect image, there may possibly be a few more steps after you apply the filter. So here goes with a normal image.

This image does not have a panoramic aspect ratio (in general vertical images are more challenging to use than landscape) but there is limited detail at the top and bottom of the frame with a linear shape along the horizon displaying strong vertical development.
For any image that is not a 360 degree panorama, the first step is to make sure the horizon is level. After that do everything we did above. You will get the following intermediate images.


Just as before run the Polar Coordinates filter and you get this.

There is the tiny planet but there is a seam at the top because our image ends did not match perfectly. No worries, do a quick retouch and rotate the image to the desired angle and you get this.

A small planet with a volcano or two. This effect can be used on all sorts of images so have fun. Here is one more for the fun of it, this is a composite of a tiny planet and a tiny tube from the same image.

As you play remember to try the opposite effect. If you do not flip the image you can make a tiny tube like this one. (the opposite of the image at the top of this post.)

Fiat Lux!
Monday, October 1, 2012
Long Exposures in the Midday Light
It is difficult to imagine that in a day when all
photographers are pushing the manufacturers for higher and higher ISO that at
the same time there is a need for lower and lower ISO. The truth is I enjoy
shooting 30 sec and longer exposures during the daylight hours. There is no way
to reduce the ISO low enough to create such long exposures while the sun is up.
The only way to create this long shutter speed is with the use of neutral
density filters. If you’re like me and
want to attempt this very cool look, I recommend the new Lee ND filter called
“The Big Stopper”. This filter requires their holder but offers 10 stops of
density to help you create those long exposures.
 |
| Before Filter |
 |
| After Filter |
Life is short, take pictures!
Marc Muench
Tuesday, September 18, 2012
High Angle Shooting Tip!
By Rob Sheppard

 The obvious answer is to get higher. You can see the difference
in these two shots from Death Valley showing a creosote bush in the Eureka
Dunes area. You would not think that the main bush is the same one! The first
shot is from a high camera angle, whereas the second one is shot from standard
tripod height. The first shot gives an interesting foreground to background
relationship that shows how the creosote bush fits into this landscape. The
second is hardly worth considering because the bush is too high in the
landscape. (The green of the creosote bush is better in the first image because
I used Viveza 2 on that image, but not on the second.)
The obvious answer is to get higher. You can see the difference
in these two shots from Death Valley showing a creosote bush in the Eureka
Dunes area. You would not think that the main bush is the same one! The first
shot is from a high camera angle, whereas the second one is shot from standard
tripod height. The first shot gives an interesting foreground to background
relationship that shows how the creosote bush fits into this landscape. The
second is hardly worth considering because the bush is too high in the
landscape. (The green of the creosote bush is better in the first image because
I used Viveza 2 on that image, but not on the second.) So how did I do this? Did I drive a truck onto the dunes? Bring
a big heavy ladder with me? Nope. I used my tripod, but in a unique way that
works very well with digital photography.
So how did I do this? Did I drive a truck onto the dunes? Bring
a big heavy ladder with me? Nope. I used my tripod, but in a unique way that
works very well with digital photography.
Did you ever see the photos of Ansel Adams standing on top of his car? He had a platform built that allowed him to set up a camera
and tripod on his car to gain some height. A challenge we often face when
photographing landscapes is that we are too low. Too low means we have to shoot
through foreground stuff that is distracting or we can't get a good perspective
on the scene. We can't get above important objects so they become truncated and
we cannot show their real relationship with the scene.

 The obvious answer is to get higher. You can see the difference
in these two shots from Death Valley showing a creosote bush in the Eureka
Dunes area. You would not think that the main bush is the same one! The first
shot is from a high camera angle, whereas the second one is shot from standard
tripod height. The first shot gives an interesting foreground to background
relationship that shows how the creosote bush fits into this landscape. The
second is hardly worth considering because the bush is too high in the
landscape. (The green of the creosote bush is better in the first image because
I used Viveza 2 on that image, but not on the second.)
The obvious answer is to get higher. You can see the difference
in these two shots from Death Valley showing a creosote bush in the Eureka
Dunes area. You would not think that the main bush is the same one! The first
shot is from a high camera angle, whereas the second one is shot from standard
tripod height. The first shot gives an interesting foreground to background
relationship that shows how the creosote bush fits into this landscape. The
second is hardly worth considering because the bush is too high in the
landscape. (The green of the creosote bush is better in the first image because
I used Viveza 2 on that image, but not on the second.)
 So how did I do this? Did I drive a truck onto the dunes? Bring
a big heavy ladder with me? Nope. I used my tripod, but in a unique way that
works very well with digital photography.
So how did I do this? Did I drive a truck onto the dunes? Bring
a big heavy ladder with me? Nope. I used my tripod, but in a unique way that
works very well with digital photography.
I extended the tripod legs to their max, then brought them
together. I set the self-timer of the camera to 10 seconds, set up my exposure
and focus appropriately (in this case, aperture priority and auto focus),
pressed the shutter, then hoisted my camera on tripod over my head. I held it
until the shutter released, then brought it back down.
The great thing about digital for this technique is that you can
instantly see what you got and make revisions. You may need to hold the camera
straighter, aim a little higher or lower, and so forth. In just a few shots, I
had my shot. (I did have to do some minor cropping for a slight straightening
-- it can be hard to get the camera perfectly level when doing this, but then
the Crop Tool in Lightroom makes this easy to fix!).
Obviously, you have to watch your shutter speed doing this or
risk unsharp images due to camera movement during exposure. With a wide-angle
lens, you can shoot at a slower shutter speed and still get sharp images,
though this is inherently an unstable camera position, so you can't go too low.
With a wide-angle like this, it is easy to use f/8 or f/11 to allow a faster
shutter speed, plus I will use a higher ISO as needed, too.
So the next time you are in front of a landscape that is giving
you problems, try hoisting your camera overhead! It can be worth a try just to
see what the landscape looks like from up there.
This last picture includes a shadow of me hoisting that camera
overhead to get some unique views of the tufa formations at Mono Lake that
actually show Mono Lake as part of the scene.
-Rob Sheppard
Tuesday, September 11, 2012
Denoise Video
A recent video showing my Topaz Denoise and Detail process.
Thanks for the questions that help generate these videos!
Fiat Lux!
Thursday, September 6, 2012
Ambrosia Coating: Rolling it on.
Ambrosia Coating: Application to Canvas with a roller. from Hal Schmitt on Vimeo.
A quick video showing the process and disussing tactics, techniques, and procedures for effective canvas coating with a roller. For this demo, I used a Canon ipf 6350, Alpha Strike's new Lucia/Lucia EX ready canvas, and Ambrosia.
With this new coating you can also coat water resistant photo and art papers;archival protection without glass or glazing, very, very cool. More videos on those soon.
For all of the product specs check out Ambrosia.
Subscribe to:
Posts (Atom)