Monday, February 28, 2011

Hal Schmitt is Coming to Las Vegas!


Hal is bringing his new seminar The Dynamic Duo: Lightroom 3 & Photoshop CS5 to Nevada! 
In this one day event Hal will demonstrate the tips, tricks, and techniques of Lightroom revealing a streamlined but effective process to execute all stages of the digital workflow from import to output. Transitioning seamlessly from Lightroom to Photoshop (via the built-in functionality) Hal will demonstrate the beauty and power of the world’s finest image optimization software.


The course will be held at:

Morgan Stanley Smith Barney

701 North Green Valley Parkwa
Henderson, NV 89074

Admission is $50 at the door, but pre-register before March 11th and pay only $39! For more details call the office at 805-528-7385 or go online to www.LightWorkshops.com

Fiat Lux!

Sunday, February 27, 2011

Almost Eagle Time

 Love the talon shadow on the right wing.
For my studio and speedlite/CLS crowd, light source hard or soft? And how do you know?

I was going through some older images this evening and that is when it hit me.  Eagle time is almost here.  I know it is still technically winter but Spring is right around the corner (although I would not guess it from the nippy -45 wind chill outside.)  With Spring on the way wildflowers and eagles cannot be far behind.  Time to break out and tune up the macros and super telephotos.


I am fortunate to photograph just about everything and I really get into it all, regardless of subject.  With that said, there is just something special about eagles. 

Hope you can join me to shoot some of Spring's offerings.

Fiat Lux!

Friday, February 25, 2011

When Boring Photos Attack!

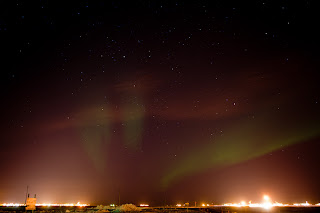
A boring, uninteresting aurora shot.  Destined for the Recycle Bin.
Just because it is a big stitched pano, does not make it interesting.

I am sure it would never happen to our readers here but every now and again I run across the dreaded "Boring Photos of Interesting Things" phenomenon. 

The more I think about it, it probably happens to everyone at some time in their photographic journey.  You have perhaps traveled around the world to an exotic location or maybe just stepped outside your front door to an amazing scene.  During the capture process, it seemed like everything went right.  We had the equipment, we knew the technique, and had a great subject in front of the lens.  After the fact looking at the images in Lightroom or Photoshop, something just is not right. 

When this happens there are a couple of great takeaways or lessons to be learned.  First and most important, go back to the basics and fundamentals of what makes a great image.  Where does the pop, the impact, or the wow factor really come from.  Strong composition and exposure will always start you off on the right track.  Ask yourself if you took the shot or if you made an image.

Second, try to remove yourself from the experience itself and concentrate on just the image.   Examine your effort with a critical eye and look at the image from a detached observer perspective.  We often have an emotional connection to our shots that do not allow this type of examination.  Pull back and view the image as if you were not the one who shot it.  Would you still be interested? 

Third, if possible, get rid of the image or at least bury it.  I understand that sometimes these images are all we have to remind us of a particular event, trip, or experience.  If I do not have a better capture, I will keep some of these around as mementos.  Most of the time, I just let them go.  I will learn from the experience and next time I will make an image.  

Off to the trash.

Here I have attached two recent unbelievably boring pictures of a really cool thing.  Like so many others I've shot, here are two bad aurora images.  It was great to experience but the images, for lack of a better word, suck.  As described above, I went back to the basics; both of these images have no real subject, no anchor, no foreground element, no real composition, no flow.  From a detached observer perspective, they are not interesting.

So these two shots make their debut and finale all at the same time. You'll find these images here and in my Recycle Bin for another few minutes before they go bye-bye.

Fiat Lux!

Sunday, February 20, 2011

Morro Bay 360 Pano Follow Up

14 shot stitched panorama
Canon 5D Mk II, EF 24-70mm f/2.8L at 24mm, and RRS pano gear
Adobe Photoshop Lightroom and Photoshop CS5

Here is the follow up image to my recent post regarding my preferred pano gear (RRS.)  Pano will end up at a 1:5 ratio.  That is a bit more than I typically prefer but the field of view is also quite large.  Using native resolution only I would print this at 27 x 133.

You might notice I reorganized the pano as well.  I originally started the shots just to the left of the moon.  The result did not have the composition and flow I wanted.  Once the pano is stitched it is a relatively easy process to recompose the image.  Of course, if you want to move around large chunks of pano at 750+ GB a pop it is good to have some RAM and processing power to back you up. 

I also dropped the pano into Photosynth to have an interactive experience through the FOV.  Plenty of other programs that will do this for you but none quite as free. 


Looking forward to later this year as more 3D viewing devices are available so I can include a 3D version of some of my favorite pano locations.  With or without 3D, the upcoming panos from wildflower season and my Alaska yacht trips are going to be amazing.  Will keep you updated.

Fiat Lux!
Bull


Thursday, February 17, 2011

Why I Prefer Really Right Stuff Pano Gear


The screenshot above is from a 360 pano I shot last night.  Sunset fizzled but moonrise was very cool shining through the cumulus clouds.  Fourteen shots from a Canon 5D Mk II, EF 24-70mm f/2.8L, and my Really Right Stuff panorama kit.  The file is 2.25 GB and perfect (the small white masking artifacts are only visible at small magnification and are not really present in the file.)

Awesome!  When the source material is captured properly there is almost no loss from the pano alignment and stitching process and it is, in a word, easy.

There is not always a gear or technology solution but the right equipment really helps.  For this scene the RRS kit was essential to the simplicity and results of the shoot.

OBTW, that is Victoria standing near the left edge of the image shooting her own 360.

I'll put the final pano up when I finish the optimization.

Fiat Lux!

Bull

Wednesday, February 16, 2011

Interview at DPE

Interview with Hal on The Digital Photo Experience website.

DPE Interview

Fiat Lux!

Thursday, February 10, 2011

Tip of the Week: Using Color Lables in Adobe Lightroom and Bridge

One of the most overlooked features in Lightroom and Bridge is the Color Label. Both programs offer five colors (red, yellow, green, blue, and purple) to assist you in managing and organizing your images. These colors may be assigned a specific meaning in your workflow and when assigned to an image you will have a quick visual reference to your image "types."

To assign a Color Label in Lightroom, highlight an image or images, position the cursor over the image, and right click. From the flyout menu select "Set Color Label" and choose one of the colors. You may also use the keyboard shortcuts of 6 (Red,) 7 (Yellow,) 8 (Green,) or 9 (Blue.) Unfortunately, no keyboard shortcut for purple. In the Bridge, select just as above and then right click. At the bottom of the flyout menu choose "Label" and pick the appropriate option. You will notice there are no color names but instead text assigned to a color. To customize, go to Edit-Preferences (Win) or Bridge-Preferences (Mac) and select "Labels" from the menu. First uncheck the box at top to enable single stroke keyboard shortcuts the same as above then enter a meaningful description for each color.

You can use the Color Label anyway you prefer; as an example here is my system. Red = High Priority Yellow = Web Green = HDR Blue = Stitched Pano Purple = Expanded DOF

Join our newsletter to get more tips from the crew here at Light!

Fiat Lux!

Wednesday, February 9, 2011

The Magic of Wildflowers on the Central Coast with Rob Sheppard


Rob Sheppard is coming back to Light Workshops April 11-15, 2011 for another awesome wildflower season! The Magic of Wildflowers is a flower enthusiast's dream. We will be going all over the Central Coast to our favorite wildflower spots.


Rob will demonstrate various ways to capture beautiful and unique images of California wildflowers. We'll look at using flowers as part of an overall landscape as well as getting up close with our macro lenses to focus on the details.

When we're not shooting out in the field, we'll be back here at the Light lab learning professional techniques for optimizing our images to create one of a kind photographs.

We are extending the Early Bird pricing, so register soon to get a killer deal on this fantastic workshop!


Fiat Lux!

A Few Shots from Macro Critter Day


Best of Light is in session and we had our world famous Macro Critter shoot yesterday afternoon.  Interesting creatures and some fun photography.

We had a mix of ambient light, small strobe, reflector, and studio strobe to light the "talent."  All of the attached shots are from a Canon 7D, EF 180mm f/3.5L, Induro C213, and Really Right Stuff BH-55.

For your best macro shots and the sharpest images remember to use Live View while on tripod. 


Flash again today with models in studio, on location, and at sunset on the beach.  Action tomorrow with horses for beach and sunset.

A hectic week but good living.

Fiat Lux!

Sunday, February 6, 2011

Meetup Timelapse

A little time lapse movie from last night's Meetup event.

Shot with a Canon 40D and EF 15mm f/2.8 Fisheye.

Used my Promote Control for intervalometer duties.

Friday, February 4, 2011

Essential Gear (Thoughts after four shooting classes)

We recently finished a series of four shooting courses here at Light and there is one piece of gear that is consistently needed.  Regardless of subject, technique, camera, etc. the HoodLoupe is a must have.

I did a video last summer regarding the HL ( HoodLoupe Video ) and every shooting session reconfirms. 

There is such critical information available to us on the LCD whether in Live View before the shot or when reviewing images/histograms after the shot; try not to pass it up.  The loupe will help you eliminate distractions and overcome bright lighting conditions to focus on the LCD.

As you know, I am always a full disclosure guy.  Hoodman does not compensate me for endorsing their gear.  It is just the best stuff out there. 

If you do not have one yet, just do it.

Fiat Lux!

Bull

Wednesday, February 2, 2011

The Torn Edges Border Effect


In Adobe Photoshop CS5 there are countless ways to get creative with your photography. One of my favorite ways to make an image stand out is to use a cool border effect. One style a lot of people like is the "Torn Edges" look.

We'll start by opening a new image in Adobe Photoshop. In the layers panel double click on the Background Layer and rename the layer "Border Effect," and hit OK. The layer is now unlocked and editable. Next, add a layer mask to the Border Effect layer by clicking on the Add Layer Mask icon located at the bottom of the layers panel; the symbol looks like a square with a small circle in the middle. You should now see a white layer mask appear on the right of your layer thumbnail.

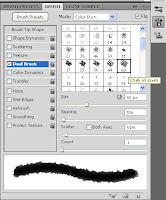
Select the brush tool from your tools panel or tap the 'B' key. Be sure to set the foreground color to black and the background color to white. Next, go to your Brush panel (if you do not see it go to Window> Brush, Or, click the panel button  on the left side of the options bar. With the Brush panel open you'll see a list of brush setting displayed on the left. Start clean by unchecking all of the brush setting options. Click on 'Brush Tip Shape' located at the top. Displayed on the right will be several brush tip shapes, select a soft, round brush from the menu. In the brush options find the Size slider and make the brush between 120-125px in diameter. Be sure that hardness is set to 0% and spacing is at the default of 25%.

Go back to the brush settings list and select Dual Brush (when selected a check mark will automatically appear next to Dual Brush). In the dual brush settings select the 60px Chalk brush, leaving the brush options set at their defaults. In the brush stroke preview at the bottom of the Brush panel, you'll see your brush shape change from a soft round brush to a textured, rough edged brush. For now hide or close the Brush panel.

Now that the brush is configured to give uneven edges and texture, go back to your Border Effect layer. On the Border Effect layer click on the layer mask thumbnail to be sure that it is selected. Be sure that your brush tool is still selected and that you are painting with black. Move your cursor into the image and begin to paint along all four edges of your picture. You will see the edges of the image turn rough and uneven. The beauty of using a layer mask to create the border is the fact that it's non-destructive.

If you look at the border and decide it's not quite what you had in mind you can paint with white on the layer mask and reveal more of the original image. You can always modify the brush by changing the size and opacity. You can also experiment further with the brush shape by going back to the Brush panel and adjusting the spacing, scatter or count settings of the Dual Brush. Once you have found a brush you like save it as a preset! At the bottom right of the Brush panel you'll see a New Brush icon (this looks just like the New Layer icon in the Layers panel) Click on the New Brush icon and give your brush a distinct name like "Torn edges." You'll now be able to find the brush you created in the Brush Presets panel and use it whenever you need.

To finish the effect, create a new layer and fill with your color of choice (or leave it transparent) and move under your background in the layer stack.

You can follow these steps to create a variety of brush presets to use for creating fun and original borders for your images. You can also use the other Brush Settings in conjunction with Dual Brush to make even more styles of brushes.

If you have any questions about this or any of the tips you see here on the Light Workshops Blog contact us at info@LightWorkshops.com

Fiat Lux!