Wednesday, May 16, 2012

Photographing the Solar Eclipse
By Hal Schmitt


Remember to scout and plan your 20 May eclipse photo-shoot ahead of time.  Things you might want to include in your process: determine when the eclipse will happen in your time zone, determine the sun azimuth and elevation of the sun during the eclipse, plan and frame your shot/composition, determine your solar filter requirements, and take a series of test shots to validate your exposure.
If you wait until the eclipse starts to figure all of this out you might be a bit behind.

Read more on NASA's website for the technical data on the eclipse and where the best viewing regions will be. Who knows! It could be the best in your area!
For those of you photographing the eclipse please submit your images for us to see. The best images will be posted on the blog!
Email them to info@lightworkshops.com and size to 400x600 px (or close to that).
 -Happy Shooting!

Fiat Lux!


Tuesday, May 8, 2012

Long Lens + Stability = Great Performance

 Canon 1D Mk IV, EF 800mm f/5.6L 1/320, f/5.6, ISO 400

Both of the shots above were captured with a Canon 1D Mk IV and a Canon EF 800mm f/5.6L.  The image of the mountain goats used a shutter speed of 1/500 and the bear was even slower at 1/320. I could have easily increased the shutter speeds by increasing my ISO but I was trying for the cleanest image I could possibly get.

Canon 1D Mk IV, EF 800mm f/5.6L 1/500, f/5.6, ISO 400

Such shutter speeds are definitely possible but when on a moving boat and compared with an effective focal length of 1040mm, the results are impressive.  I used the image stabilizer in Mode 1 which helped significantly but the real reason I could shoot with certainty at lower shutter speeds is my support setup.

I used a Really Right Stuff camera support setup including TVC-33 tripod, PG-02 gimbal head, and a long lens support package as depicted in the images below.

TVC-33, PG-02, and Long Lens Support Package

If you are a long lens shooter give yourself the advantage of perfect support.  I often say there is not a gear/technology solution to every problem but in this case I could not have made the same shot without it.  When combined with a good foundation in exposure and camera/lens functionality, the support system makes a nice trifecta!

TVC-33, PG-02, and Long Lens Support Package

Fiat Lux!

Monday, May 7, 2012

Get Low Part II


Last week, I showed a panorama of a few bergs in SE Alaska.  Interestingly, as I was shooting the bergs someone shot me.  This image gives you an idea of getting low.  Sometimes to get a different angle you might need to get a little bit wet, muddy, dirty, cold, etc.

Fiat Lux!

Friday, April 27, 2012

Get Low!

 4-shot stitched panorama,


In port for a day before departing again for more eagles, whales, bears, glaciers, and fun.  Rick Sammon and I along with the cruise participants had a tremendous experience and I cannot wait to share some of the images we made.  Marc Muench joined me in Petersburg for this next cruise and I am sure we will have another incredible trip.

A technique I used often during the trip was to get low.  The image above is a four shot stitched panorama shot from a RHIB (rigid hulled inflatable boat) slowly moving through the water.  To make this shot more dramatic I placed the camera about an inch above the water and shot.  Since pixels are more or less free, experiment with different approaches and angles to your photography.  Some will work and others not so much, just part of the process.


Even though the image had tremendous color I thought I might try a black and white also.  It is great having options and experimenting with both capture and your post processing.  Continuing along that process, the image below is the combination of the color version and the black and white version's luminance values.


Fiat Lux!

Wednesday, April 18, 2012

Gear and Leaving Sitka


Quick shot of the gear heading out with me today.  The great thing is all of it fit into a Think Tank Airport International except the big lenses.  It is possible to put the 400 mm (upper right) in the Airport International but not on this trip. 

Taking a Canon 5D Mk II, 7D, 1D Mk IV for bodies.  Lenses include 15mm f/2.8, 24-70mm f/2.8L, 70-200mm f/4L, 70-300mm f/4-5.6L, 100-400, 400mmf/4-5.6L  f/2.8L, and 800mm f/5.6L.  Also have a 580 EX II with battery pack, Zoom sound recorder, and I do not go anywhere without a HoodLoupe from Hoodman.


Sunset kind of fizzled but not a bad view from Sitka.

Heading out from Sitka this morning.  This is my first visit here and the town is spectacular.  The people are friendly and I won't even get started about the fresh seafood.

Fiat Lux!


Tuesday, April 17, 2012

GoPro + Lightroom 4 + P90X = Interesting Time Lapse


Just finished recording a tutorial about the LR 4 slideshow module and its timelapse functionality (part of a 14+ hour LR tutorial series).  I am biased but the LR 4 series is without equal. Nothing like a little power yoga to relax afterwards. Thought I might try a  timelapse with Lightroom 4, P90x, and a GoPro camera.

Heading south from Anchorage tomorrow for Sitka to meet the Northern Song, Rick Sammon, and the participants on our first eagle photo trip.  Will put up a shot of the gear list I have with me tomorrow.

Fiat Lux!

P.S. Please no comments on the yoga form or lack thereof.

Thursday, April 12, 2012


TIP: How to Get Rid of Chromatic Aberration / Jane Conner-ziser

Chromatic Aberration, in simple terminology, is when the colors in a digital file do not line up correctly and you can see color “fringing” around the edges of objects in your picture, mostly in places where a dark object is next to a light one. This is caused when the lens fails to converge all of the colors to a single focal point due to different wavelengths – and it can be exaggerated if there is movement during the capture process.

Sometimes chromatic aberration occurs only in specific areas of a file, but sometimes, like in this sample, it occurs throughout the image and correcting it can become a big job!


SO, in this article I will share with you the most common options for getting rid of chromatic aberration, starting with the easiest; Adobe Camera Raw or Lightroom.

Both ACR and Lightroom have options in the Lens Correction Panel that address chromatic aberration.


If the aberration is slight, all it takes is some visual adjustment of the sliders and choosing the defringing option that provides the best visual correction. Finite. Done – but it didn’t work on this image because the aberration is too severe.


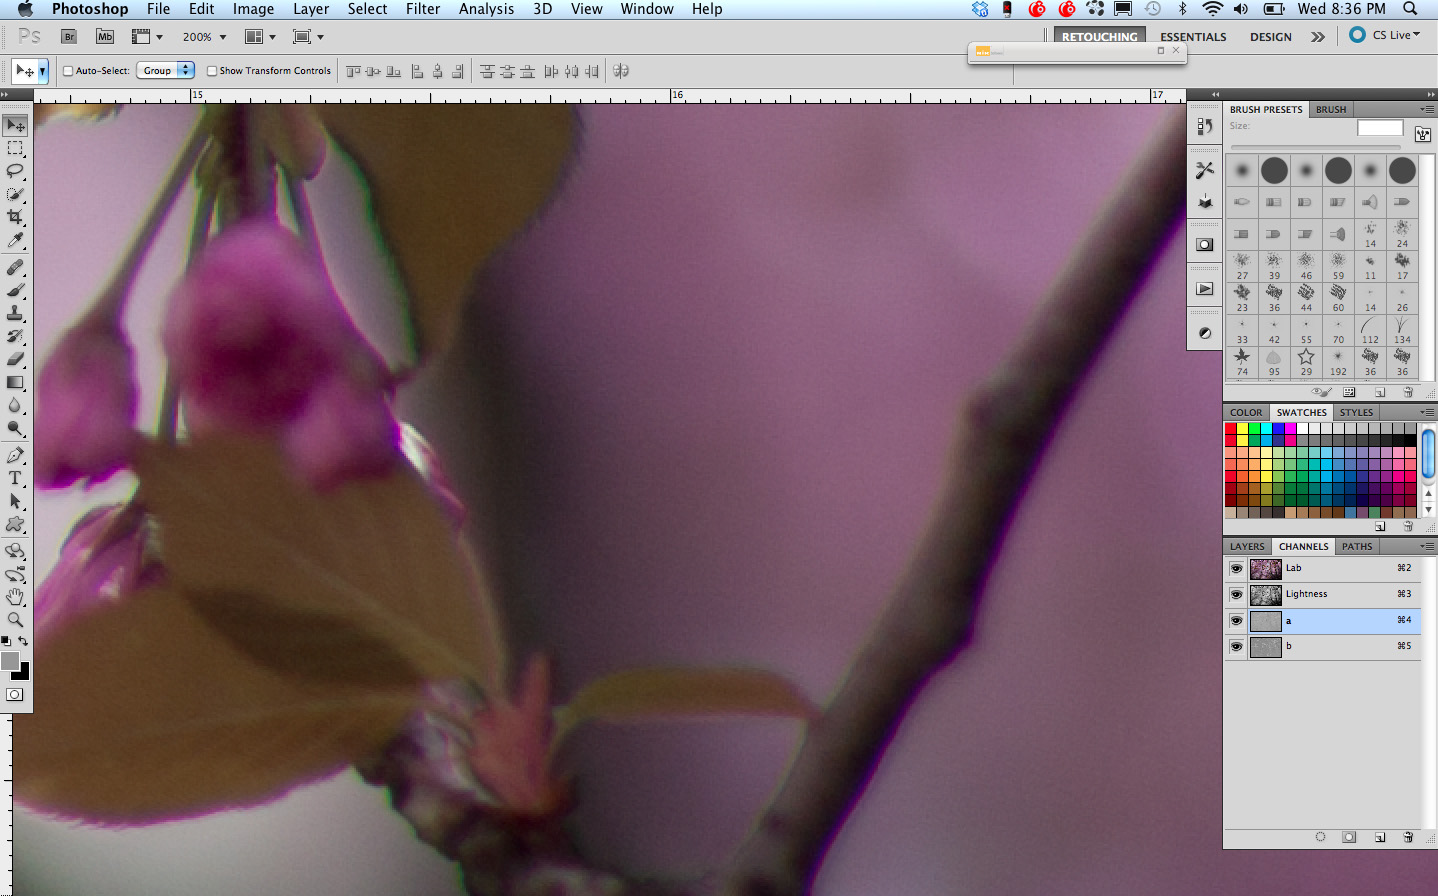
 The next option is to consider that the problem is that the color channels are not lining up correctly and perhaps there might be an adjustment that can be made in Photoshop to realign them. There are two options for this. The first involves opening the Channels Window, clicking on a color channel plus the visibility icon (eyeball) on the RGB channel and using the Move Tool to realign the color channels, matching the edges of your image.


 This worked well in some areas, but not in others. It is possible to distort (transform) the separate channels … but you must keep in mind that image clarity is easily affected – which brings us to the second color channel option, changing the Image Mode to Lab Color first (Image / mode / Lap color) in order to separate the luminosity (detail and value) of the file from the colors. Once the adjustment has been made, return the file mode to RGB.


Unfortunately, this option didn’t do very well on this file either! We will be forced to take care of this the old fashioned way – correcting it by hand, one edge at a time. It’s going to take longer but the results will be perfect – here is how you do it:

Make a New Layer and change the Layer Blending Mode from Normal to Color. Choose the Brush Tool and set the opacity to 50%; use a small sized brush (this image was done with the brush size at 5 pixels, just large enough to cover the discolored edges). Hold down the Option (Alt) key to choose the neighboring color, then simply color over the one you want to change. Apply a few coats, reselect, and continue throughout the image. It is faster than you think and the results are worth it!


I dropped in a neutral gray layer under my paint and am showing the color layer in Normal Mode so you can see my work:


The total of my work looks like this:


And the detail looks like this:


The job took just under an hour once I decided upon my strategy, and you can see how important it is to know your software! Options are important when you’re doing real world retouching because you want to get your work done as quickly as possible, but no two images are alike. Always start with the quick option, but learn a variety of ways of doing things so you won’t find yourself stumped on an important image that just has to be better.

This image was going to be printed as a 6 foot mural, part of a three image display with two other images that did not have the same problems as this one so it was really important that the work was perfect and would hold up to the enlargement. I’m so happy to say that everyone was pleased! Awesome!

Thank you for letting me share this project with you!

Jane Conner-ziser is an internationally recognized expert in ACR, Lightroom, Photoshop and Painter. She is an author, portrait retouching artist, painter and instructor living in Ormond Beach, Florida. She has been actively involved in professional photography for over 25 years. Contact Jane at Light Workshops www.lightworkshops.com or through her websites www.janeconner-ziser.com and www.jczphotographics.com