Monday, August 31, 2009

Creative Light Softboxes

Recently, I received a large number of Creative Light (http://www.creativelight.com/) softboxes as part of our relationship with the MAC Group.  These are entirely new so I wanted to give them a thorough test before really discussing them with the blog following. 
After a few weeks and a few thousand test shots, I am officially a huge fan of these softboxes.  Setup is simple with color coded parts and quick but strong "connections."  The pieces demonstrate bombproof construction. The design is good and the tolerances are tight yielding no light leaks and a very solid feel.  With flexible steel construction, the boxes are still relatively light but maintain shape very well even out in the windy, Paso Robles area vineyards.  With that said, always remember to use a solid stand anchored with a sandbag as necessary.

The softboxes attach to strobe specific speed rings allowing a fit for almost every major brand out there.  I have mine set up for use with the ProFoto system. 
Creative Light offers two choices for the boxes either a flat front or a recessed front.  We have the recessed front which I prefer since a grid may be attached to control the light even more. 
The light is beautifully soft and even with or without the interior diffuser.  I shot all of the boxes with and without.  There is a difference but only slight.  As you would expect with the interior diffuser you must run your strobes at a slightly higher output power but you do get a more even light across the entire effective area.  We used a Sekonic meter to test as well as the subjective analysis of our Mk 1 Mod 0 eyeball (a little Navy speak thrown in there.  It seemed that every piece of equipment had a Mk and mod (modification.) So we always called the unaltered eye Mk 1 Mod 0.)

What seals the deal for me are the prices.  I have normally used ProFoto softboxes and for my use, these are equivalent or better at 55-60% of the cost.  Moreover, the MAC Group offers Light clients some even better deals (as many of you have taken advantage of!)  With the MAC/Light deals the cost comes down to 40-50% of a ProFoto option. 

Ya'll know I am a big fan of effective, efficient, and economical solutions.  In my simple, ex-fighter pilot opinion Creative Light softboxes are all three.

Cheers and see you at Monday Night Light!

Hal

Thursday, August 27, 2009

Monday Night Light - Free, live, web seminar link

Click the following link to register for Monday Night Light, 31 August 6:30-7:30 PM PDT.

This week's topic is image resizing.  Just one of the most interesting and heatedly debated subjects out there.

https://www1.gotomeeting.com/register/469192177


Cheers!

Hal

TOPAZ Detail - Checking it out today for the first time!

Duval Ranch Red Plymouth
Canon 5D Mk II, EF 24-70mm f/2.8L, Induro C213, RRS BH-55
Lightroom, Photomatix Pro, Photoshop, and Topaz Detail
Topaz Labs recently provided Light with their plug in suite.  I finally had a quick opportunity to try the newest addition to their line Detail.  The image above is a five shot HDR taken at the Duval Ranch in San Luis Obispo during our recent HDR Intensive workshop. 
I shot a series of six images with the Canon 5D Mk II using AEB and manual exposure compensation.  I always like to use the camera's automated processes as much as possible to speed my shooting.  It really helps when shooting for HDR source since the faster you can take the shots the less chance of anything moving. 
As a Lightroom user, I imported the shots with my HDR Prep preset (Tone Curve - Linear / Sharpening Amount slider - 0) and then exported to Photomatix Pro with the plug in.  I almost always tone map the radiance file twice.  The first is always as realistic as possible and the second is as far from reality as I can get.  When using the Lightroom plug in it is required to rename the first tone mapped file before sending the images again. 
After both tone mapped images are back in Lightroom, I give them a quick optimization in the Develop module and then my normal workflow is to create a stack by selecting both and then Edit In>Open as Layers in Photoshop.  Once loaded into Photoshop, I arrange the layers as required, modify blend modes, copy, and mask as desired to get the proper effect. 
I normally run a creative sharpening or sharpening for content workflow in Photoshop but for this image I used Topaz Labs' Detail for that job.  The interface was amazingly simple and I was able to perform "sharpening" and detail enhancement at small, medium, and large levels at the same time!  I found this to be a huge boost in efficiency (and ya'll know I love something effective and efficient.)  I'll run a quick demo video of the interface soon.
I also used Detail to desaturate a bit of the image in an effort to make the red car pop a little more.  When Detail finished I added a quick vignette using a curve set to Multiply blend mode.
This was a fun first effort with Detail and I really look forward to becoming more familiar with the software.  Take a peek at the plug in at http://www.topazlabs.com/.
Fiat Lux!

Wednesday, August 26, 2009

Hey Hal?

The temptation of forbidden Photoshop knowledge?
After 16 straight days of class here at LIGHT, time for another episode of "Hey Hal?"  You may recall this is our new forum to highlight common questions here at the school.

Last week we enjoyed Charles Cramer's Digital Printing for the Fine Art Photographer and the number one question during all those Curves and Masks was, "Where is my brush?"  In this simple fighter pilot's opinion this is one of the most asked Photoshop questions of all time.  99/100 times the answer is "Check Caps Lock."  When Caps Lock is on the normal brush symbology disappears.  Sometimes even this small difference from the norm is enough to throw off the workflow.  So when the brush disappears, first look to Caps Lock.

We'll make it a two-for Wednesday, the second most asked question last week was "Why isn't anything working?"  How is that for general?  Interestingly, there is usually one answer that remedies this common Photoshop roadblock.  Hit Ctrl/Cmd + D to deselect (control for Win and command for Mac.)  When he have an active selection Photoshop will only allow changes to that selection.  Where this sometimes trips our workflow is when a very small selection is active and we don't know it.  Sometimes the selection is so small the "marching ants" are very hard to find.  If it seems that nothing is working try a quick deselect and assess.

As a quick addendum to the previous paragraph, sometimes being stuck in Quick Mask will cause strange happenings as well.  You will most easily recognize an inadvertent Quick Mask situation by checking your Layers Panel.  Highlight a layer and see what color or tone is used to highlight.  If you see a dark grey, you are probably in Quick Mask.  Hit the "Q" key to get out.

If you have run across a common question or occurrence that others should know about please send to Hal@LightWorkshops.com

Fiat Lux!

Tuesday, August 25, 2009

Monday Night Light Video Recap

See you online next Monday. The link will be posted here and via Twitter Friday morning.

Monday, August 24, 2009

Detailed Sharpening Mask Step-by-Step

Here are Light's guidelines for part of the Sharpening workflow.

This mask creation workflow gives you a starting point to build a very detailed mask to use in conjunction with your sharpening layer. You may go a step further and create an action to do this for you.

-Copy your background layer and rename the layer “Sharpen”
-Go to the Channels Panel and choose the channel (red, green, or blue) that has either the best contrast or is the best black and white image. Play around with all to see which you prefer.
-Copy the desired channel by dragging the channel icon to the Create New Channel icon at the bottom of the Channels Panel.
-With the “Copy” channel active, go to Filter>Stylize>Find Edges
-Invert the “Copy” channel by Image>Adjustments>Invert or by typing Ctrl/Cmd + I
-Remember the basic rule of masks – white reveals and black conceals. As you use Levels and your brush you want the image to be white where you want sharpening and black where you don’t.

-Open a Levels adjustment and increase the contrast by going to Image>Adjustments>Levels and move the white and black sliders.
-Paint with black or white as necessary.
-Go to Filter>Noise>Median and enter 3ish pixels.
-Blur the channel by going to Filter>Blur>Gaussian Blur and enter a value from .5 to 5 pixels depending upon image size.
-While holding the Control or Command key, move your cursor over the Copy channel icon and click the mouse, this will load a selection.
-Throw the channel copy away.

-Go back to the Layers panel and add a layer mask to your Sharpen layer.
-Sharpen the image. The layer mask will determine where the sharpening is effective. At any point you may paint on the layer mask with black or white to change the effective sharpening.

Fiat Lux!

Hal

HDR from a Seminar Participant


© 2009 Allan Duff
The image above is a tone mapped high dynamic range (HDR) file from Allan Duff, President of the NV Camera Club in Las Vegas.

I was fortunate to speak with Allan and his club earlier this year and we discussed HDR capture and processing techniques as well as some Lightroom. It is always great to receive work from photographers who attend my seminars and then put the info to good use. Nice work creating a great image!

I also attached Allan's three component files below.


We'll be covering HDR here at Light again in September. Check out http://lightworkshops.com/HDR_LosOsos_Workshop.html for details.
Fiat Lux!

17 Aug MNL Recap

Quick recap of last week's MNL. Much easier to do this discussion in an hour!

Fiat Lux!

Sunday, August 23, 2009

Epic Canvas Weekend


LIGHT just finished another canvas printing, finishing, and gallery wrapping weekend course. I know I am biased but there is no place else in the world that you can learn canvas like LIGHT.

We spent the last two days learning everything about the canvas media itself as well as optimizing prints for canvas. After the prints were made we coated, stretched (by hand and machine!), and finished the pieces with an incredible archival process.

Love it or hate it, there is no more effective, efficient, and economical way to get big prints on display than the canvas gallery wrap.

Fiat Lux!


Friday, August 21, 2009

Morro Bay Pano

4 Shot Stitched Panorama
Canon EOS 5D Mk II, EF 24-70mm f/2.8L, Handheld

Day five of Charles Cramer's Digital Printing for the Fine Art Photographer here at LIGHT. Should be another good day in the lab as everyone's image optimization and output workflow are dialed in. We will step up to larger prints today using roll media on the Canon ipf5100s and ipf 8100.
We worked with photo media yesterday printing on Canon Satin and RCPL (resin coated photo luster.) We will move into some Fine Art media today. Although I have a few different types in house, I only use Premier Art's Generations Fine Art media. It completely blows away all other fine art or matte media for color and L* (Dmax.) All of the cool specs are at www.PremierArt.info If you are ever interested in picking up some Premier media please shoot Anna an email at inkjetstation@cox.net and mention Hal sent you from LIGHT. Anna's prices are great and she gives an additional discount to LIGHT clients.
Remember to visit yesterday's post and sign up for Monday Night Light!
Fiat Lux.

Thursday, August 20, 2009

Monday Night Light - Free Web Seminar Link

Follow the link to register for Monday Night Light. The best one hour, live, online training session around.

Hal will continue a discussion of output sharpening, actions, and more.

https://www1.gotomeeting.com/register/959515889

See you online!

Fiat Lux!

Border Effect Step by Step

In class here at LIGHT with Charles Cramer and a few of the students discussed the border effect from one of my recent video tutorials (http://www.youtube.com/watch?v=wY2Kt64hu-Y). They thought it would be a good idea if I posted the steps online. So here they are.

The “LIGHT Border” step-by-step

Finish the image
Resize
Sharpen
Flatten
Create a new layer
Select all (CTRL A)
Edit>stroke
Enter 1 pixel width
Choose Black as the color
Ensure “Inside” is checked
Deselect
Image>Canvas Size
Check “Relative”
Enter 1 into Width and Height (you can change the size as desired)
Ensure Canvas Extension color is white or black
Create a new layer
Select all
Edit>Stroke
Enter 20 - 40 pixel width (you can change the width as required)
Click on the color square. A “Select stroke color” dialog box opens.
Move your mouse into your image and a select a color for the border (color should be light enough that black will show up)
Ensure “Inside” is checked
Deselect
Click the Fx tab on the Layer palette.
Click “Inner Shadow”
Adjust Distance, Choke, and Size until desired effect is achieved.
Image>Canvas Size
Check “Relative”
Enter 1 into Width and Height (you can change the size as desired)
Ensure Canvas Extension color is white or black
To change the stroke color
Select the layer with the thick stroke
Click the Fx tab on the Layer Palette and select “Color Overlay”
i. Click the color swatch and select a new color from the image
ii. Click “Ok”

Cheers!

Hal

Wednesday, August 19, 2009

Ben will be Back Soon!

" Dreaming of Roadtrips Past"
In honor of Ben Willmore coming back to LIGHT in a month or so I put up a the closest thing I could find to a vintage bus. Ben will be here in October for an encore presentation of his "Digital Fine Art Nudes." http://www.lightworkshops.com/fine_art_nudes.htm There are a few spots left so come join us and learn from an amazing photographer, Photoshop Hall of Famer, great instructor, and all around good, beer-loving guy.

The Winnie above is a 5 shot HDR image taken out at a local ranch. I processed in Lightroom, Photomatix Pro, Photoshop, and Lightroom.

For the Canon shooters out there the G11 was announced this morning. Looks like a nice upgrade to the high end of the Powershot series. Check it out at http://www.dpreview.com/news/0908/09081908canong11.asp

Fiat Lux!

Hal

Tuesday, August 18, 2009

Another Maui Shot

Canon 5D Mk II, EF 24-70mm f/2.8L, hand held

Was working a few images to send to the models we worked with in Maui and thought this might be a fun one to post to the blog.

I shot the image with a Canon 5D Mk II and a 24-70mm f/2.8L handheld about 30 minutes before sunset. Nikki, our model, was brave enough to lie down in a relatively cool stream while we shot from every conceivable angle and level.
As a dedicated Lightroom user, I imported the image, edited, and managed appropriately before performing some basic adjusments in the Develop Module. I wanted a little extra retouching and find the Photoshop interface gives me the power and control necessary to get it right. I removed some issues/distractions in the water and then performed a quick Liquify on Nikki's left hand. Hindsight being what it is I think I should have modified the right hand a bit as well. The angle of the shot and the focal length I chose "amplified" the hand and I find it a distraction now. Fortunately, I maintain a Master file within LR and will experiment with reducing it's impact.
As you might guess, I am comfortable with optimizing, enhancing, removing, or whatever else I need to do in order to create the look I want.
Cheers!
Hal

Thanks Bob!

@2009 Bob Canepa
A 3 shot HDR taken by Bob Canepa during last week's HDR Intensive here at LIGHT. Bob shot a Canon EOS 5D Mk II to generate the component shots for this image.

Thanks to the Duval Ranch for positioning some amazing vehicles around the property so we could shoot at will.

We just added another HDR Intensive course in September so come on over to LIGHT and check it out! Whether realistic, hyper realistic, grungy, mixed, or whatever your creative heart desires we will learn how to shoot, process, and print it.

Dinner break day two of Charles Cramer's Fine Art Printing for the Digital Photographer. If there is one thing about our digital darkroom it is we are equipped to teach and execute high end printing. With eight Canon ipf 5100s, a couple of Canon 9500s, and a 44" Canon ipf 8100 we are dialed in.

Fiat Lux!

Hal

Monday, August 17, 2009

Kathleen's HDR Shot of Me!

©2009 Kathleen Brennan

Kathleen Brennan shot me inside an old car out at the Duval Ranch during last week's HDR Intensive here at LIGHT. Looks like the image was tone mapped and processed with two different settings in Photomatix Pro and then the results were stacked in Photoshop. Probably a little blend mode fun to enhance the effect. Nicely done!
Thanks for the shot. I will not lie to you though, I'm not a handsome man to begin with and Photomatix Pro and Photoshop don't do me many favors.
Fiat Lux!
Hal

Sunday, August 16, 2009

September is Looking Great! Sign up now!


For those of you looking for something to do on Labor day weekend, we will have our 3-day Lightroom course with Hal Schmitt. This class is really helpful for the photographer who is trying to get a seamless workflow down for their photography.


We are just now adding another HDR class September 15-19 which is Tuesday-Saturday. We will be able to photograph some awesome cars and a few incredible areas that we have discovered that are perfect for HDR. Our sponsor, Really Right Stuff is letting us borrow their Panorama gear to show you how to create and process HDR panoramas as well!


And don't forget! Canon is coming into town for their first of many Canon Explorer of Light Lecture Series for only $5! 2 hours for $5 AND cookies? You can't go wrong. We will feature Jennifer Wu, one of their newest additions, for a three day Canon Field Photography workshop on the Central Coast with Canon Gear Rep Jim Rose bringing some awesome Canon lenses to play with!
Keep looking at the courses schedule for more additions! October will feature Canon Flash, Rob Sheppard, Jack Davis and Ben Willmore! Catch them now before they are gone!


Saturday, August 15, 2009

Change of Subject


We've been a little HDR focused on the blog recently so I thought I would change it up and attach a shot from our studio. LIGHT is, of course, all things photographic.

The image is from a test shoot we did last week with the new Creative Light softboxes. So far, I highly recommend them and the prices are great, especially for LIGHT clients.

Fiat Lux!

Bull

HDR Guidelines Part 2


This is part 2 of Bull's HDR guidelines here at LIGHT.

Camera
-Manual mode
- ISO: 100 Canon / 200 Nikon
-Constant Aperture = vary shutter speed only
-Constant White Balance
-Continuous shooting drive mode – high if you have it
-Focus – One shot or one time.
-Use AF to assist and either hold AF-On button continuously through the shots or switch to manual focus after focus lock is achieved.
-Shoot RAW
-Use auto exposure bracketing (AEB) functionality as much as possible
-Know your camera’s capes and lims
-Use +/- 2 EV jumps (new Nikons only have 1 EV jumps available)
-Some scenes may use +/-1 EV for better results

How Many Shots?
-Depends on the scene’s dynamic range (DR)
-Meter the highlights and shadows and determine the difference between the two in stops
For example, with a constant aperture and ISO the highlights are exposed properly at 1/8000 and the shadows at 1/15, there is a 9 stop difference.
-Shoot the required number of shots at your desired interval. In our above example, take nine shots 1 EV apart or 4-5 shots 2 EV apart (sometimes even with a 9 stop difference as above you can cover with a three shot sequence at 0, +2, and -2 EV)
-Use AEB to capture the full range for increased efficiency.
-First shot determines the starting point of the full DR captured with your series of shots
-In the example above (highlights at 1/8000 and shadows at 1/15,) full stops between are shown below. 1/500 is the center point of the dynamic range. Only whole stop increments are depicted. Each green bar shows one shot and the associated range.


-We arrive at the efficient method by shooting our first shot in the middle of the range and then shooting two addition images at +2 and -2 EV. New Nikons will need to shoot 5 images at the max 1 EV spacing to generate the 9 stops of usable data.
-Biasing the initial capture EV will skew the range as well.

-AEB may be used in series to expand range even further
-For example take first 3 shots at -2, -4, and 0 take second three shots at +2, +4, and 0
-Total range will be 13 stops of data (-4 to +4 = 8 stops plus 2.5 usable at each end.)


Part 3 next week.


Fiat Lux!

Thursday, August 13, 2009

Free Monday Night Light Link

Follow the attached link to register for next Monday's free Monday Night Light Web Seminar!

https://www1.gotomeeting.com/register/867957785

See you online!

Fiat Lux!

Hal

"Hey Hal?" Lightroom Photomatix Pro Plug In

We'll start a new regular feature on the blog today with the "Hey Hal?" series. This is a suggestion from one of the folks in class this week after noticing a common theme from the participants. Every now and again during the flow of class, a "Hey Hal?" will ring out letting me know there is a question. So today, I've taken a question from this week and the most common bug in the Photomatix Pro plugin for Lightroom.

When Tone Mapping is complete and you click Save and Re-import Photomatix will process the results and bring the image back into the LR catalog. If you clicked the stack with highlighted photo option, LR will stack the tone mapped, processed image with one of the source files. Every now and again the stack symbology will show up but the stack will not expand. This is a bug on the Mac and on Windows.

To regain full stack functionality, go to the Left Panel Folders Tab and click on the folder that contains the stacked images. When you highlight the folder, the stack will work properly.

Fiat Lux!

Hal

Wednesday, August 12, 2009

Programming Custom User Settings for Canon DSLRs

One of the great features on the current Canon consumer and pro-sumer DSLRs is the inclusion of Custom User Settings on the Mode dial. You may have looked down at your Mode dial (the dial on the left side on top of the camera where we normally select M for Manual) and seen C1, C2, or C3 (if you have a 50D you will only see C1 and C2.)

The "C" options are programmable with just about every function on your camera. At LIGHT, we have found setting these custom modes is a huge benefit when shooting. When properly configured switching between shooting modes does not get any more effective or efficient.

LIGHT recommends setting the dials as follows (this is, of course, our recommendation and your own settings may vary)

C1 = Portrait. We consider "portrait" to be a broad category when we the shooter and the target, make that subject (old fighter pilot habits sometimes die hard) are both stationary. This applies to actual portraits, landscape, sea scape, macro, etc.

C2 = Action. We define action as either shooter, subject, or both in motion.

C3 = HDR Auto Exposure Bracket. We use the bread and butter setting of 3 shots 2 E.V. apart.

(Since 50D shooters do not have C3, LIGHT recommends setting C1 to Action and C2 to HDR. The normal M setting is used for "portrait.")

It is fairly straightforward to set the custom user settings. LIGHT offers the following initial parameters. We will assume shooting RAW.

To set the C1 custom user setting. Switch the camera to Manual mode by turning the dial to M. Once in Manual, set the following:
-Evaluative Metering
-Auto White Balance (remember the custom mode is a baseline, you may switch if desired later.)
-One shot auto focus (AF)
-Single shot drive mode
-ISO 100
-Aperture = f/8 This is a baseline. You will, most likely, need to change aperture based upon your desired depth of field and shutter speed requirements.
-Shutter Speed = 1/250 This is a starting point. You will, most likely, need to change shutter speed to reach the desired exposure.
-Select center AF point
-Quality = RAW
-Color Space = Adobe RGB
-Picture Style = Neutral

Once the camera is configured per above (or with your own desired settings) do the following:
-Push Menu
-Navigate to the last "yellow" menu and highlight "Camera User Setting"
-Push the Set button inside the secondary control dial
-Highlight Register and push Set
-Highlight Mode dial : C1 and push Set
-Highlight OK and push Set

To set the C2 custom user setting we must first discuss how you shoot Action. If you are a Manual shooter set the modedial to M. If you are an Aperture priority shooter consider switching to Manual in the future and set the mode dial to Av.

Once in either M or Av set the parameters as above with the following changes.
-AI Servo AF
-Continuous or Continuous High drive mode
-Aperture = set maximum aperture (when configuring this C2 setting LIGHT recommends attaching your fastest lens so any other lens will always be at maximum aperture. For example, LIGHT's fastest lens is f/1.4 so our C2 default is 1.4. If you subsequently put a slower lens on it will default to it's maximum aperture.
-Shuter speed = 1/500 This is again a starting point.
-ISO = 1oo but consideration may be given to increasing to 200 to generate faster shutter speeds in lower light conditions.

Once the camera is configured per above, follow the same procedures as above when setting C1 with the exception of highlight C2 this time.

To set the C3 custom user setting set the mode dial to Manual. Configure exactly as C1 with the following exceptions.
-Continuous or continuous high drive mode.
-Enable Auto Exposure Bracketing (AEB) by pushing menu and navigating to the second "red" menu. Highlight Expo.comp./AEB and hit the set button. Move either the primary or secondary control dial (camera dependent) until the ticks are at -2 and +2. Hit the Set button.

Once the camera is configured per above, follow the same procedures as above when setting C1 and C2 with the exception of highlight C3 this time.

With all three custom user settings configured you are now just a quick mode dial turn or two away from rapidly swiching from portrait to action to HDR.

How about that for effective and efficient?

Fiat Lux!

Hal

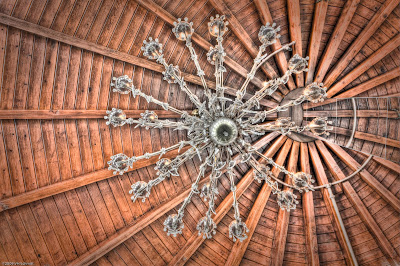
Interesting Chandelier


An interesting image from yesterday's shoot at the Madonna Inn, San Luis Obispo, CA.
The shot is a 5 component HDR taken from the floor directly underneath a fun chandelier. I was testing the new Benro travel tripod with the Really Right Stuff BH-55, great support system. I'll have a detailed review of the tripod up soonest.
I imported to Lightroom, prepped tone curve and sharpening settings, and then exported to Photomatix Pro. After a quick tone mapping using the details enhancer I processed and reimported to Lightroom. To keep it interesting I sent the image to Photoshop to add some creative high radius low amount sharpening to the image. Upon return to LR I adjusted the vibrance a little.
Thought it was an interesting shape and form exercise. I think the image is ultimately destined for a huge black and white canvas. I included a slightly higher res picture so you could zoom in and see some of the detail.
Check back soon. Next post will be directions to set up the custom settings on your Canon camera's mode dial.
Fiat Lux!

Tuesday, August 11, 2009

Class Shooting at Madonna


A quick shot of part of the class shooting interior HDR at Madonna Inn in San Luis Obispo. I've found that a terrific way to master the theory and practice of shooting for high dynamic range source images is to shoot in a dark room with windows. The dynamic range typically exceeds the cookie cutter 3-shot standard (0, -2, and +2) forcing the photographer to shoot series of 3-shots using exposure compensation. A tremendous learning experience.

One of the students shot a 3 segment panorama with 6 component HDR images each this afternoon. During night lab he smoothly merged the components, tonemapped, and easily photomerged the resultant TIFFs into a beautiful interior HDR Pano! Nice work!

Fiat Lux!

Hal

We'll be shooting outside tomorrow to practice some more.

Monday, August 10, 2009

Jim Divitale Blog

Check out Jim Divitale's blog at the following link. Great content and a cool description(with pictures) of his LIGHT experience.

http://divitalephotography.blogspot.com/

Monday Night Light Recap Video


Come check it out next Monday when we continue with a detailed description of output sharpening!

Fiat Lux!

HDR Guidelines Part 1

The following post is some basic guidelines for shooting HDR source material. Parts 2 and 3 will be up in the next couple of days. Enjoy and shoot well.


High Dynamic Range Considerations - Bull's Guidelines

Shooting a scene with a dynamic range (DR) exceeding the capability of your sensor will either leave you with blown highlights or no shadow detail. Shooting multiple images to overcome the limitations of your sensor may, with sound processing, give you good highlights and shadow detail. When shooting multiple images try to ensure the exact same composition for each shot (to ensure optimum processing each pixel should match exactly!)

Different situations require more or less stability. For example, a series of bracketed shots taken with camera auto exposure bracketing (AEB) functionality and high shutter speeds may be hand held. For more challenging situations a sound tripod and ball head optimized as below will create a better series of source files.

-Use a STABLE tripod and head (a poor tripod is the number one equipment issue seen here at LIGHT.) The following tips may help make the tripod more stable.
-Lower legs
-Lower center column all the way and lock down
-Hang a weight
-Remove camera strap

Once the camera is firmly attached to the tripod via a good ballhead (Really Right Stuff BH-40 or BH-55) the following may also help reduce vibrations.
-Mirror lockup (more on mirror lockup's efficiency or lack thereof later)
-Cable or wireless release
-If no release, use the camera’s self timer
Part 2 soon.
Fiat Lux!

Sunday, August 9, 2009

Fun with Filters and Blend Modes


A quick image from a Jim Divitale lesson this morning in class. Stacked images, diplacement maps, blending mode changes, and more. Fun living. Thanks to Jim for the circuit board image and Michelle for the jump and smile.

Saturday, August 8, 2009

Jim DiVitale's Workshop is Incredible!

Today Jim started his The Creative Process of Fine Art Montage workshop here at LIGHT. We were able to get enough coffee and doughnuts to maintain some focus on his powerful techniques on creating his montage work.

Lots of blend modes, lots of masking and lots of creative brainstorming!

We learned to make our own custom brushes and lots of keyboard shortcuts to make the process go a lot smoother.

Jim gave us files to work off of to see how we would interpret what he had already finished for his commercial work.

Here is an example of our second hand-on work folder. 5 different images all combined using primarily the Overlay, Soft Light and Lighten blend modes.
You can see his version of this on his website gallery 2, only his version is more blue.
We will be learning how to do Displacement first thing in the morning and then how to do a few other tips and tricks he has waiting up his sleeve. This is a very Savvy class this weekend. Everyone seems to be on the same page. Great group, great instructor and some great doughnuts.
Tonight, Hal is a defending champion at the Paso Robles Wine Maker's BBQ Cook-off, assisted by Rich Hartenberger the wine maker at Midnight Cellars. Filet-wrapped Bacon and a port, triple chocolate, bacon and sea-salt finish brownie. Good luck boys!

Friday, August 7, 2009

36 Shot HDR Panorama

"Secret Beach" Maui
Canon 5D Mk II, EF 24-70mm f/2.8L, Induro C213, RRS BH-55, PCL-1, and Slide

Another image from our Maui workshop last week. This one is a 36 shot high dynamic range (HDR) stitched panorama. I split the scene into 12 segments and fired off three shots of 0, -2, and +2 EV for each segment.
I imported the Canon 5D Mk II RAW files into Lightroom and prepped them for Photomatix Pro by turning the Tone Curve to Linear and setting the sharpening amount to 0. I would normally export the files to a working folder and batch process with Photomatix Pro for speed. I wanted to see how long it would take to export each segment's HDR components via the Lightroom plug-in for comparison. After I sent the first three components and decided upon Photomatix Pro Details Enhancer settings, I saved a preset. Not necessarily required since the Details Enhancer has sticky settings (they will stay as you last had them.) This is a preference and can be changed so that the settings return to the default each time you tone map. We do not recommend this, keep them sticky!
I continued through all of the remaining images saving the output as a 16-bit TIFF. Expecting a brutal stitch from Photoshop I changed PS's performance preferences and reduced the amount of RAM devoted to PS to about 45%. Strangely, this actually improves PS performance for big panos. The discussion as to why goes a bit beyond the post; I'll re-engage on that one soon.
The 12 TIFFs stitched flawlessly. Of course, it really helped that I followed all the rules with this one most importantly I located the EF 24-70mm f/2.8L's entrance pupil and aligned it with my tiripod's axis of rotation (using the Really Right Stuff PCL-1 and "Nodal" slide.)
I added a bit of contrast and removed a pesky swimmer.
Hope to see you here soon.
Fiat Lux!
Hal

Thursday, August 6, 2009

Free Live Web Training Every Week only at LIGHT!

As many of you know we started live online training a few months ago in the format of Monday Night Light (MNL.) The intent was MNL would be just like your favorite TV show; scheduled regularly so you can tune in each week.

The seminars have been great and we are expanding the program with one change, every session of MNL is FREE, no catch, no hidden costs. All you need to do is sign up and tune in.

Every Thursday evening or Friday morning we will post the new link here on the LIGHT blog, via Twitter, and on our Facebook page (Light Photographic Workshops.) The sessions are limited to 1000 attendees so register early.

For the Twitter crowd follow LIGHT at www.twitter.com/LightWorkshops.

Click on the following link to register. After you register you will receive a confirmation email as well as reminders one day and one hour before the event.

https://www1.gotomeeting.com/register/154307416

Hope to see you online next Monday!

OBTW, next week's topic is creating an action to automate your luminance mask creation.

Fiat Lux!

Hal

Wednesday, August 5, 2009

Photo Focus Article

Hal's panorama guidelines and workflow are online at Photo Focus. Check out the following link.

http://photofocus.com/2009/08/04/basic-stitched-panorama-guidelines-workflow/#comments

Fiat Lux!

Hal

Monday, August 3, 2009

Last Day Here in Maui


Going to spend our last day here in Maui on the beach. Time to relax. Relax, that is, until Monday Night Light broadcasts live from the Insitute of Visual Arts at 6:30 PM PDT.

Visited a small, verdant valley on the west side of Maui yesterday afternoon. We shot some amazing portraits and figure work in and around a cool little stream. Incredible shooting for Randy, V, and me.

Will update again later today. Look for new courses posted this week at www.lightworkshops.com/

Aloha!
Fiat Lux!

Hal

Sunday, August 2, 2009

The Unaltered West Maui Sugar Pano


Before the storm.

Post Apocalyptic West Maui


A little Canon 5D Mk II 9-shot pano. Playing around in Lightroom yielded the result above. This version is a virtual copy. Will put up the normal version soon.
Fiat Lux!
Hal

Interesting HDR Shot


A 6 shot HDR from Maui. Very interesting location with an old sugar mill completely taken over by a tree; an unreal location crossed between history, spray paint, and nature.

I shot the images with a Canon 5d Mk II, Canon EF 24-70mm f/2.8L, Induro C213, and RRS BH-55.

I am not sponsored by the Induro tripod brand but their product is very, very good at an incredible cost. The competition is Gitzo who make a very nice tripod. Unfortunately, Gitzo charges over $800 for the tripod I have at around $350. No comparison!

The money you save on an Induro tripod will allow you to purchase the best camera support gear on the planet. Really Right Stuff gear is totally bombproof. Worth every single penny.

Heading back to Cali Monday evening. Just in time for another few courses, Fine Art Montage with Jim Divitale, HDR Intensive at LIGHT, Photoshop 2, and Total Workflow in Lightroom.

We also must dominate the annual Paso Robles Winemakers' Barbeque Cook-Off Saturday the 8th of August. As many of you know we at Midnight Cellars and Volatus are the defending champions and are about to tear it up again with a filet wrapped bacon. Yes, you read it correctly. Thick bacon cooked perfectly wrapped in killer, thin-sliced fillet mignon grilled to perfection and delicately covered in a 24 hour reduction of red wine, stock, and veg. Did I mention the double chocolate, port infused brownies for dessert?

Fiat Lux!

Hal

Saturday, August 1, 2009

Another HDR Pano


I just never get tired of shooting HDR panoramas!


Shot at White Rock beach on Maui's south shore.
15 shots total from the Canon EOS 5D Mk II = 1 BIG pano!

HDR + People? Absolutely

3 shot HDR - Thanks Martina!
Canon 5D Mk II, EF 70-20mm f/4L, Induro C213, and RRS BH-55
Processed with Lightroom, Photomatix Pro, and Lightroom
HDR and people photography? Yes, it is possible and opens some interesting creative opportunities. As ya'll know we are in Maui teaching at IVA. Today we spent about 4 hours in the lab and then ventured out to shoot some more. One of the course participants volunteered to model so we could try out some HDR with people. Our location was amazing; it looked as if it was a movie set more than a strange outpost in the middle of a sugar cane field. We'll be posting more images from this shoot as the days progress and I have the opportunity to process.
Having an incredible time here in the islands but looking forward to returning to our daughter and the amazing Central Coast.
Fiat Lux!
Hal